[Childcare] Penguin wall decoration ideas: Perfect winter decor for February

Penguins, which can be seen at aquariums and zoos across the country, are popular with children too.
Some people may associate them with winter because of the way they live on snow and ice.
In this article, we’ll introduce penguin wall decoration ideas that are perfect for February in early childhood settings.
Many of these can be made with origami paper, construction paper, or paper plates, making them great projects for children to create together with teachers and parents.
Display the children’s creations on the walls of your nursery or kindergarten to bring a touch of winter indoors—give these ideas a try!
- [Childcare] Cute Penguin Craft Ideas | Introduced by Age Group
- [For 2-year-olds] A collection of craft ideas useful for winter childcare
- [February] Perfect for Valentine’s Day! Cute wall display ideas
- [Childcare] Ideas for January wall decorations
- [Childcare] Cute to display! A collection of wall decoration ideas you’ll want to make in February
- Brighten up your winter daycare room! A collection of recommended wall decoration ideas
- [Childcare] Ideas for snowman wall decorations. Recommended for January crafts.
- Recommended in February! A collection of easy origami ideas perfect for childcare to enjoy the season.
- [For 3-year-olds] Winter craft activities and bulletin board decoration ideas for use in childcare
- [December Wall Displays] Cute Winter Craft Ideas You Can Use Beyond Christmas!
- [Childcare] Simple winter-themed origami craft ideas
- [February Wall Decorations] Perfect for Setsubun! A Collection of Ideas You Can Use in Childcare
- [Childcare] Winter Projects You’ll Want to Try! Recommended Craft Ideas
[Childcare] Penguin wall decoration ideas: Perfect winter decorations for February (11–20)
origami

Wall decorations featuring penguins—always a favorite with children—are perfect for February.
It’s fun for teachers and kids to make them together using construction paper and origami.
With origami penguins, you can create adorable figures just by combining a body silhouette and wing shapes.
You can also give each penguin a different expression, resulting in a unique, characterful group.
The finished pieces will decorate nursery or kindergarten walls with a winter scene and nurture children’s creativity.
Give these recommended wall decorations a try!
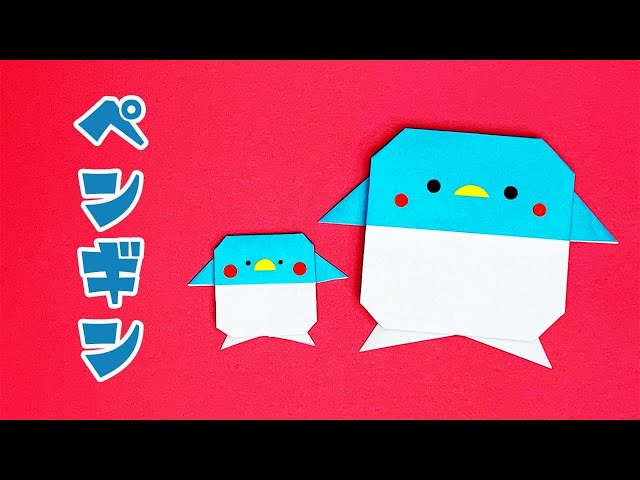
Perfect for summer! A penguin folded with two sheets

Here’s a penguin you can make from two sheets of origami paper, featuring an adorable plump shape.
Prepare one large sheet, one smaller sheet, scissors, and glue.
First, use the smaller sheet to make the penguin’s face.
After creasing along the diagonal, fold the left and right sides in along the vertical line.
Open it up once, then fold the corners along the crease lines.
When the overall shape is folded, round the corners to finish.
Use colored pens to draw the facial expression.
For the body, fold the large sheet into a triangle, then fold the base of the body along the center crease.
When making the wings, snip slits with scissors and fold along the crease lines.
The key is to leave a wide area for the belly.
Finally, glue the face and body together to complete your penguin.
Cozy Penguin

Here’s how to fold an origami penguin that can also wear a hat and scarf.
First, fold it into a triangle twice, then open it once.
With a corner pointing down, fold up the top layer so about 2 centimeters stick out, then fold it down along the edge.
Fold the edge you just made in half to make a crease, then fold the bottom corner up to that crease to set a guideline.
Next, fold the other corner up toward the front crease.
Fold the tip of the corner down just a little.
Fold up along the crease you made earlier, align the edges, and fold the whole piece in half.
Finally, adjust the shape to look like a penguin and draw the eyes with a pen to finish.
Try making a hat and scarf for it, too!
Peekaboo Penguin

Here’s a super cute way to fold a penguin that’s perfect to attach to letters or cards! First, place the origami paper with the back side facing up and fold it into a triangle twice to make crease lines.
Lift one corner up to just slightly before the center line, then fold both edges of the lifted section upward at a slight diagonal.
Fold both corners of that folded section inward.
Turn it over so the white side is facing you, and fold along the center line twice to shape the face.
Next, use a 2.5 cm piece of origami paper to make the hands.
Start with a basic “zabuton” fold, then fold both corners diagonally to shape the hands.
Make two of these.
Finally, glue the hands on, and add eyes and a mouth with round stickers or similar—done!
a round and laid-back penguin
This is an easy and cute origami penguin.
First, turn the paper over and make two creases by folding it in half both ways into a square.
Fold one edge down to align with the center crease.
Flip it over, then fold the left and right edges to the center line.
Open the colored corner and squash-fold it.
Fold the bottom edge up to the center to make a crease, open it once, then fold the bottom tip inward along that crease.
Fold the corners to form the feet.
Fold the protruding colored corner to suggest the hands.
Finally, round off the colored tip to finish! Decorate it cutely with round stickers or a pen.
A penguin that’s perfect for decorations

Let’s make a penguin out of origami—perfect as a seasonal decoration for fans or other ornaments.
Fold the paper into a triangle twice, then gently squash-fold it by inserting your finger into the pocket and pressing down softly from the top to puff it open.
Keep folding along the creases to form the penguin’s shape.
Be careful when using scissors to make the cuts—don’t cut the wrong spots.
As you continue, the paper will get thicker, but sharpening your creases will make it easier to proceed.
Once you fold the wings and feet while checking the balance, you’re done.
Give it a try!
[Childcare] Penguin wall decoration ideas. Perfect winter decorations for February (21–30)
Penguin parent and child
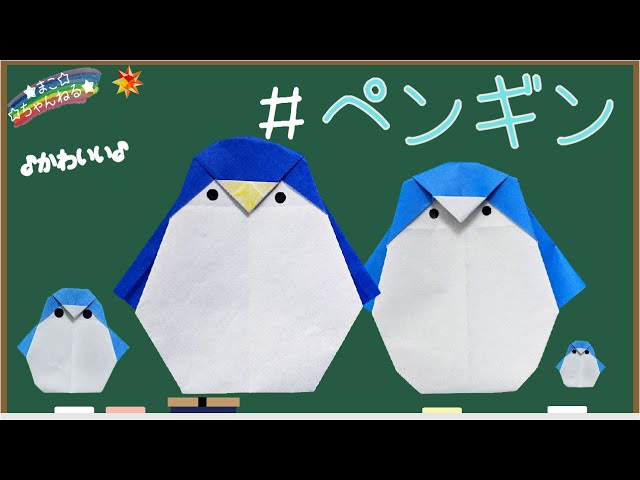
Here’s how to fold cute parent-and-child penguins.
First, turn the origami paper to the back and fold it into a triangle twice to make creases.
Fold one corner to align with the center line, open it, then fold along the creases two more times to set the folds.
Fold the corner up twice.
Next, fold both corners at the folded section toward the center line.
Fold the tip up to the front crease, then flip it over.
After flipping, fold the outer corners diagonally upward toward the center line.
Then, fold both corners outward so they stick out, like in the image of hands.
Finally, adjust the corners to shape them into penguins, and you’re done! If you make them with small origami paper as well, you’ll have a parent and child penguin set.
Decorate the eyes with round stickers or a pen.