[February Wall Decorations] Perfect for Setsubun! A Collection of Ideas You Can Use in Childcare


Are you wondering what design to choose for a Setsubun-themed wall display to brighten up the nursery in February? There are so many quintessential motifs—ogres (oni), tiger-striped pants, bean-throwing, and more.
In this article, we’ve gathered ideas perfect for a February wall, such as three-dimensional oni made with balloons and fun oni pants created with blow painting and stamping.
Techniques vary—from finger painting and wax-resist to tearing and pasting origami paper.
Imagine a wall filled with works that showcase each child’s individuality, and use these ideas as inspiration! Note: Since children’s creations are treated as artworks here, we use the term “seisaku” (制作, creation/production) in the text.
- [February Bulletin Board] Perfect for Setsubun! A Collection of Oni (Demon) Craft Ideas to Enjoy in Early Childhood Education
- [Childcare] Cute to display! A collection of wall decoration ideas you’ll want to make in February
- [Childcare] February Setsubun Bean-Throwing! A Fun Collection of Oni Craft Ideas
- [For Day Service Centers] February Craft Ideas: Decorations for Setsubun, Valentine’s Day, and the Feeling of Spring
- [Setsubun] Let’s make an oni mask! A collection of ideas using everyday materials
- [For Seniors] February Wall Decorations: Setsubun-Themed! Fun Ideas with Oni Demons and Ehomaki Sushi Rolls
- Perfect for January bulletin boards! A collection of Daruma craft ideas kids will love in childcare settings
- [For Seniors] Fun February Crafts: Ideas Inspired by Setsubun, Valentine’s Day, and Other Events
- [Childcare] Enjoy Setsubun! A collection of handmade ideas you can decorate with and play with
- Fun Setsubun Activities for Childcare: A Collection of Exciting Games and Craft Ideas
- [Childcare] A collection of craft ideas for enjoying Setsubun
- For Seniors: Fun Activities in February — Celebrate Setsubun, Valentine’s Day, and Snow
- [Nursery Schools & Kindergartens] Liven Up Setsubun! Entertainment Ideas
February Wall Decorations: Perfect for Setsubun! A Collection of Daycare-Friendly Ideas (21–30)
Origami Mumps

Would you like to make an Otafuku, which is said to bring good fortune and stands in contrast to oni, considered symbols of malevolent energy? It’s a simple process and a kid-friendly idea! First, fold the origami paper into a triangle twice to create creases, then unfold it back to the original shape.
Next, fold the bottom corner up to meet the center to make a crease.
Unfold that corner, then fold the bottom corner again along the new crease, and use the top crease to make a wrapped fold.
Fold the right corner next to it in the same way to create Okame’s hair.
Finally, fold the remaining corners in toward the center to form Otafuku’s characteristic rounded outline—and you’re done.
Oni of Setsubun

Here’s an idea for making an ogre using a single sheet of origami paper.
Start by folding the paper into a triangle, then fold both corners inward so they align neatly—up to this point, it’s the same steps as making a paper cup.
Once you’ve done that, flip the origami upside down, and fold the two corners you just made upward.
These will be the ogre’s horns.
They’ll be too thick as is, so reverse-fold the inner sides outward to make the horns thinner.
Next, fold up the bottom point into a triangle, then fold both corners of that triangle inward to finish.
Add a face with a pen, and use patterned washi tape to create the pants, and you’ll have a wonderful ogre.
February Wall Decorations: Perfect for Setsubun! A Collection of Daycare-Friendly Ideas (31–40)
ogre’s iron club

For this idea, use origami paper measuring 7.5 cm × 15 cm.
First, position the paper so the 15 cm sides are at the top and bottom.
Next, fold it in half by bringing the top and bottom edges together, crease well, and open it.
Then fold the top and bottom edges in to meet the center crease.
After that, fold the right edge over the left edge to fold the paper in half, and create a step by folding back a strip about 1 cm wide from the crease.
This step separates the club (kanabō) section from the handle section.
For the handle, fold the top and bottom of the right-side portion of the paper in toward the center crease, and squash the pulled corner into a triangle.
Finally, fold the four corners of the remaining club section into triangles to round them off, and you’re done.
Origami for a Setsubun wreath

I want to use these for room decorations! Here’s a colorful and cute wreath idea.
You’ll need origami paper in various colors, pens or crayons, round stickers, and double-sided tape or glue if needed.
The key feature is a lovely design that combines parts for a blue oni, a red oni, and an Otafuku face.
You can enjoy adding personality through the expressions of the oni, so it’s highly recommended! In the video, the project is made with quarter-size origami paper, but it’s a good idea to adjust the paper size to suit the children’s growth and abilities.
Handmade demon decoration made of felt
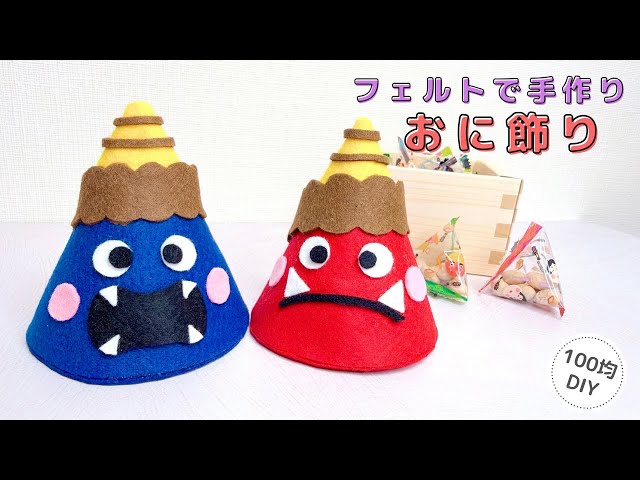
Let’s make an oni (demon) decoration out of felt—it’s fun to cut and paste the pieces together.
Cut the felt into a semicircle, shape it into a conical body, and glue the felt in place.
Stuff the oni’s torso with cotton to give it a three-dimensional shape.
Apply glue to the bottom, cap it with felt of the same color, trim around the edge, and the oni’s body is complete.
Add patterns by attaching felt to the horn area, and finish by creating the eyes and mouth.
You can also play with different colors for the face and body to make it extra cute.
Give it a try for Setsubun!
Let’s make an ogre with a sponge stamp!
@hoiku.labo Perfect for Setsubun in February: Let’s make an oni (demon) with sponge stamping!ChildcareNursery teacher / Childcare workerKindergarten TeacherChildcare job openingsChildcare Column#NurseryTeacherThings#IWantToConnectWithChildcareWorkers#Nursery School Craft#DaycarePreparationNursery School PracticumChildcare studentAspiring childcare workerChildcare Job LabNursery teacher skillsJob change activities#JobChange#nursery_teacher_job_changeNursery teacher employmentProduction#CraftworkProduction#Sponge stampSponge Stamp CraftSponge Stamp ProductionSetsubun craft
♬ Under the skin – &TEAM
This fun activity of dabbing with a sponge is a perfect February craft: making oni (Japanese ogre) characters full of seasonal flair.
It’s very easy to create cute oni, making this idea ideal for daycare centers and at home.
Cut out the oni’s face, hair, and horns from construction paper and glue them together.
Make a stamp using a sponge and a wooden skewer or chopstick, dip it in paint, and stamp the hair area.
It’s fun to see the sponge create patterns as you stamp.
Draw the face with black and red pens, and your adorable oni is complete.
Because it’s quick and simple, it’s perfect for one-year-olds.
Making an ogre through finger-play activities
@hoikushisatomi Making an oni with finger-play starting around age 1Nursery teacher / Childcare worker#NurseryTeacherDailyLife#NurseryTeacherThingsSetsubunOni of Setsubun#100-yen shop DIYwork#OuchiMonte
♬ Paradise – COX2
Here’s a craft idea for making an ogre using construction paper and tissue paper.
In this activity, you’ll crumple tissue paper and stick it onto a paper base made from construction paper.
Use your hands and fingers well to crumple the paper.
Once the tissue paper is crumpled, attach it to the base with double-sided tape.
Next, stick the eyes, mouth, and horn parts onto the ogre’s face base, add the hair, and you’re done.
Please have an adult cut out the necessary parts in advance.
If you put double-sided tape on the back of the face and horn parts to make them like stickers, even one-year-olds can stick them on by themselves and enjoy it.