Fun to make! A collection of simple handmade doll ideas using a variety of materials

Do you all have dolls?
When we were little, we used them for make-believe play, changed their clothes, and some people carried them everywhere—when going out or even when sleeping—and still treasure them to this day.
This time, we’ve gathered ideas for making such dolls by hand.
Many of these dolls can be made from recycled materials like cans and cartons, and most of the supplies can be found at 100-yen shops.
So find a doll you like, make it, and have fun playing with it!
Fun to make! A collection of easy handmade doll ideas using various materials (1–10)
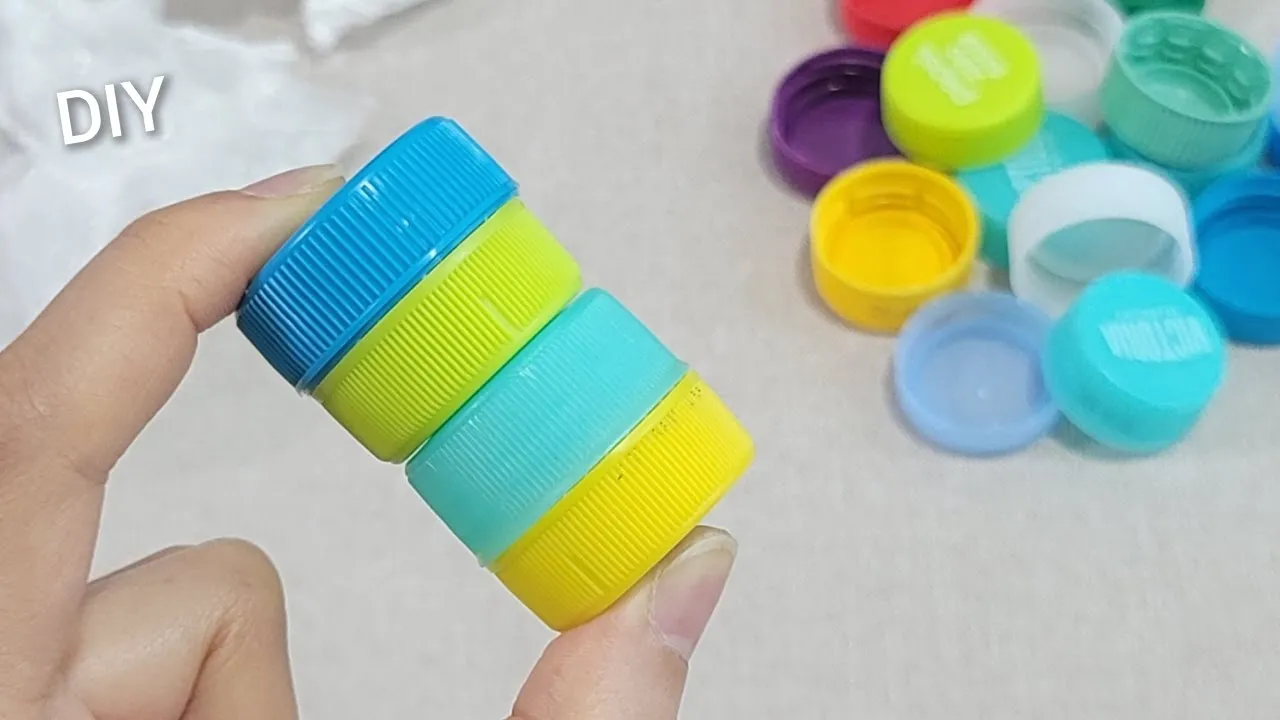
Dolls made from plastic bottle caps

Here’s an idea for a doll you can make by collecting plastic bottle caps you have at home.
First, use a hot glue gun to secure the inner rims of two caps and stick them together.
Make another identical pair.
Wrap the cap pairs with fabric, glue them with the hot glue gun, and create the torso parts.
For the head, place a wad of tissue inside a piece of circular fabric that you’ve sewn into a pouch, then attach it on top of the torso.
Add a piece of lace fabric between the head and torso.
Make a hair piece by bundling several strands of thread and folding them, then attach it to the head.
Attach both arms made from string, decorate with a lace outfit, and finally draw the facial features with a pencil or blush to finish.
A girl doll made from socks

Here’s how to make a girl doll.
Prepare organic cotton socks, matching parent-and-child socks, a 35 cm × 30 cm floral cut cloth, stuffing, a ruler, an iron, a fabric marker, two 6 mm safety eyes, yarn, craft glue, and lace.
The head and body will be made by cutting the sock and working with two separate parts.
For the head, do a running stitch and stuff it.
For the body, sew the leg area and add stuffing.
Once the face and body are finished, sew the two together.
Next, use the floral cut cloth to make the clothes.
After pressing the folds with an iron, sew the garment with running stitches and backstitches and adjust the size.
For the hat, cut the parent-and-child socks, sew with a slip stitch (invisible stitch), then turn it right side out to finish.
Attach the two eyes with craft glue, and for the hair, cut six strands of yarn and braid them.
Attach the hair with craft glue, and your cute girl doll is complete!
dress-up doll

These are paper cup dolls that you can dress up with clothes in various colors and patterns.
Cut out the bottom of a paper cup, make slits, and fold them in to create a collar.
Depending on how you cut the cup, you can make outfits like tuxedos or uniforms.
You can also cut the lower edge into a zigzag to make a skirt, and decorate the cup with pens and stickers for lots of different variations.
The key is to make the face slightly small so that changing clothes is smooth.
Fix the facial parts made from colored paper onto the bottom of an upside-down paper cup, and then enjoy dressing it up with whatever outfits you like.
Dolls made from paper cartons

Here’s an idea for making a three-dimensional puppet with moving facial features and body parts using a milk carton.
Cut off the bottom of the milk carton and mark along the length of the base.
Make slits along the marks, fold them in, then attach a face, hands, and shoes made from colored paper and pen to complete a clown.
By cutting parts of the carton or changing the colored paper you attach, you can enjoy many variations, such as a woman in a kimono, a musician, or someone skiing.
It’s also recommended to create matching settings like a stage for the musician or a sports venue.
chenille stem doll

A pipe-cleaner doll that can bend its joints to strike various poses.
Make the arms and legs using four straws cut to 2 cm and additional straws cut to 1 cm.
Thread three beads onto two pipe cleaners to form the torso, then thread a straw and a bead from the bottom.
Bend the pipe cleaner to form the tip of the foot, thread another straw, and make the other leg the same way.
Once you bend the pipe cleaner to the length of the hands, thread in the order of straw, bead, and straw.
Do the same on the other side, then twist the pipe cleaners and fold one side to form the head.
Shape the head carefully so the pipe cleaners don’t poke out, and your doll that can strike any pose is complete.
A doll rolling around

Here’s an idea for a handmade doll that rolls quickly down a slope.
Draw any illustration you like in the center of a toilet paper tube, then fold one end closed.
Place a single AA battery inside the tube and fold the other end closed to finish.
The key is to fold both closed ends into horn-like points.
When you roll it on a desk or other surface, it becomes a cute doll that tumbles along with a rumbling sound.
You can decorate it with paint or stickers, and it’s fun to try making them with family and friends.
pinecone doll

This is a figurine made from pinecones that grow on pine trees from autumn to winter.
Glue an acorn, which serves as the head, to the bottom of the pinecone using a hot glue gun.
After attaching legs made from cut tree branches to the pinecone, secure the figure to a base that you can buy at a 100-yen shop.
Once you add a dried leaf to represent a violin and arms posed to show the playing motion, the pinecone figurine is complete.
You can attach a stainless-steel wire to the head to hold plants, or use parts of the pinecone to make hair—the figurine allows for a wide range of creative ideas.