
Let’s make Hina dolls for the Doll Festival in March! This time, we’ve gathered a variety of ideas you can choose from based on the children’s ages and interests.
Any of these ideas will result in beautiful, festive Hina dolls.
After enjoying the activity at the preschool, the dolls can be displayed at home too, which makes it fun not only for the children but also for their caregivers.
The kids might come back brimming with excitement to report, “Look at the Hina dolls we made!” You can also mix and match multiple ideas to create your own arrangement.
Let’s make adorable Hina dolls and enjoy the Peach Festival.
- [Childcare] Perfect for Hinamatsuri! Hanging Hina doll craft ideas you can make with kids
- [Childcare] Fun Craft Ideas for Hinamatsuri (Girls' Day)
- [For Preschoolers & Kids] Game, Play, and Craft Ideas to Enjoy on Hinamatsuri (Girls’ Day)
- [Childcare] Recommended crafts and activities for March, such as Hina Matsuri (Doll’s Festival) and cherry blossoms
- [For 3-year-olds] A collection of recommended craft ideas to make in February
- [Childcare] Wall decoration ideas to make for Hinamatsuri (Girls’ Day)
- [Childcare] Spring craft ideas to enjoy with 2-year-olds! Techniques and materials included
- [For Preschoolers] Let’s Make It Together with the Kids! Origami Ideas for February
- [Childcare] A Collection of Origami Ideas for Hinamatsuri: Let’s Make Them with Kids!
- [Childcare] Fun for Hinamatsuri! Performance ideas perfect for the event
- [Daycare/Preschool] Let’s Make Handmade Hinamatsuri Costumes! An Idea Collection You’ll Want to Copy
- [Childcare] Enjoy Setsubun! A collection of handmade ideas you can decorate with and play with
- Let's make toys with paper cups! Simple and fun handmade toys
[Childcare] Recommended for the Doll Festival! Handmade Hina Doll Ideas (1–10)
Recommended for 0- and 1-year-olds! Sticker Hinamatsuri dolls

This idea lets children enjoy the tactile fun of freely sticking stickers.
It helps them discover the joy of crafts while experiencing the atmosphere of the Peach Festival (Hinamatsuri).
For the idea of using stickers to represent the outfits of the Empress (Ohina-sama) and Emperor (Odairi-sama), it’s recommended to prepare colorful stickers.
Please have the teacher prepare illustrations with the faces of the hina dolls in advance.
By sticking them onto a base, such as a paper carton, children can play with it over and over.
Try this activity to enjoy Hinamatsuri together with the children.
Fluffy Hina Dolls Made with Tissue Paper

These hina dolls are made with translucent, soft-to-the-touch tissue paper.
You can create a beautifully ornate hina princess and lord, making the activity fun and surprising for children.
First, accordion-fold the tissue paper to make creases and staple it.
Cut the edges while imagining the soft texture of petals, then gently fan it open.
Next, draw and prepare illustrations for the faces.
Finally, place the hina princess and lord on a paper plate with the background cut out, and you’re done.
Try making these hina dolls with the children—they’re perfect for the spring season filled with warm sunshine.
Dress-up Hina dolls you can play with

These are Hina dolls you can dress up and play with by spinning them to change the kimono patterns! Cut a large triangle out of the front of a paper cup.
Paint it, then attach a belt and decorative parts around the cup.
Add the faces of the Empress (Ohina-sama) and Emperor (Odairi-sama) to complete the outer piece.
Next, take another paper cup decorated with various patterns using masking tape, etc., and nest the first piece over it.
Each time you rotate it, a different pattern appears on the front of the Hina doll.
It’s an irresistible craft idea for kids who love playing with dolls!
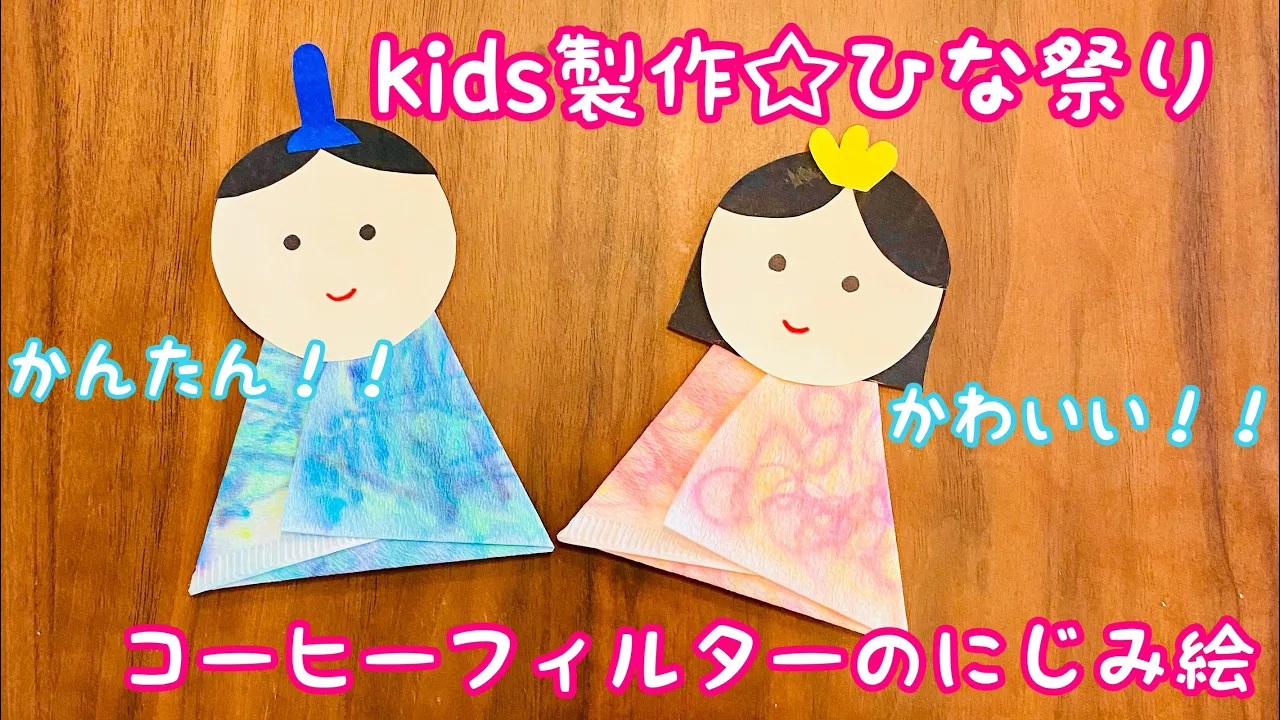
Making Hina dolls with coffee-filter blot painting

Let’s make fun Hina dolls using coffee filters and water-based markers to create a bleeding watercolor effect.
The coffee filters will become the kimono for the Ohinasama (Empress) and Odairisama (Emperor), so start by coloring them with water-based markers.
Try using warm colors for the Empress and cool colors for the Emperor.
Once you’re done coloring, place the filters in water.
Watch with the children as the ink gently spreads in the water—it’s a delightful effect.
The way the colors bleed will change depending on how long you soak them.
Afterward, let them dry thoroughly and then attach the facial features.
Three-dimensional Hina dolls made using empty lactic acid bacteria drink containers

Here’s an idea for making three-dimensional Hina dolls using empty lactic acid drink containers.
Wrap yarn around the lower half of the empty container to look like a kimono.
Be sure to apply glue where you start and finish wrapping.
Use red and blue for the kimono, and try mixing in some white yarn rather than using a single color.
The process of winding the yarn around and around is fun, too.
Once you’ve finished wrapping, add parts like hair and a crown made from colored paper.
Finally, draw the face with a permanent marker, and you’re done! You can display them standing on a surface or enjoy them hanging as decorations.
Hina dolls that make the cut-and-paste work fun

Here’s an idea for making Hina dolls by cutting and pasting with colored construction paper.
Cut circles from colored paper for the Empress (Ohinasama) and Emperor (Odairisama), pair them with colored paper for their kimono, and draw in their faces.
Attach small accessories like the eboshi cap, crown, and fan to the dolls as well.
Paste the finished Hina dolls onto a backing sheet and add your favorite patterns to the kimono.
You can draw with crayons or pens in any colors you like, or use round stickers to create kimono patterns.
Adding decorations to the backing sheet will make it even cuter!
Cute Hina dolls made with origami

How about making Hina dolls with origami? With this origami, the body parts of the Hina dolls are completed in just three folds, so it’s suitable for a class of two-year-olds.
Fold the origami paper in half into a triangle, then fold the tips of the left and right corners inward to finish the body.
Next, attach parts like the face made from round paper, as well as the crown and fan.
You can also draw the face and hair with pens or add stickers.
Let’s make a cute pair of the Hina princess and prince, and enjoy the Peach Festival with the children.