![[Childcare] Fun Craft Ideas for Hinamatsuri (Girls' Day)](https://i.ytimg.com/vi/5SWshB6eY7s/sddefault.jpg)
[Childcare] Fun Craft Ideas for Hinamatsuri (Girls' Day)


When you think of Hinamatsuri (Girls’ Day), many people probably picture hina dolls.
Some kindergartens and nurseries make hina dolls together with the children in the lead-up to the festival.
This time, we’ve gathered ideas for making hina dolls.
Many can be made with familiar materials like paper cups and origami, so be sure to try them at school or at home.
Customize the colors and designs to create a one-of-a-kind, original hina doll!
Make lots and enjoy a bright and festive Hinamatsuri.
Because children’s creations are treated as works, we use the term “制作” (production/creation) in the text.
[Childcare] Fun Hinamatsuri Craft Ideas (1–10)
Spin and Swap! Dress-Up Hina Dolls
This spinning, mix-and-match Hina doll craft is an idea you’ll want to include in March childcare activities.
Use colored construction paper to make the emperor and empress’s faces, hair, and head ornaments.
Combine the parts and draw in the faces.
Cut a paper cup into a cone shape and paint it to color the kimono, then attach an obi piece made from origami paper.
Attach the faces and place them over another paper cup decorated with masking tape to finish.
Stick on various patterns of masking tape and enjoy swapping outfits!
Hina dolls made from toilet paper rolls
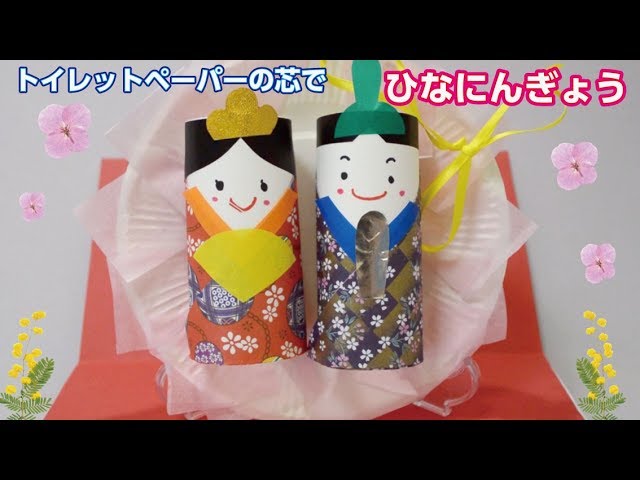
You can even make hina dolls using toilet paper rolls.
First, prepare two toilet paper rolls.
Wrap them diagonally with washi-patterned origami to make them look like kimonos.
Then create and attach accessories and hair pieces, and draw the faces—now you have the Emperor and Empress.
If you have more toilet paper rolls, you could probably make the three court ladies and the five musicians, too.
It would be fun to draw cheerful expressions, or make the faces resemble yourself or your family.
Hinamatsuri coffee filter blot painting

Draw on a coffee filter with water-based markers, then float it on water to wet it.
Once the ink has bled, take it out and let the filter dry.
When it’s dry, fold it to make the body of the Hina doll.
Finally, attach the face you made from construction paper, and it’s done! Imagine the filter as a kimono: fold the left and right sides to overlap at the center, then fold the bottom up to the back to finish.
The impression of the bleeding pattern changes depending on which colors of markers you use, so you’ll end up with wonderfully unique creations.
Hinamatsuri tree

This is a Hinamatsuri tree where the Empress and Emperor dolls sway merrily! Draw your favorite patterns on a paper cup for the base and make a hole in the center of the bottom.
Twist three pipe cleaners together into a bundle, insert them through the hole, and secure them inside the cup.
Shape the ends of the pipe cleaners outside into loops or any shape you like, then hang the Empress and Emperor dolls or peach blossoms with strings from the pipe cleaners to decorate—your tree is complete! Try adding pom-poms or lavish decorations to the paper cup itself to enjoy your own custom arrangement.
Fluffy, colorful Hina dolls

Let’s make fluffy, colorful Hina dolls that look very festive when displayed! First, use pastels to draw spirals on paper, then rub over them with a balled-up piece of cotton to tint the cotton.
Make as many as you need in your favorite colors.
Attach Hina dolls and the Emperor doll you made from construction paper or origami to a base, then glue the colored cotton around them to finish! You can use any base you like, but lace paper doilies or paper plates are recommended.
If you want to make it a wall decoration, punch a hole and thread a string through it.
Hina dolls made with jelly cups

After you finish eating your favorite jelly, try making Hina dolls using the cups! Prepare the parts—such as the face, hair, and crown—by cutting them out in advance.
Crumple tissue paper in colors that match the images of the Empress (Ohinasama) and the Emperor (Odairisama), place it into each cup, and attach the assembled face parts to the rim of the cup.
Then attach the kimono sleeve parts made by fastening origami into rings, along with the fan and the ritual baton (shaku), to the cups to complete them.
Display them on a nice stand to give a more festive atmosphere—highly recommended!
Paku-Paku Hina Doll

These are chattering Hina dolls that overturn the idea that Hina dolls are just for display and admiring! All you mainly need is a single paper cup.
Make deep slits on two opposite sides of the cup, and it will open and close like a mouth! Then draw the face and add a crown or a fan and scepter, and your wide-mouthed Hina doll is complete.
Since it moves, it could be fun to use the dolls you’ve made to create an original story with the children and put on a little puppet show.
You can make the other characters the same way—why not develop a brand-new Hinamatsuri storyline?