
Why not turn your favorite character or your favorite idol’s photos into handmade stickers and have some fun? In fact, you can easily make original stickers with items that are simple to get! Print your illustrations on sticker paper, use laminate film, or decorate with holographic sheets to create professional-looking stickers.
In this article, we’ll share easy, high-satisfaction ideas for making handmade stickers.
Express your unique style with one-of-a-kind stickers!
- Simple handmade sticker ideas: how to make original stickers
- Reward Stickers: Handmade Ideas for Original Sticker Charts
- A collection of DIY stamp ideas you can easily make with everyday materials
- New Year’s card ideas to make with children: simple designs using stickers and stamps
- Perfect for potty training! Handmade ideas for cute sticker charts
- [Oshi Activities] Ideas for making DIY trading cards. Handmade merch for your fave
- Handmade acrylic stand ideas: DIY merch for your fave
- Simple yet amazing! Handmade New Year’s card ideas that will delight
- Let's make a handmade smartphone case! A collection of simple and cute ideas
- Let's make a handmade stamp card! From how to make it to design ideas
- [Handmade Mascots] Curated easy-to-make ideas using felt and everyday materials
- Handmade photo frames! Simple and stylish craft ideas
- Handmade accessory ideas that will delight the recipient! Easy DIY with everyday materials
Let's Make Handmade Stickers! A Collection of Fun DIY Ideas Using Everyday Materials (1–10)
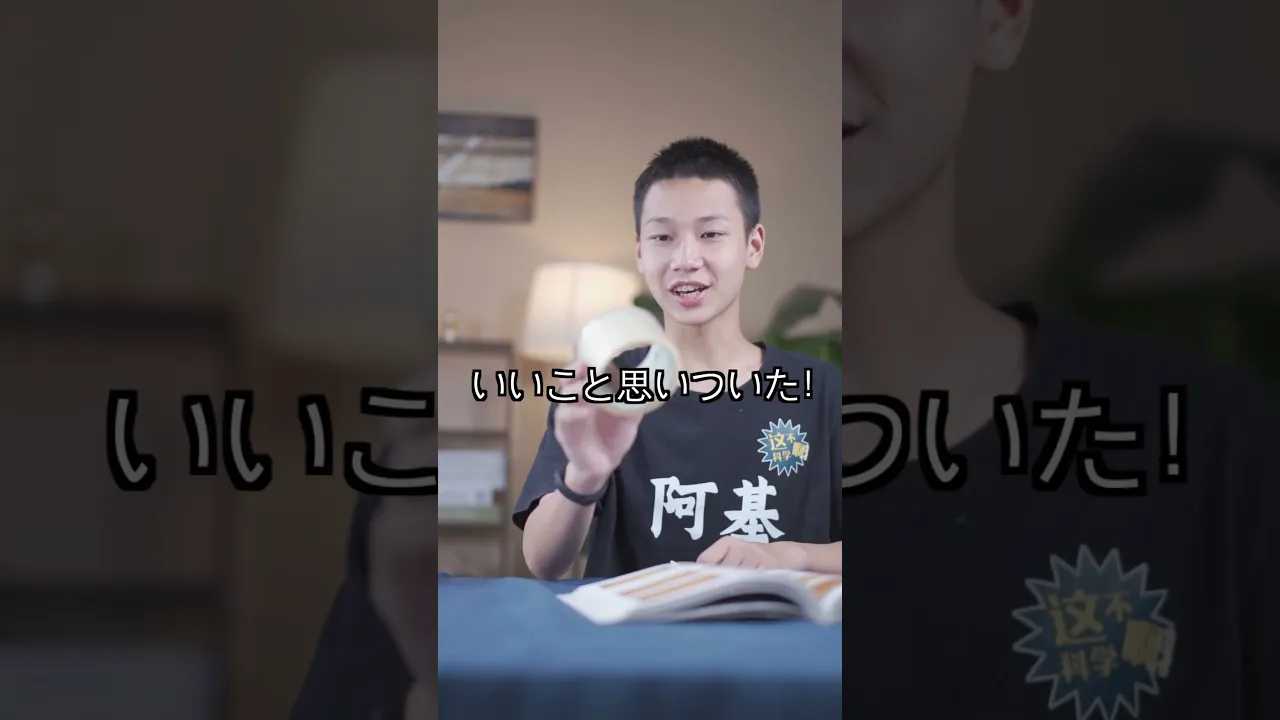
Stickers made with tape

Here’s an idea you can make using printer paper and clear tape.
Since everything except the design becomes transparent, the professional-looking finish is the real charm! First, print the design you want to turn into a sticker.
Then place clear tape over the printed design and cut it to the size of the design.
Next, soak it in water to soften the paper the design was printed on.
After a few minutes, gently rub the softened paper with your fingers; the paper will crumble away, leaving only the design.
Finally, place the sticker you took out of the water onto a sheet of parchment/baking paper and let it dry—that’s it! You might wonder, “If the tape went in water, won’t it lose its stickiness?” Surprisingly, the adhesive doesn’t weaken, so you can stick it wherever you like! By the way, inkjet printer ink will bleed when it gets wet, so using a laser printer is recommended.
Stickers suitable for outdoor use
Make it with your smartphone! Here are some sticker ideas you can use outdoors.
It’s disappointing when you’re thinking of making stickers but your favorites can only be used indoors, right? How about creating stickers with materials that are suitable for outdoor use in your favorite designs? Another nice point is that you can easily try designing them as long as you have a smartphone.
This is a great idea for those with a beloved dog or anyone who has a favorite motif!
Stickers made with parchment paper
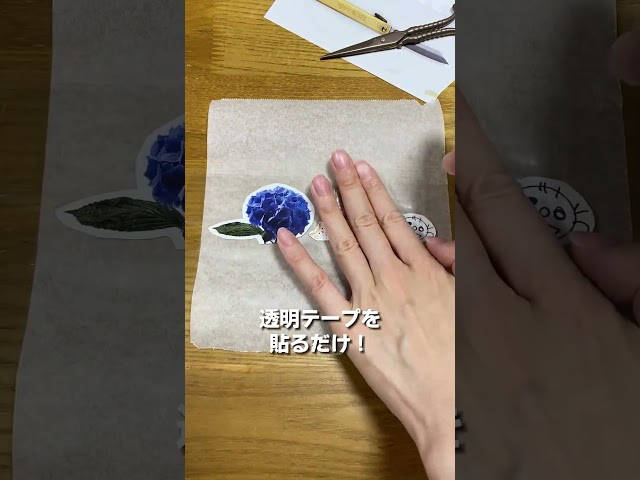
Here’s a way to make original stickers with no complicated steps at all! All you need is parchment paper and clear tape.
First, stick the tape onto the parchment paper and arrange your favorite illustrations or images on top.
Then place another layer of clear tape over them to secure the images.
Finally, cut along the outlines of the illustrations with scissors, and you’re done.
Even after peeling them off the parchment paper, the tape’s adhesive remains strong enough to use as stickers! Try making all kinds of stickers using your own drawings or photos.
Stickers made by printing on sticker sheets

Here’s a method that uses sticker sheets you can even find at 100-yen shops.
Draw your illustration by hand on the sticker sheet with a ballpoint pen or similar, then cut around the design with scissors to create your own original flake stickers.
Instead of hand-drawing, you can also create the illustration on a computer or tablet and print it onto the sticker sheet.
If you use a cutting machine to cut them, you can make even more professional-looking stickers.
Try starting with hand-drawing and cutting with scissors, and if you get hooked on sticker-making, consider getting a cutting machine.
Stickers made with laminate film

Here’s an idea: print your designs on sticker sheets sold at 100-yen shops and finish them with a type of laminate that doesn’t require a laminator.
First, create your design on a computer or tablet and print it onto the sticker sheet.
Next, apply a self-laminating sheet, which is a laminate that doesn’t require a machine.
Finally, cut out the shapes with scissors or a craft knife to match your design, and you’re done.
Laminating makes them more resistant to moisture and dirt, expanding the range of places you can stick them.
Cheki-style stickers made with an app
The price is about 15 yen per sheet! Here’s an idea for stickers that look like Polaroids made with an app.
Polaroids refer to photos taken with an instant camera that you can print right on the spot, and their distinctive vibe has stayed popular from the past to today! Of course, you can make stickers with close friends or family, but it also sounds fun to make stickers of your favorite artists or idols! You can choose the size, too, so it’s lovely to slip them between your smartphone and its case and carry them around.
Stickers made with cutting sheets

Here’s an idea that pairs well with lettering and logos using a cutting sheet (adhesive vinyl).
First, glue a printed sheet of your desired design onto the cutting sheet.
Next, use a craft knife to trace and cut along the outlines of the letters you want to turn into stickers.
Then peel away the unnecessary parts along the cuts you just made with the knife, and apply masking tape over the entire design—that part is done.
When you’re ready to apply the finished sticker, peel the design off the cutting sheet’s backing while keeping the masking tape on, and place it where you like.
Finally, remove the masking tape and you’re done.
The steps are a bit complex, so it’s a good idea to check a detailed reference such as a video.
However, you can create stickers that look store-bought, with separate letters held in place, so give it a try!