

On July 7, we hang tanzaku strips and Tanabata decorations on bamboo, right?
Streamers, net ornaments, and paper lanterns are the classics, aren’t they?
There are many other kinds of decorations too, and each one has its own meaning.
In this article, we’ll share some ideas for Tanabata decorations.
Along with the classics, there are arranged twists on the standards and cute decorations inspired by foods, so feel free to use these as references and try making them.
Most of these ideas can be made with origami, so it’s also a great activity to do with your children!
- [For Kids] Handmade Ideas for Hanging Hina Decorations You’ll Want to Display for the Hina Festival
- Simple and breezy handmade fans | A curated selection of ideas you can whip up in no time!
- Handmade ideas for summer decorations. Perfect for interior decor and craft activities!
- [Easy] Cute Origami Ideas Recommended for Tanabata Decorations
- Let's decorate the bamboo! Stylish handmade Tanabata ornaments
- A roundup of handmade decoration ideas perfect for summer festivals
- Handmade decoration ideas for summer festivals
- I want to decorate in summer! Handmade garland ideas
- Handmade Fireworks Festival: Easy Origami Firework Ideas
- Handmade lantern ideas. Let's make festival decorations!
- For New Year’s! A collection of fun origami ideas to make, decorate, and play with in childcare
- [For Kids] A Roundup of Perfect Origami Ideas for June [Rainy Season]
- Simple: A roundup of origami ideas perfect for Christmas
Handmade ideas for Tanabata decorations: from classic ornaments to creative variations (1–10)
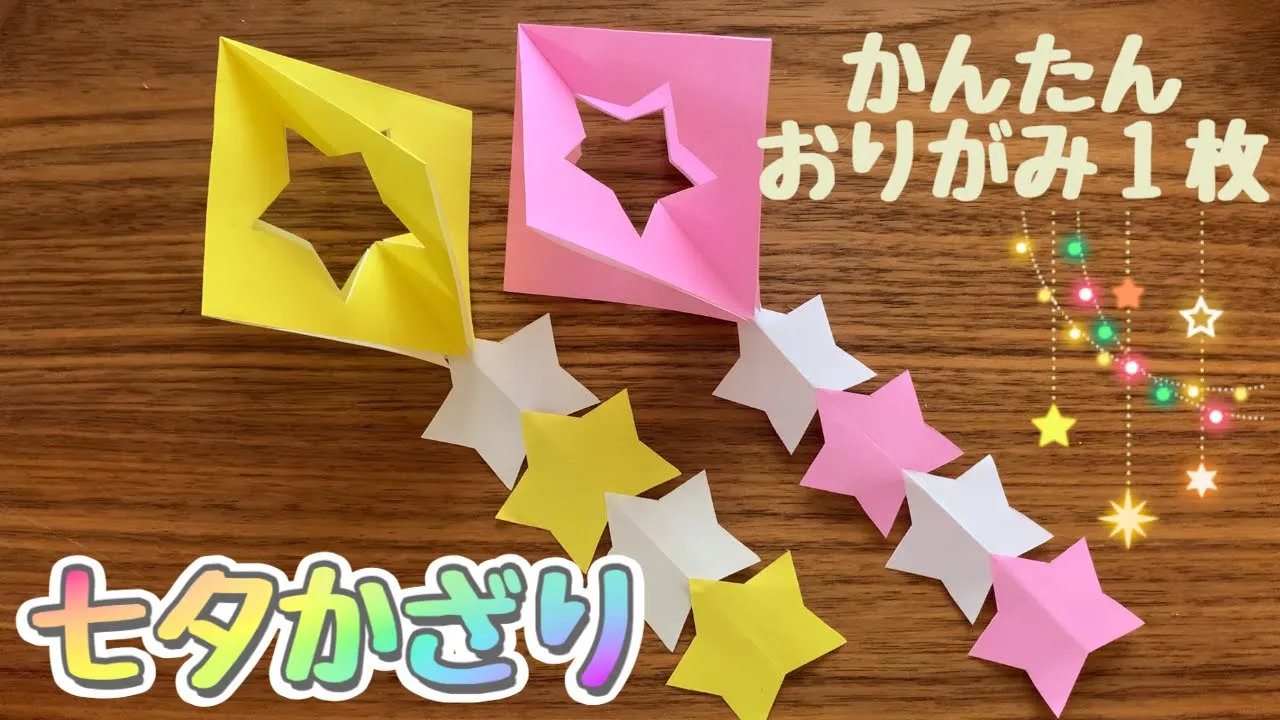
Star Linking

Star ornaments that evoke the summer night sky are sure to brighten up the Tanabata season.
Their three-dimensional designs and cute finishes will definitely boost the excitement for the event.
Each one can be made from a single sheet of origami paper, making materials easy to prepare, and the neat results make them perfect for children’s crafts.
Use various colors of origami or chiyogami to decorate your room—this is a craft that lets you feel not only Tanabata but the essence of summer itself.
Milky Way of watermelons

Watermelon, a fruit kids love, is the quintessential taste of summer.
Decorations that combine watermelon with the Milky Way make the perfect room accents for Tanabata.
Beyond the standard design, changing the colors or sizes will surely add a festive touch to the season.
With few steps involved, it’s easy enough for children to make—as long as they handle scissors carefully—so it’s highly recommended.
It’s a summery decoration you can enjoy not only in kindergartens and daycare centers but also at home.
Give it a try!
paper ball
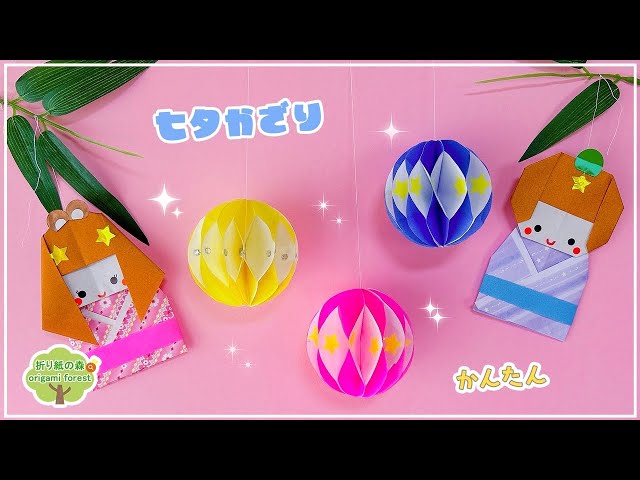
Paper balls, which look cute and are fun to customize with decorations, are perfect for Tanabata room decor.
Since you don’t need to use scissors much, they’re relatively easy even for young children to try.
The position and width of the glue can be a bit precise to get the shape right, but the work itself isn’t difficult, so if adults provide a little support while letting the child finish it themselves, it can become something they feel proud of.
Attach a string and hang them up to create a dreamy, quintessentially Tanabata atmosphere in your room.
diamond ornament

The classic Tanabata decoration, the diamond-shaped ornament.
It has a delicate shape, but once you learn the steps, you can make a lovely decoration with origami.
The key is to use origami paper that has colors or patterns on both sides.
Of course, regular origami paper works too, but double-sided colored or patterned paper gives a more beautiful finish.
To make it, fold the origami paper into a triangle twice, then open it once.
Using the creases from the triangle, draw several cut lines.
Where you make the cuts takes some thought and affects the design, so be careful when drawing the lines.
Cut along the lines, open it up, and fold down from the outermost cuts—this will create a diamond-shaped ornament.
Adding star decorations will enhance the Tanabata atmosphere even more.
Shell ornament

Since July includes Tanabata, it also marks the opening of the beach season and the start of swimming in the sea.
So let’s make a shell decoration for Tanabata that evokes the summer ocean.
With a little creativity, you can use origami to make a cute, shell-like piece.
Fold the origami paper in half, then make several cuts, leaving about 2 cm uncut at the edge.
Open the folded paper and glue only one corner along a diagonal so the corners overlap.
The cut sections will form an accordion shape, making it look like a spiral shell.
For a Tanabata touch, try using star-stamped origami paper or adding stickers.
You can make them in various colors, and connecting several shells together also creates a lovely decoration.
a thousand paper cranes

Speaking of senbazuru, they’re best known for being given to wish for someone’s recovery from illness, but they’re also often displayed at Tanabata with hopes for the family’s health and longevity.
Here, we’ll introduce a way to fold cranes suitable for senbazuru.
It follows the basic crane folds except for not spreading the wings at the end, and it also shares ideas that let you skip some steps and tips to keep the crane looking neat even while still folded.
Folding a thousand cranes is a lot of work, so feel free to use this as a reference to make your cranes efficiently while filling them with your wishes.
a large windsock

Why not try making a large, eye-catching windsock to hang up? When it comes to Tanabata, people think of bamboo decorations, but even if you can’t get bamboo, just hanging this windsock by the front door will let you feel the Tanabata spirit.
The base of the windsock is a sphere made by cutting an empty tissue box into strips and linking them together.
Hang rings made from empty boxes in the same way from that base, then tie on strings threaded through paper cranes and let them dangle.
Attach one more ring below each crane and stick on bands made from wrapping paper.
Finally, add tissue-paper flowers to cover the base, and you’re done.