Simple: A roundup of origami ideas perfect for Christmas

When you think of December events, Christmas is the first thing that comes to mind, right?
It’s a time to enjoy parties together and get excited wondering, “What kind of presents will I get?”
It’s an event that gets kids and adults alike in a festive mood.
In this article, we’ll introduce cute origami ideas that will elevate the Christmas spirit!
They’re perfect for making and playing with while you look forward to Christmas, and they also make great decorations for your room.
Be sure to read to the end!
[Easy] A roundup of origami ideas perfect for Christmas (1–10)
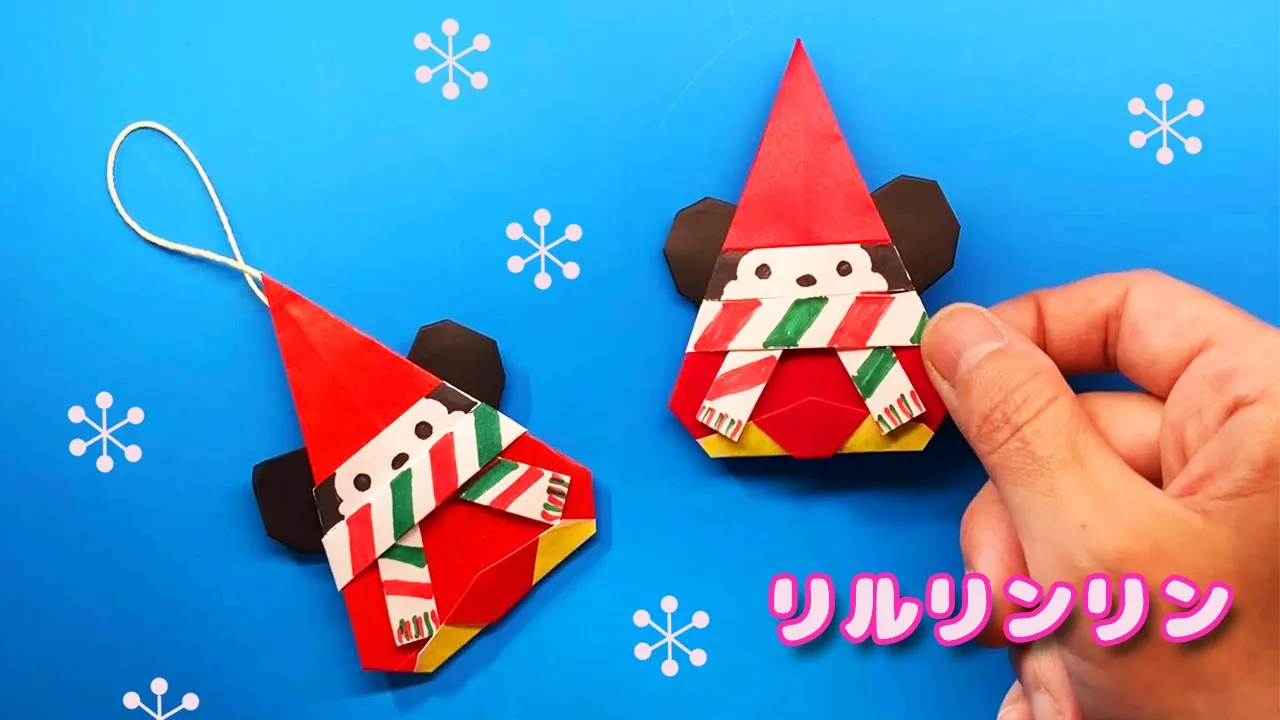
Lil Lin Lin

As a Christmas fairy, Lil Rinrin appears at Tokyo Disney Resort during the holiday season.
Let’s make this cute Lil Rinrin with origami! First, use red origami paper to make a triangular hat.
Next, cut a sheet of white origami paper in half: fold one half from both sides; take the other half, fold from both sides and then fold once more, shaping it into a V.
Combine these two pieces and draw Lil Rinrin’s face and scarf pattern.
Finally, make Lil Rinrin’s ears with black origami paper, then assemble all the parts to finish!
Clapping Santa
https://www.instagram.com/reel/ClBF8ERJ0Dg/Let’s make an origami piece that’s perfect as a toy, with Santa Claus clapping his hands.
First, crease the paper into quarters, then fold both sides toward the center and make an X-shaped crease in the middle.
Fold from the top and bottom toward the creases as if forming two boats, creating four small squares.
Add a slit to one of those squares to form Santa’s face.
On the two squares below that, add folds so they become Santa’s hands.
Finally, add creases to give the whole model a three-dimensional look, and spread out the hand sections—done! By moving Santa’s head and the section below it up and down, the hands will move as if he’s clapping.
gloves

Origami gloves that warm your hands on a cold winter day.
You can enjoy them by changing the colors and patterns, arranging them as ornaments, or putting them on other creations.
Fold a crease down the center, then cut the paper and fold it from bottom to top; fold back only the top layer.
Open the paper, fold the top edge toward the center, and fold the left and right edges toward the center—make these steps for both parts.
Unfold the edges, then make mountain folds from the inside toward both the left and right, and fold the origami diagonally downward from the left and right corners, tucking inward.
Fold in the protruding corners and the inner left and right edges; then, leaving a small gap, fold from top to bottom and fold the top corner diagonally.
Fold the unfolded part back to the inside, tuck the bottom edge into the folded section, and your gloves are complete.
Christmas bells

Origami bells to decorate rooms and doors for Christmas.
You can make them from a single sheet of origami paper—an easy idea even for beginners.
Start by creasing the paper down the center, then fold the top corners toward the center.
Fold up about 1 cm from the bottom, flip the paper over, and fold the top section.
Next, fold the left and right sections toward the center point, and tuck in the corner—your bell is complete.
You can also combine leaves, flowers, ribbons, and other parts to create a more festive piece.
It’s a Christmas craft you can enjoy making with family and friends.
Christmas candle

Candles that warmly illuminate the Christmas scenery.
Make them with origami and bring a cozy glow into your room.
Prepare red origami paper, slightly fold just one of the four edges, then fold the paper in half with the white side facing out to make a crease.
Next, fold both sides in toward that center crease twice.
Make a small slit along the remaining red edge, then shape it into a candle flame to finish.
You can also draw in a yellow flame if you like! It might be nice to make a separate Christmas cake and display them together.
Christmas tree

Decorating with a big Christmas tree is nice, but filling your space with lots of cute origami Christmas trees is wonderful, too.
Use your favorite colors of origami paper and make a colorful forest of trees! Fold the paper into a triangle twice, then open the pocket to make a square.
From there, fold it so the tree has two tiers and also forms a flowerpot at the bottom.
After that, adjust the shape and you’re done! It’s also a great idea to add round stickers and other decorations like ornaments.
When you put them on the wall, try adding star stickers as well!
Christmas wreath

Let’s make a wreath that’s perfect as a Christmas wall decoration! Prepare some small origami sheets and create several parts for the wreath.
You can use the same color throughout, or use two or more colors for a colorful finish—highly recommended.
Once the parts are ready, glue them together one by one to form the shape of a wreath.
After that, decorate it as you like by adding round stickers or drawing embellishments with a pen, and you’re done! You can also fold a ribbon from another sheet of origami and attach it to the wreath—also recommended.