[Autumn Activities] Nature Play and Craft Ideas for Fall to Incorporate into Childcare!


Autumn is a season full of nature that can be put to good use in childcare.
It’s also a time when we can really feel children’s growth, isn’t it?
As it becomes more comfortable to spend time outdoors, many preschools and kindergartens likely enjoy activities like collecting nuts and gathering fallen leaves.
You want to introduce lots of new activities but can’t find any ideas…
For those with that concern, we’ve gathered recommended nature play and craft ideas for autumn.
Enjoy them together with the children and savor the fruitful season.
The experiences they have at your center will become precious memories for them.
- [Early Childhood Education] Enjoy Autumn! Play and Activity Ideas Inspired by Sweet Potatoes
- [Autumn] Seasonal play ideas to incorporate into childcare: Let’s connect with nature both outdoors and indoors
- [October] Craft ideas for fall you can use in childcare
- Even 1-year-olds will be captivated! A collection of craft ideas to enjoy the art-filled autumn
- Autumn craft ideas that will captivate 2-year-olds! Have fun making them and enjoy the fall to the fullest
- Fun nature activities that children will love. Recreational games.
- September: Autumn crafts! Ideas you can use in childcare
- Autumn Acorn Craft Ideas! Enjoy with Your Kids
- Summary of activities you can use in childcare in September: autumn-themed play such as crafts and fingerplay.
- [Childcare] For 2-year-olds! November craft activity ideas
- September crafts for 2-year-olds! A collection of make-and-play ideas to enjoy autumn
- Get kids excited in November! A collection of play and craft ideas using autumn’s natural treasures
- Play ideas kids can enjoy from 1st to 6th grade [indoors & outdoors]
[Autumn Activities] Fall Nature Play and Craft Ideas to Incorporate into Childcare! (41–50)
Three-dimensional grapes with just one sheet!

Cut a sheet of construction paper into a rectangle and make two slits at each end.
On the left side, roll the middle section with slits toward the front and glue it, then roll the remaining sections toward the back and glue them.
On the right side, roll the middle section toward the back and glue it, then glue the remaining sections toward the front.
Fold the paper in half so the rolled parts form three rows, then cut along the fold with scissors to shape the stem.
Make leaves and vines out of origami paper and attach them to the grapes to finish! Try making them in various colors.
[Autumn Activities] Fall Nature Play and Craft Ideas to Incorporate into Childcare! (51–60)
Super huge! Tissue paper grapes

Here’s an idea that’s perfect when you want to make an impactful autumn wall display.
Stack several sheets of tissue paper and accordion fold them.
Once folded, tie the center with wire.
Gently pull apart the layers of tissue paper one by one from the inside; when all the layers are fluffed, shape it into a round form.
This makes one grape.
Make eight of these, then arrange them in four rows as 3, 2, 2, and 1.
Glue them onto the base, and add a stem made from construction paper and leaves made from tissue paper to finish.
When you display it on the wall, adding a vine is a nice touch too.
Hedgehogs for infants (ages 1 and up)
https://www.tiktok.com/@hoiku.labo/video/7293786076940963074A hedgehog craft made by sticking pieces is perfect for one-year-olds who find complex tasks difficult, and it’s a great activity that lets them feel a sense of accomplishment from “I did it!” Prepare construction paper cut into parts for the hedgehog’s legs, body, and spines, along with glue and round stickers.
Have the children glue each part onto the body.
Repeating the sticking action is also recommended for promoting children’s fine motor development.
As the teacher encourages them by saying things like “You stuck it on so well,” the children accumulate small successes, build confidence, and this leads to meaningful growth.
[Ages 2 and up] One-snip hedgehog with scissors
Let’s make an adorably prickly hedgehog using scissors.
Prepare construction paper, glue, and scissors.
It’s recommended that the teacher pre-cut the hedgehog’s spines/fur pieces and the face parts in advance.
Have the children work on the part where they make slits by cutting vertically into the spine pieces with scissors.
Start by practicing cutting straight vertical lines to help them learn how to use scissors.
Folding the cut spine pieces will add a three-dimensional look.
For the face, drawing with crayons or colored pens might result in hedgehogs with a variety of expressions.
[Ages 3 and up] Hedgehog Snip-Snip Craft
Using everyday paper plates to make hedgehogs is a great craft for 3-year-olds who are starting to enjoy expressing themselves.
Get paper plates, scissors, construction paper, and glue ready.
Prepare the hedgehog bodies in advance, and have the children make cuts around the edge of the paper plate, snipping from the outside toward the inside.
It’s also a good idea to draw guide lines so they can cut along them.
By drawing the hedgehog’s face themselves, each child can create their own original hedgehog.
Giving the hedgehogs names and using them in play can make the activity even more fun.
[Ages 2 and up] Let’s make a hedgehog with newspaper!
![[Ages 2 and up] Let’s make a hedgehog with newspaper!](https://i.ytimg.com/vi/F5K2YKZHSU4/sddefault.jpg)
Making newspaper hedgehogs is perfect for two-year-olds who enjoy using their hands.
Prepare construction paper, a hedgehog template, glue, newspaper, and scissors, and get started.
You can cut the newspaper with scissors, but tearing it by hand to represent the hedgehog’s spines or fur is also recommended.
Since two-year-olds aren’t yet familiar with using scissors, be sure to check their grip and how to open and close the scissors before proceeding.
Using tissue paper or origami to make a colorful hedgehog can also be a great way to help them enjoy colors visually.
Swirly Grapes
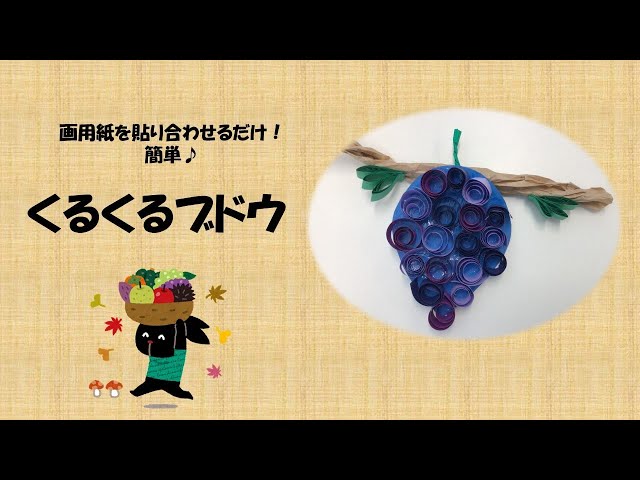
When it comes to the king of autumn flavors, grapes surely take the crown.
Let’s make a seasonal craft by rolling construction paper.
Prepare construction paper, scissors, and glue.
Cut the construction paper into a teardrop shape to create the base for the grapes.
Cut long, thin strips of construction paper and roll them tightly with your fingertips to form grape shapes.
Glue the rolled “grapes” onto the base in a three-dimensional way, making sure there are no gaps.
Finally, cut and roll green construction paper to make the stem and cluster top, then glue it on to finish.
Try making it while paying attention to finger dexterity, size, and overall balance.