


Those adorable cat ears that capture children’s hearts and won’t let go! Here, we’ve gathered a variety of DIY cat ear ideas using headbands, hoods, felt, and pipe cleaners.
Perfect for costumes in nursery and kindergarten performances or as props for pretend play, we’ll show you fun ways to make them together with kids.
From easy projects using materials from 100-yen shops to fluffy designs with a cute finish, you can enjoy customizing them to your taste.
Use this as a guide and try making your very own special cat ears!
- [For Kids] Handmade Headband Ideas Collection
- [For costumes and cosplay] How to make a cute bunny-ear headband
- Halloween gets even more exciting! A collection of DIY mask ideas using a variety of materials
- Cute and handmade! A collection of Halloween costume ideas recommended for babies
- [October] Craft ideas for fall you can use in childcare
- [Preschools & Daycare] Costume and Cosplay Ideas for Halloween
- Handmade Halloween costume ideas! A roundup of outfits you can make with everyday materials.
- At daycare and kindergarten! A collection of Halloween decoration ideas
- [Childcare] Handmade Oni Masks: Craft Ideas by Material
- [Daycare/Preschool] Let’s Make Handmade Hinamatsuri Costumes! An Idea Collection You’ll Want to Copy
- [Childcare] Enjoy Setsubun! A collection of handmade ideas you can decorate with and play with
- [Childcare] Ideas for props for a school play. Easy ways to make them.
- [Childcare] Sports day costume ideas: easy-to-make outfits
How to Make Cute Cat Ears! A Collection of Kid-Friendly Ideas Perfect for Events (1–10)
Origami cat ears

Here’s an idea for cat ears made with origami! Prepare two sheets of black origami paper.
Fold the first sheet in half, and cut the second sheet about 3 cm from the bottom.
Use the larger piece of the second sheet for the ears, and the remaining pieces for the base.
For the cat ears, fold the origami in half and glue it, then fold it in half again.
Open the paper and fold the top two corners down to meet the bottom edge.
Open the paper again and fold backward along the crease lines.
The triangular part you created will be the ears.
Cut pink origami to match the size and attach it inside as the inner ear.
Glue the parts so the ears stand up.
For the base, take the halved piece of origami, fold it lengthwise into a thin strip to match the width of the ears, and connect it by inserting the 3 cm strip inside as a joint.
Attach the ears to the base, punch holes at both ends of the base, tie on rubber bands, and your cat-ear headband is complete!
Fluffy cat ear headband

You often see fluffy faux fur cat ears for sale, right? Let’s try making them by hand! Prepare faux fur fabric in the color of your choice, felt in the same color, and a plastic headband.
Cut two triangles from the fur fabric for the ears, place them right sides together, sew around the edges, turn them right side out, and stuff them with batting.
Cover the plastic headband with the fur fabric using double-sided tape, finish the inner edges of the fabric, then cover the part that touches your head with felt and glue it in place.
Finally, glue on the ears, and you’re done.
cat ear muffler

How about making a cat-ear scarf that’s integrated with a hat? This scarf has a hood-like part you can wear on your head, with cat ears attached.
Since it’s a scarf, it keeps your neck warm, and the design looks like a cat is hugging you from behind—super cute! It might take some time to make, but there’s a pattern provided, so why not give it a try? If you make it in a cute color for your child, they’re sure to love it! Feel free to adjust the length of the scarf portion to your liking.
Cat-ear headband made from empty boxes

Here’s an idea for making cat ears using an empty tissue box and colored construction paper.
Cut the empty tissue box into long strips, trim off any unwanted parts with folds, connect them to fit the size of your head, and layer two strips together to make a sturdy headband.
Hold it against your head and trim the paper so it’s roughly the length from ear to ear.
Curl it into a circle and clip it with clothespins to set the round shape.
Once it holds its shape, cover it with colored construction paper, attach the triangular ear pieces you’ve cut out, and you’re done.
Change the colors of the construction paper to become all kinds of different kitties!
How to fold cat ears

With just black and yellow origami paper, glue, and scissors, you can make realistic cat ears! The key is to cut the origami to the size you need before you start.
Apply glue and lift the paper to give the ears a three-dimensional finish, and you’ll have adorable cat ears.
It’s also nice to clip them to your hair with hairpins.
When attaching the black and yellow origami together, using double-sided tape or similar may help prevent the papers from peeling apart.
Cat ears made from newspaper
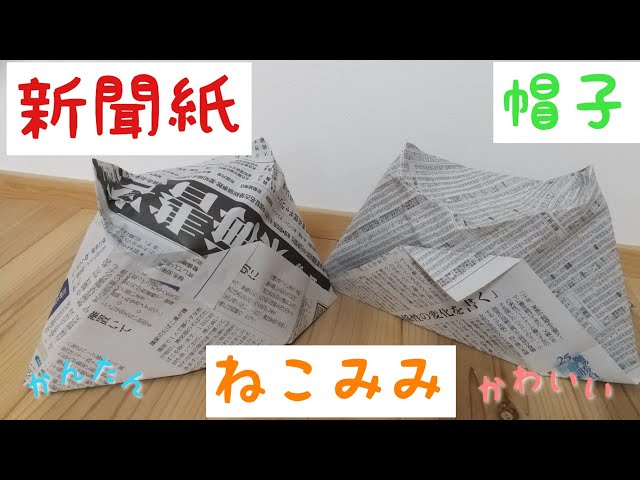
Just fold with a familiar material—newspaper! Here’s a simple method for making cat ears.
All you need are newspaper, scissors, and glue.
It finishes like a hat, so after you’re done, you can wear it on your head and play at being a cat.
The key is to sharpen the sides of the hat so they stand up like ears! It also sounds fun to customize it by coloring with crayons or paint, or by gluing on torn pieces of origami paper.
Give it a try!
Easy cat ears with construction paper!

All you need to do is attach paper cat ears to a simple headband you can buy at a 100-yen shop, and you’re done! The only materials are a basic headband, two colors of construction paper, and glue.
You can just cut the paper into triangles and stick them on, but it might look a bit flimsy.
For sturdier, more realistic cat ears, it’s best to fold the paper to add thickness and dimension.
Changing the color inside the ears makes them look even more lifelike, so try layering two sheets of construction paper to create cat ears with a carefully crafted finish.