Helpful for childcare! Let's make Christmas decorations using familiar materials.

Christmas is full of fun things like presents from Santa and delicious cakes, isn’t it?
How about making Christmas decorations with the kids to get ready for the holiday?
A dazzling lineup of festive, cute items you’ll want to display for Christmas—like trees, wreaths, and snow globes!
They’re easy to make with everyday materials, so they’re perfect not only for preschools and kindergartens but also for doing at home.
Place them on desks or lockers, stick them on the wall—decorate your space in all kinds of ways and build up that Christmas spirit!
- Christmas card ideas to make with children: great for both preschool and home
- Easy Christmas crafts to enjoy with kids! Make them with everyday materials.
- Christmas Crafts to Enjoy with Kids: A Stylish and Easy Idea Collection
- [Age 3] Let’s Make It at Nursery or Kindergarten! A Collection of Christmas Craft Ideas
- December origami! Simple ideas for Santas and wreaths that kids can enjoy in childcare
- Handmade Christmas present ideas! A collection of fun ideas for nurseries and kindergartens
- [Handmade] A Homemade Christmas Present for a 2-Year-Old
- Preschool: Easy and cute Santa craft ideas
- [Childcare] December Wall Decoration Ideas: Festive Crafts for Christmas and Winter
- [Childcare] Christmas wall decoration ideas
- [December Wall Decorations] Christmas Trees and Wreaths! Ideas You Can Use in Childcare
- December craft ideas! A collection of childcare activities to enjoy with Christmas and winter themes
- Christmas wreaths to make in childcare! A collection of handmade ideas to enjoy with children
Helpful for childcare! Let's make Christmas decorations using familiar materials (11–20)
Stained-glass-style tree made with transparent origami
It’s a stained-glass-style tree you can enjoy decorating on walls or windows! By using transparent origami paper, it looks adorably see-through.
Fold construction paper into an accordion, sketch the tree, and cut it with scissors to make the base.
Next, cut out the construction paper in the shape of a tree.
Also, sketch a tree shape onto a clear file, then attach small pieces of cut transparent origami to fill it in.
Trim around the edges, glue it to the construction paper tree, and fix it to the base—and it’s done! Changing the color of the construction paper tree or the colors and patterns of the transparent origami will create a different vibe, and kids will surely love it when it’s displayed.
Stained-glass-style tree made with aluminum foil
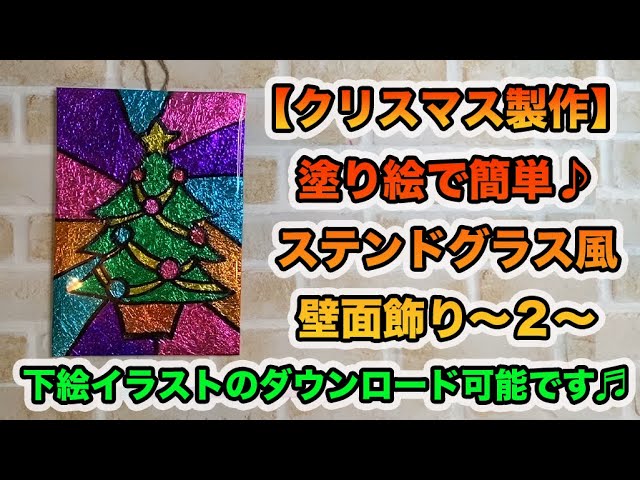
A Christmas decoration that evokes stained glass and can be made without using real glass.
First, draw a Christmas-themed illustration.
Place transparent tape over the illustration and trace the lines with a thick marker like a Magic Marker.
Add lines in the blank areas of the tape, then flip it over and start coloring.
By coloring the blank areas in a variety of colors, you can create the vibrant look unique to stained glass.
Place the illustration on a piece of thick paper wrapped in aluminum foil, fold any excess around to the back, and secure it with tape to finish.
Give this translucent wall decoration a try!
Christmas garland made with raffia tape (suzuran tape)

At parties, the most commonly used wall decoration is the garland.
Many people may not be familiar with the term, but a garland is a string-like decoration made by braiding or twisting materials together.
There are many types, such as ones with little flags or artificial flowers.
A simple way to make one is to use raffia tape (suzuran tape).
You don’t need any special tools, so even small children can give it a try.
Garlands also pair well with other wall decorations.
Scratch art Christmas tree

Scratch art is also drawing attention as a form of educational play.
What’s more, by adapting scratch art, you can easily create sophisticated Christmas decorations.
One item I especially want to highlight is a scratch-art Christmas tree; display it in your room and it will create a magical atmosphere.
You can also cut out pieces of scratch art to make ornaments.
Another fun idea is to prepare a large scratch-art sheet and draw Christmas illustrations together as a parent and child.
Scratch art offers endless possibilities depending on your ideas, so be sure to give it a try.
Origami: Santa Claus

Would you like to make a Santa Claus using a single sheet of origami paper? First, place the red origami with the back side facing up in a diamond orientation.
Crease both vertically and horizontally, then fold the top so it meets the center, shaping the tip into a trapezoid.
Fold the bottom up to the center as well, then fold it back down.
Turn it over, fold along the lines on the left and right, and collapse along the central crease.
Repeat folding so the edges align with the outer border, and your Santa is complete.
You can add a face with a pen or stickers for a nice touch.
3D Christmas tree mobile made with drawing paper

If you want to give your room a dreamy, magical atmosphere, why not try making a mobile? A mobile is an interior decoration that hangs from the ceiling.
In Japan, it’s often associated with rooms for babies.
There are two main ways to make one.
The first is to hang objects with wire.
The second is to create a base by combining straws and then hang paper cutout objects from it.
The latter allows for a wider variety of designs.
It can also be fun to hang Christmas tree ornaments along with it.
Useful for childcare! Let’s make Christmas decorations using familiar materials (21–30)
How to make handprint reindeer and Santa

Here are some craft ideas for making Santa Claus and a reindeer using handprints.
For Santa, use a handprint to create his beard, and for the reindeer, use a handprint to form the face.
Since Santa’s beard uses an upside-down handprint, make sure to pay attention to the direction when stamping.
The faces are made with round stickers, so the children can also enjoy sticking the stickers.
Once Santa and the reindeer are finished, glue them onto a base with a construction paper Christmas tree attached.
Be sure to decorate the tree with round stickers as ornaments, too!