Helpful for childcare! Let's make Christmas decorations using familiar materials.

Christmas is full of fun things like presents from Santa and delicious cakes, isn’t it?
How about making Christmas decorations with the kids to get ready for the holiday?
A dazzling lineup of festive, cute items you’ll want to display for Christmas—like trees, wreaths, and snow globes!
They’re easy to make with everyday materials, so they’re perfect not only for preschools and kindergartens but also for doing at home.
Place them on desks or lockers, stick them on the wall—decorate your space in all kinds of ways and build up that Christmas spirit!
- Christmas card ideas to make with children: great for both preschool and home
- Easy Christmas crafts to enjoy with kids! Make them with everyday materials.
- Christmas Crafts to Enjoy with Kids: A Stylish and Easy Idea Collection
- [Age 3] Let’s Make It at Nursery or Kindergarten! A Collection of Christmas Craft Ideas
- December origami! Simple ideas for Santas and wreaths that kids can enjoy in childcare
- Handmade Christmas present ideas! A collection of fun ideas for nurseries and kindergartens
- [Handmade] A Homemade Christmas Present for a 2-Year-Old
- Preschool: Easy and cute Santa craft ideas
- [Childcare] December Wall Decoration Ideas: Festive Crafts for Christmas and Winter
- [Childcare] Christmas wall decoration ideas
- [December Wall Decorations] Christmas Trees and Wreaths! Ideas You Can Use in Childcare
- December craft ideas! A collection of childcare activities to enjoy with Christmas and winter themes
- Christmas wreaths to make in childcare! A collection of handmade ideas to enjoy with children
Helpful for childcare! Let's make Christmas decorations using familiar materials (51–60)
Cute yarn paper plate decoration

Here’s an idea for an easy, seasonal decoration.
First, prepare a paper plate and paint it navy blue to create the base.
Wrap some clear tape around the tip of green yarn, then punch holes in the plate in the shape of a Christmas tree.
Thread the yarn through the holes, and the outline of the tree will gradually appear.
Once the shape looks right, attach decorative stickers and a star ornament to complete the tree.
You can add white round stickers around it to create a snowy atmosphere.
Finally, punch a hole at the top and tie a ribbon, and your cute decoration is finished.
With color and decoration tweaks, it’s a fun winter craft to enjoy with children.
White Christmas tree made with paper doilies
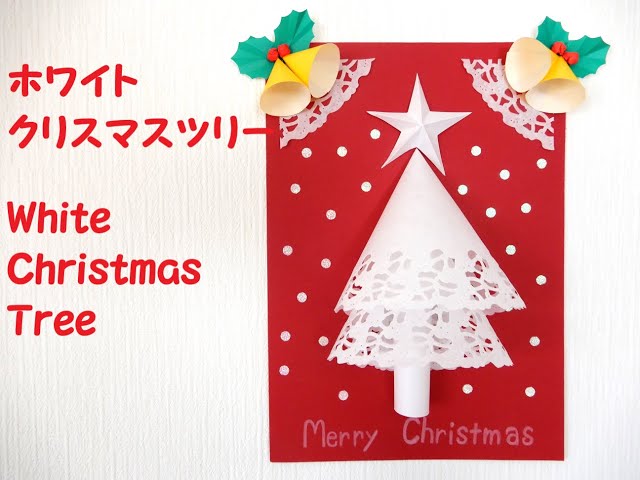
Set a red construction paper as the background and decorate it with a Christmas tree made from white paper doilies for a festive, seasonal wall display.
Shape the tree into a cone and stack two cones to add depth.
Roll a small tube to represent the trunk.
Attach a bell and holly ornament to the top corner, and scatter white round stickers to create a snowy effect.
The contrast of white and red stands out, resulting in a finish that feels both vibrant and warm even with simple materials.
It’s an easy, cute Christmas craft you can enjoy decorating together with children.
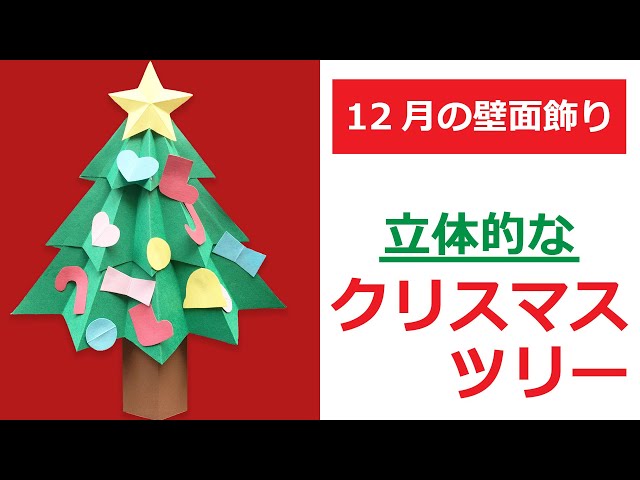
Make it with origami! A simple Christmas tree

Stick pieces onto the wall and you’re done! Here’s a wall decoration idea with simple steps.
Prepare green-toned origami paper, red origami, yellow origami, brown origami, blue-toned origami, tape, scissors, and so on.
Use green origami cut into triangles to create the base of a Christmas tree.
Combining not only green but also light green and dark green will add depth to the colors.
It’s also recommended to make paper-cut snowflakes to decorate—this adds a nice seasonal touch!
Construction paper Christmas wreath

It would be wonderful if we could make a three-dimensional Christmas wreath using construction paper.
Let’s create a gorgeous, eye-catching wall display that makes you look forward to the Christmas season! You’ll need construction paper in various colors, scissors, a craft knife, glue, paste, tape, and so on.
One of the great things is that you can customize the method, size, and design.
How about making it together with the kids—perhaps a colorful tree, or a tree that looks snow-covered by using cotton? Wishing you a fun and festive Christmas!
Helpful for childcare! Let’s make Christmas decorations using familiar materials (61–70)
Three-dimensional Christmas tree wall
Even if you can’t display a real Christmas tree, this is a lovely idea to brighten up your room.
When you think of Christmas, many people probably picture a tree, right? This time, let’s make a three-dimensional, charming Christmas tree using construction paper.
The materials you’ll need are green construction paper, red construction paper (and other colors if you like), a template, scissors, a stapler, glue, and a ruler.
It’s also fine to choose any colors you like for the construction paper besides green.
Since some steps in making the tree involve small, detailed work, it’s best for children to do this together with a teacher or guardian.
Easy paper-plate Christmas tree

First, fold a paper plate and cut along the crease to divide it into four equal parts.
Tear green origami paper into small pieces, as you would for a collage, and paste them on to represent the leaves of a Christmas tree.
If you layer and attach the paper plate pieces with double-sided tape, you’ll create bumps and add a three-dimensional effect.
Stick on stickers in your favorite colors to light up the tree, then add a star ornament at the top.
Finally, make a trunk with orange origami paper and attach it, and your Christmas tree is complete.
It’s a Christmas craft that uses simple materials but can be made festive with a bit of creativity.
Cute Minnie Santa origami

Let’s make a Minnie Santa with origami! It’s cute to stick on the wall as is, and it would also look great combined with other Christmas-themed origami pieces to create a garland or hanging decoration.
First, use one sheet of origami paper to make the face, body, and hat.
Then use several other sheets to make the ears, bow, and scarf.
Since there are parts that require cutting, prepare scissors, a pen for drawing the face, and glue for assembly.
There aren’t any complicated steps, but because you’ll be putting several pieces together, fold each part carefully, one by one.