Grape craft ideas to enjoy in childcare! Have fun making autumn fruits


When autumn arrives, grapes are a popular craft theme in nurseries and kindergartens.
Their sweet, abundant feel makes them a big hit with children! The unique shape of grape clusters and their colorful hues are also very appealing as a creative theme.
In this article, we’ll introduce fun grape craft ideas using various materials such as bubble wrap stamps, bubble art, and tissue paper.
These activities are easy to adapt to different developmental stages, from infants to older preschoolers.
秋の壁面装飾にもぴったりです——ぜひ子どもたちと一緒に作るのを楽しんでください!子どもたちの作品は芸術作品として扱うため、本文では「制作(seisaku)」という用語を使っています。
- Exciting September crafts for 4-year-olds! A special collection of fun ideas with autumn-themed motifs
- September crafts for 2-year-olds! A collection of make-and-play ideas to enjoy autumn
- [Childcare] For 5-year-olds! Autumn craft ideas
- Autumn craft ideas that will captivate 2-year-olds! Have fun making them and enjoy the fall to the fullest
- Ideas for September Crafts for 1-Year-Olds: A Fun Collection of Autumn-Themed Projects
- September: Autumn crafts! Ideas you can use in childcare
- [Childcare] Autumn craft ideas
- [October] Craft ideas for fall you can use in childcare
- [Autumn Activities] Nature Play and Craft Ideas for Fall to Incorporate into Childcare!
- Preschool: Autumn-Themed Craft Ideas Recommended for November
- Craft ideas for 4-year-olds to try in autumn! Enjoy creative activities with seasonal motifs and events.
- Recommended for 5-year-olds’ September crafts! A collection of ideas to enjoy autumn
- [Childcare] November wall decorations and autumn craft ideas
Grape Craft Ideas to Enjoy in Childcare! Have Fun Making Autumn Fruits (21–30)
3D grapes made from toilet paper
Glue purple origami paper onto a toilet paper roll and cut it into 1 cm-wide rings.
On the base, arrange and glue them in four tiers of 4, 3, 2, and 1.
Paint the insides with purple paint.
Attach a stem and leaves cut from construction paper, and your grape cluster is complete.
When attaching the origami paper to the toilet paper roll, be sure to apply glue across the entire sheet so it adheres firmly.
If it’s not well attached, it may peel off when you cut it.
Grapes are typically purple, but it’s fine for children to paint them in whatever color they imagine grapes to be.
Let’s make grapes using bubble wrap!
@hoiku.labo Perfect for autumn! Let’s make grapes using bubble wrap 🍇 Preschool craft | For childcare workers | Easy craft to do with kids | Bubble wrap | Construction paper | Grapes | Autumn crafts
♪ Original Song – Hoiku Kyujin Labo – Hoiku Kyujin Labo | Nursery Teacher Job Changes and Helpful Information
Here’s a craft idea for making grapes using bubble wrap.
Stick bubble wrap onto light purple construction paper and cut it into a grape shape.
Attach a stem made from brown construction paper, then use a permanent marker to color in each round bubble one by one.
There are many, so it can be a bit of work, but keep at it patiently.
Once you’re done coloring, your grapes are complete! Display them in your room to enjoy an autumn vibe.
When you’re finished using them as decorations, it could be fun to pop the bubble wrap and play with it.
Three-dimensional grapes with just one sheet!

Cut a sheet of construction paper into a rectangle and make two slits at each end.
On the left side, roll the middle section with slits toward the front and glue it, then roll the remaining sections toward the back and glue them.
On the right side, roll the middle section toward the back and glue it, then glue the remaining sections toward the front.
Fold the paper in half so the rolled parts form three rows, then cut along the fold with scissors to shape the stem.
Make leaves and vines out of origami paper and attach them to the grapes to finish! Try making them in various colors.
Swirly Grapes
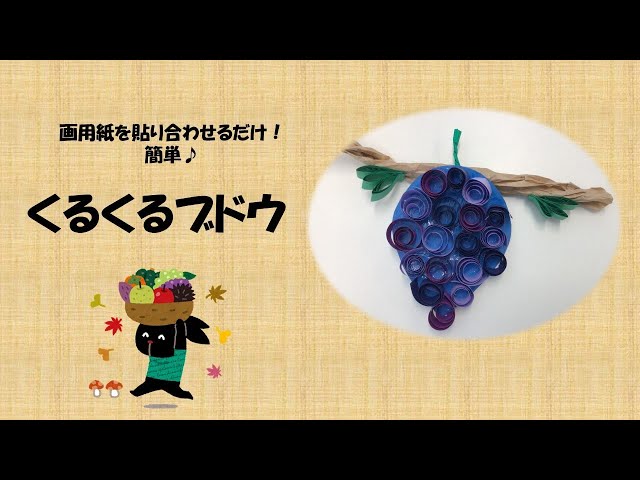
When it comes to the king of autumn flavors, grapes surely take the crown.
Let’s make a seasonal craft by rolling construction paper.
Prepare construction paper, scissors, and glue.
Cut the construction paper into a teardrop shape to create the base for the grapes.
Cut long, thin strips of construction paper and roll them tightly with your fingertips to form grape shapes.
Glue the rolled “grapes” onto the base in a three-dimensional way, making sure there are no gaps.
Finally, cut and roll green construction paper to make the stem and cluster top, then glue it on to finish.
Try making it while paying attention to finger dexterity, size, and overall balance.
Easy grapes—just put them in a plastic bag

Let’s make grapes by crumpling tissue paper—an activity kids can enjoy from around age one.
Prepare a clear plastic bag, tissue paper, and a pipe cleaner.
Shape the clear plastic bag into a triangle, then crumple the tissue paper into small balls to make grape berries.
Put the berries into the bag and twist the opening closed with the pipe cleaner.
Once your 3D grape cluster is done, add a leaf made from a handprint and create a wrinkled pattern on it to finish.
This is a craft that children around one year old, who love squeezing and crumpling, can enjoy.
Give it a try!
Super huge! Tissue paper grapes

Here’s an idea that’s perfect when you want to make an impactful autumn wall display.
Stack several sheets of tissue paper and accordion fold them.
Once folded, tie the center with wire.
Gently pull apart the layers of tissue paper one by one from the inside; when all the layers are fluffed, shape it into a round form.
This makes one grape.
Make eight of these, then arrange them in four rows as 3, 2, 2, and 1.
Glue them onto the base, and add a stem made from construction paper and leaves made from tissue paper to finish.
When you display it on the wall, adding a vine is a nice touch too.
Grapes wreath
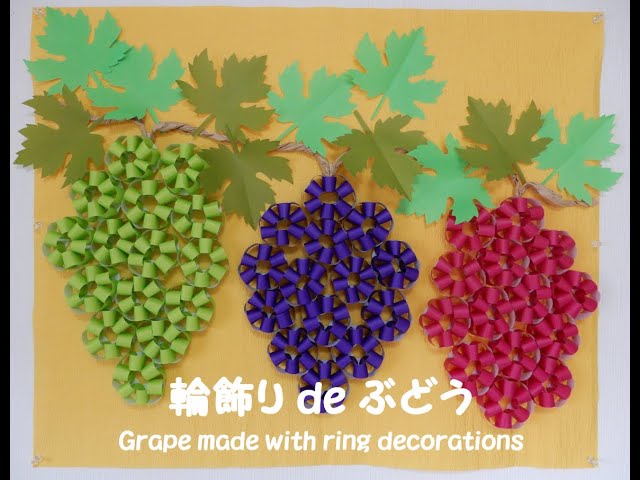
Using origami to make delicious-looking grapes is also perfect as a craft that stimulates fine motor development.
Prepare origami paper, glue, and scissors, and let’s get started.
Cut the origami into strips with scissors and glue the ends to make loops.
Make a total of 12 loops.
Glue the loops together to form a bunch of grapes.
If you use light green origami, you can make Shine Muscat grapes.
You can also make leaves and the stem, which might be fun for wall displays and other decorations.