[For Kids] Handmade Headband Ideas Collection

When it comes to items that can be used to tie up hair or to transform cutely as part of a cosplay outfit, a classic pick is the headband.
If you’ve come here now, you’re probably thinking, “I want to make a headband by hand.”
In this article, I’ll be introducing a roundup of handmade headband ideas!
We’ve selected a wide range—from easy, quick projects to more authentic pieces that involve sewing.
If you want to make accessories with your child, or you’re planning to handcraft costumes for a school play, recital, or Halloween, be sure to use this as a reference!
- [For Kids] Handmade Headband Ideas Collection
- [For costumes and cosplay] How to make a cute bunny-ear headband
- [Childcare] Simple DIY ideas you can use for pretend shops
- [Make It With Your Favorite Character!] Handmade Ideas for Disney Ear Headbands
- Handmade Halloween costume ideas! A roundup of outfits you can make with everyday materials.
- [Handmade] Stylish Handmade Headbands You’ll Want to Use for Your Baby
- Fun for 1-year-olds! A collection of Halloween craft ideas you can make while playing
- Simple and cute! Handmade ideas for crib mobiles
- How to make cute cat ears! A collection of ideas recommended for kids and perfect for events
- [Graduation Ceremony] A collection of handmade corsage ideas you can make with your child
- Halloween gets even more exciting! A collection of DIY mask ideas using a variety of materials
- Cute and handmade! A collection of Halloween costume ideas recommended for babies
- [Daycare/Preschool] Let’s Make Handmade Hinamatsuri Costumes! An Idea Collection You’ll Want to Copy
[For Kids] Handmade Headband Ideas Roundup (11–20)
maid headband

Here’s an idea using origami paper and lace paper doilies.
Use the origami paper as the headband base and the lace paper as decoration.
First, cut the origami paper in half, fold each piece in half horizontally to make a crease, then open it.
Fold the top and bottom edges to meet the center crease.
Once both pieces are folded the same way, connect and glue them together.
Next, cut the lace paper doily—removing the solid white center—and trim it to a suitable size.
Glue it little by little to the upper half of the inside of the base, gathering it as you go.
Fold the base in half to sandwich the lace paper and glue it together.
Fold so the lace paper stands up, attach rubber bands to both ends of the base, and you’re done!
Easy cat ears with construction paper!

All you need to do is attach paper cat ears to a simple headband you can buy at a 100-yen shop, and you’re done! The only materials are a basic headband, two colors of construction paper, and glue.
You can just cut the paper into triangles and stick them on, but it might look a bit flimsy.
For sturdier, more realistic cat ears, it’s best to fold the paper to add thickness and dimension.
Changing the color inside the ears makes them look even more lifelike, so try layering two sheets of construction paper to create cat ears with a carefully crafted finish.
[100-yen shop] Headband with arranged/modified vinyl ball
![[100-yen shop] Headband with arranged/modified vinyl ball](https://i.ytimg.com/vi/Bn5ASavSY_U/sddefault.jpg)
Dollar stores sell all kinds of items, don’t they? With a little twist on how you use them, they can transform into something wonderful.
Let’s make headbands that go with Halloween costumes using plastic balls.
You can turn ribbons and round balls into things like cat ears, pumpkins, and bats.
Try cutting felt and sticking it onto the headbands or plastic balls as well.
Since felt is soft and easy to work with, this is a great project to make with kids.
Easy! Handmade cat ears
https://www.tiktok.com/@__.rliq0x/video/7284537142661926146Create your own original ears using your favorite fabric and pattern! Cut the fabric according to the pattern and sew it together.
For a soft, fluffy finish, add stuffing inside the ears at the end.
The finished cat ear pieces are great because you can customize them—attach them to a headband, glue them to hairpins, and more! You can also stick them onto items like a pass case or a compact mirror.
We recommend using long-pile, fluffy fabric! Give it a try.
cat-ear knit hat
https://www.tiktok.com/@zorro_rothello/video/7465280574840671495Let’s make a hat with cat ears that’s perfect from autumn through winter! It’s a great idea for kids who love fashion or cat-themed designs.
The best part is that it can be used not only for events but also in everyday life.
Choosing a fluffy knit material will make it even cuter.
You’ll need yarn, a crochet hook, and a thin black ribbon.
You can customize the ribbon and yarn colors, so pick your favorites.
Here’s hoping it turns into a wonderful hat full of your personal touches!
Cute cat ears you can make with 100-yen shop items
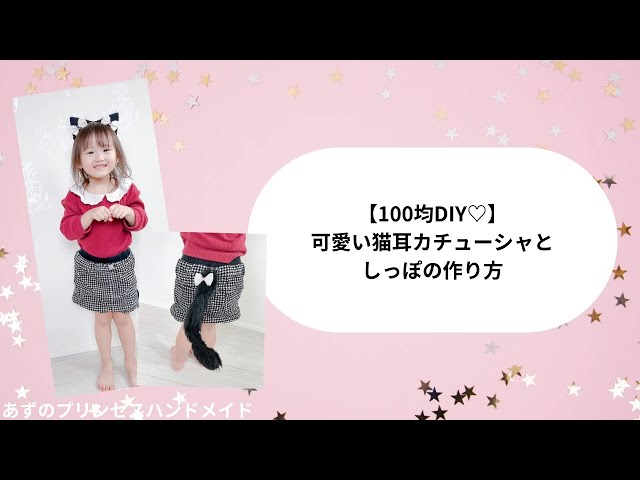
It’s great when you can get all the materials at a 100-yen shop—it makes it easy and fun to give it a try.
This is an idea I’d recommend even to those taking on handmade crafts for the first time! You’ll need items like sponge sheets, a template, scissors, black fabric, a hot glue gun, frilled ribbon, a headband, a lighter, and ribbon embellishments.
Since you won’t be using a sewing machine or needles, it’s easy to start.
Making a matching tail to wear with the headband would be adorable, too! You can enjoy customizing it as well.
[For Kids] Handmade Headband Ideas Collection (21–30)
Become your favorite kitty!

Design your own cat ears and create a one-of-a-kind, special pair just for you! When you think of cat ears, many people might picture black or white ones.
But it’s also wonderful to make a headband packed with kids’ free ideas and favorite designs! You’ll need a headband, fabric, glue, ribbon, cardboard, scissors, glitter paper, and more.
It seems people often choose materials to match certain characters, but using a variety of materials like this can really bring out your individuality!