[For 4–5 year olds] A collection of recommended origami ideas for March—featuring seasonal events and natural motifs

From April, the Year-Middle class will become the oldest big brothers and sisters in the kindergarten.
They’re probably feeling a mix of excitement and nervousness as they look forward with anticipation and a bit of anxiety.
For these Year-Middle children who have grown so much in both mind and body over the past year, the article I’d like to introduce this time is about March origami.
We’re sharing lots of ideas that evoke spring, but consider the origami folded in April, right after they move up to the Year-Middle class, and the origami folded in March, about a year later.
When you compare them, you can really sense each child’s growth—being able to fold finer details, or progressing through the steps on their own.
Teachers, please try folding together with the children, and enjoy feeling their growth along the way.
- [Kindergarten (older class)] What kind of season is March? Let’s make events and natural objects with origami!
- [Origami] Easy spring-themed origami ideas to enjoy with 4-year-olds
- [For 4-5-year-olds] Folding is fun! A collection of January origami ideas to enjoy with preschoolers
- [Childcare] Recommended crafts and activities for March, such as Hina Matsuri (Doll’s Festival) and cherry blossoms
- [Origami] Simple Origami Ideas to Feel the Spring with 3-Year-Olds
- For older kindergarteners: Let’s make it! A collection of recommended origami ideas for February
- [For preschoolers] A collection of origami ideas to enjoy February, including Setsubun and Valentine’s Day
- [For 3-year-olds] Let’s make strawberries with origami! A collection of easy strawberry folding ideas
- Origami perfect for April! A collection of ideas recommended for preschoolers (around age 4–5)
- Recommended for preschoolers! A collection of origami ideas perfect for April
- [Childcare] Recommended for March! A Collection of Craft Ideas to Enjoy with 4-Year-Olds
- Origami ideas perfect for April that will captivate older kindergarteners!
- [Childcare] Perfect for March! A collection of craft ideas recommended for 5-year-olds
[Age 4–5] A collection of recommended origami ideas to make in March—events and nature themes (21–30)
Origami four-leaf clover
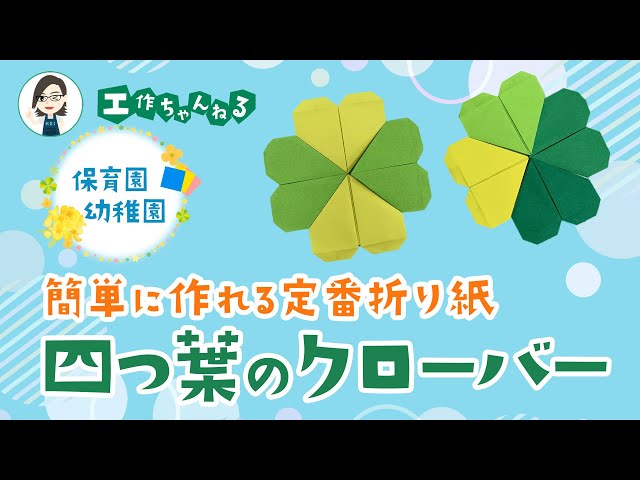
Let’s make a lucky four-leaf clover.
You’ll combine four sheets of origami to create it, but the folding itself is simple, so even children who aren’t used to origami should be able to do it.
Think of it as folding a heart-shaped origami four times.
Once it’s done, you can use it as a wall decoration or paste it onto construction paper as part of a picture.
By the way, the key is to make crisp initial creases.
If they’re misaligned, the whole piece will end up distorted, so be careful.
Candy fits inside too! Cute tulip origami

Let’s use two sheets of origami paper to make a tulip flower and leaves.
First, we’ll make the flower: fold the origami into a triangle.
Once folded, starting from the center of the base, fold the left and right corners upward at an angle to form the petals.
Turn the paper over, then fold the left, right, and bottom corners into triangles, and the flower is done! Next, for the leaf piece, also start by folding it into a triangle.
Fold the top corner down to meet the base.
Flip the paper top-to-bottom, then fold up each half of the base along the center line to create two leaves.
Turn the paper over, fold up the bottom corner, and it’s complete.
Combine the two parts to make a cute tulip.
You can place sweets inside from the top of the flower.
[Year-Round] A collection of recommended origami ideas—events and natural motifs—to make in March (31–40)
Pill bug made from a paper plate

This is a pill bug craft made from a paper plate cut in half that kids love.
First, draw patterns on the paper plate with crayons, then paint over it with black paint.
If you use a white crayon, the patterns will pop out like a resist painting.
After the paint dries, punch evenly spaced holes along the straight edge of the plate, thread short pieces of black chenille stems through, and twist to secure them.
These will be the legs, so attach antennae to the head the same way, then add the facial features to finish.
You can also make a version that curls up and opens out by cutting a round paper plate into six pizza-like slices, punching holes at the corners, and connecting them with split pins.
A simple dandelion flower

Here’s an easy dandelion idea that uses a basic folding method to create a flower shape and is simple to customize.
Fold the paper to align the top, bottom, left, and right edges to make creases, then align the opposite corners to add diagonal creases.
After cutting to the center, make pleat folds along the crease lines and align the inner corners to neaten the shape.
Slightly curl the petals for a softer look.
Glue two identical pieces face-to-face to complete the flower.
Connect a diamond-folded leaf and a made stem to create a cute dandelion.
Making them in different colors is recommended—it looks more festive when displayed together.
candy

Here’s an idea for making candy shapes by cutting an origami sheet in half.
All you need is origami paper in your favorite colors or patterns.
It’s great because you can make two candies from a single sheet! The steps are easy to follow, so it’s a fun project to try.
When you open up the folds with your fingertips, take your time and do it gently without rushing.
Once you master the folding method, you can even play pretend as a candy shop—how fun is that? Give it a try!
peach blossoms

Let’s use origami to make peach blossoms! Prepare double-sided colored origami or washi origami, a pen, and scissors.
Peach blossoms are often confused with cherry and plum blossoms, but let’s capture their distinctive features and express them with origami.
The method is simple: crease and then cut with scissors.
Peach petals are characterized by pointed tips, so keep that in mind when cutting.
You can also make a lovely arrangement by cutting the center and hollowing out the stamens and pistil!
bamboo shoot

In season in spring! Here’s an idea for making bamboo shoots with origami.
All you need is brown origami paper.
Speaking of bamboo shoots, their defining feature is how quickly they grow.
They’re also rich in dietary fiber and nutrients, and their unique texture and aroma are part of their charm.
Let’s try making this seasonal ingredient with origami.
When using this idea to create a bamboo shoot, the key is to make crisp creases and be mindful of the paper’s width.
The step where you fold in the layered paper requires finger strength, so it’s a good activity to do together with a parent or teacher.