[Childcare] Things to make in October! Easy origami ideas

October is a month full of events like sports days and Halloween.
It’s also a great time to play outside and pick up acorns and fallen leaves while out on a walk.
In this article, we introduce origami ideas recommended for October.
We’ve gathered ideas you can use for Halloween decorations and autumn wall displays, such as ghosts, pumpkins, acorns, and ginkgo leaves.
Each idea features simple folds that kids can try, so give them a go if you like.
We also recommend stringing your creations together to make an autumn garland or hanging decoration.
- [Childcare] Simple fall origami ideas
- For 5-Year-Olds: Enjoy Autumn! Easy Origami Ideas
- October origami kids will love! Easy ideas from Halloween to autumn flavors
- [Autumn] Easy Origami Ideas for November
- Fun Halloween Origami for 3-Year-Olds
- [Childcare] For 5-year-olds! Autumn craft ideas
- Simple Origami Ideas to Enjoy in Autumn (For 4-Year-Olds)
- Halloween origami that captivates 2-year-olds! A fun collection of ideas to make together with your child
- October origami for preschoolers: a collection of seasonal ideas
- Let's Make and Display! Origami Perfect for Halloween
- Make October Even More Fun for Preschoolers! A Collection of Origami Ideas
- [Preschool] Recommended for 3-year-olds! Easy-to-make fall origami craft ideas
- [October] Craft ideas for fall you can use in childcare
[Childcare] Things you’ll want to make in October! Easy origami ideas (11–20)
medal

There’s a phrase in Japanese, “autumn is for sports.” Many preschools and kindergartens hold their sports days in the fall.
So let’s make “Well-Done” award medals out of origami! First, using the creases you made in advance, fold in four small squares.
Then, one by one, open and press them outward from the inside to form the circular decorative part of the medal.
Once you’ve gone all the way around, it’s done! You might attach a longer string so the medal can be worn around the neck.
You can also draw patterns on it with a pen, if you like.
It moves! A flapping bat
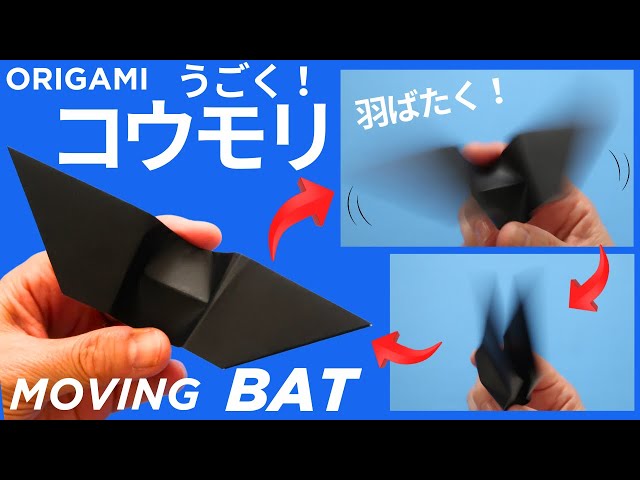
This is perfect for Halloween decorations or toys, with wings that flap amusingly.
First, cut the origami paper into a long rectangle and fold it in half vertically to make a crease.
Then fold both ends into triangles toward the center.
Keeping that shape, fold it in half vertically again, and fold further in the same direction to add a light crease at the center.
Next, flip it over and insert a finger at the center to make two creases.
Reinforce the creases you made earlier, and it’s done! By lightly holding the top and bottom of the center and moving them, the wings on both sides will flap.
Recommended for Halloween! Message Card

Speaking of autumn, it’s the season when mushrooms are delicious.
So let’s make a mushroom out of origami.
First, fold up the bottom edge of the origami paper.
Make sure the folded section and the remaining white section are the same width.
Turn the paper over and fold the left and right edges in to meet at the center.
Open the pockets on both sides and squash them into triangles, then fold the corners on both sides of each triangle inward.
To finish, fold the corners of the stem and the lower part of the cap to round them off.
It would also look cute if you draw a face on it.
Witch hat for Halloween

Here’s an idea for making a chestnut in just seven folds.
First, to create the creases, fold the origami paper in half into a square twice.
Once folded, open it with the colored side facing up.
Fold the bottom edge up to meet the center crease, then flip the paper over and fold both top corners in toward the center.
Finally, fold both bottom corners toward the center to finish.
Turn the origami to the front, and if you draw small black dots on the white part with a pen, it will look even more like a chestnut—highly recommended.
If you want a rounder shape, lightly fold the corners to the back.
Origami Halloween pumpkin
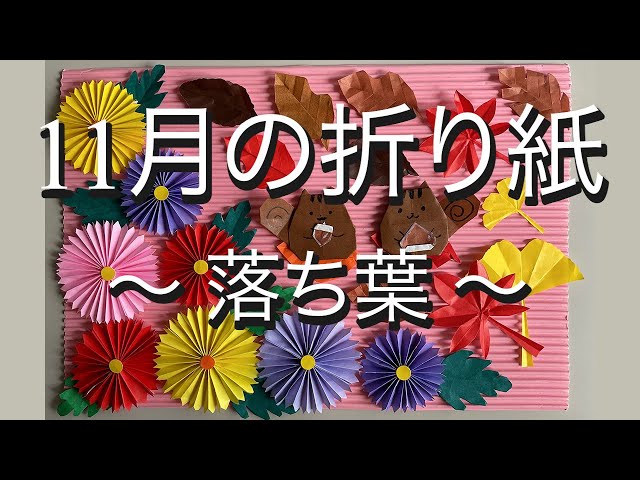
Here’s an origami idea for fallen leaves that also helps kids practice using scissors.
Place the colored side up and fold the paper into a triangle.
Next, make accordion folds from the left edge in 1 cm widths.
Once the accordion folds are done, unfold back to the triangle and fold up the base diagonally so that the left side becomes thicker.
Fold the top corners outward into small triangles, then slowly open the paper.
Tuck the triangular corner tips to the back to shape it like a leaf.
Open the white section on the left edge, make a slit on the opposite side, and form the leaf stem.
After that, add small cuts or folds as you like to give it the look of a fallen leaf.
Origami Squirrel You Can Fold from a Single Sheet!

Here’s an idea for making a squirrel out of origami, perfect for autumn crafts.
First, fold the paper into a triangle.
Then, as if making a paper cup, fold both corners inward so they cross over and overlap.
Turn the paper upside down, and fold the corners you just made upward to create the squirrel’s ears.
Flip the paper over, and fold up one layer of the bottom corner into a triangle.
Fold a small part of that corner to the back to represent the squirrel’s white belly.
Flip the paper over again, fold up the remaining bottom corner, then make a small cut near the left edge and shape it into the tail.
Draw the body pattern and face with a pen to finish.
[Childcare] Things to make in October! Simple Origami Ideas (21–30)
Origami chestnut that folds in seven steps

Let’s make chestnuts, an autumn delicacy loved for their fluffy sweetness.
The folding steps are simple, so it’s great for kids year-round.
Prepare one sheet of origami paper, then fold the top left and right corners along the creases.
Flip it over and fold the bottom part up to about the middle to form the chestnut shape.
Fold the corners of the chestnut inward to round it out, and you’re done.
It’s also fun to try different paper colors like brown or ochre.
Making a chestnut tree together with the kids could be enjoyable, too.