[October] Craft ideas for fall you can use in childcare

October is when you can feel autumn even more strongly, thanks to changes in nature and the climate.
This is a must-read for teachers who are thinking, “I want to enjoy autumn-specific crafts with the children!”
Here we introduce craft ideas perfect for October.
You’ll find a wide range of ideas: themes inspired by Halloween such as ghosts and pumpkins; and themes that feature autumn-only natural items and seasonal tastes like fallen leaves, acorns, mushrooms, and grapes.
We also introduce techniques that stimulate children’s five senses and curiosity, as well as fun ways to use materials that greatly expand their imaginative world—please use them for inspiration.
Because we focus on ideas for creating works that allow children to freely express their individuality, we use the term “制作 (seisaku)” as “creation” or “craft” in the text.
- Preschool: Autumn-Themed Craft Ideas Recommended for November
- [October] Craft ideas for fall you can use in childcare
- [Childcare] Perfect for October! Autumn crafts to enjoy with 5-year-olds
- Ideas for October wall decorations: an autumn wall display that makes use of children’s artwork.
- [Childcare] For 5-year-olds! Autumn craft ideas
- [Childcare] Fun for October! Craft ideas recommended for 4-year-olds
- September: Autumn crafts! Ideas you can use in childcare
- Even 1-year-olds will be captivated! A collection of craft ideas to enjoy the art-filled autumn
- Toddler-Approved Halloween Crafts: Ideas That Captivate 2-Year-Olds
- [Childcare] Perfect for 3-year-olds! October craft ideas
- [October] Craft ideas for 1-year-olds: Halloween, mushrooms, and more
- Craft ideas for 2-year-olds! A cute collection of creations to enjoy October events
- Irresistible for 5-year-olds! A collection of recommended craft ideas for Halloween
[October] Useful for childcare! Introducing autumn craft ideas (61–70)
Saury Origami

Fold the rectangular origami in half lengthwise to make it long and narrow, crease well, then unfold.
Fold the top and bottom edges toward the center crease, leaving a small gap.
Fold the two left corners to the center crease, unfold them, then invert the corners along those creases and squash into triangles.
Turn the paper over, fold the left triangular edge to the center crease to make it narrower, then fold the lower right corner up diagonally to meet the top edge.
Fold it back along the first crease you made.
This will be the fish’s tail, so fold the other side as well and adjust the shape.
Fold the origami along the center creases, draw eyes on the face with a pen, and you’re done.
Origami of acorns and chestnuts

After folding the origami into a triangle twice to make creases, open it up and fold the top corner down to meet the center.
Fold the top edge down to align with the horizontal crease, then fold it down once more along the crease and fold the entire paper into a triangle.
This folded section will become the acorn’s cupule (cap).
Turn the paper over, fold the left and right corners inward so they overlap at the center, then slightly fold in the five corners to refine the shape.
Flip it back to the front, and you’ll have a cute acorn.
This idea works best with double-sided origami paper.
Easy way to make grapes
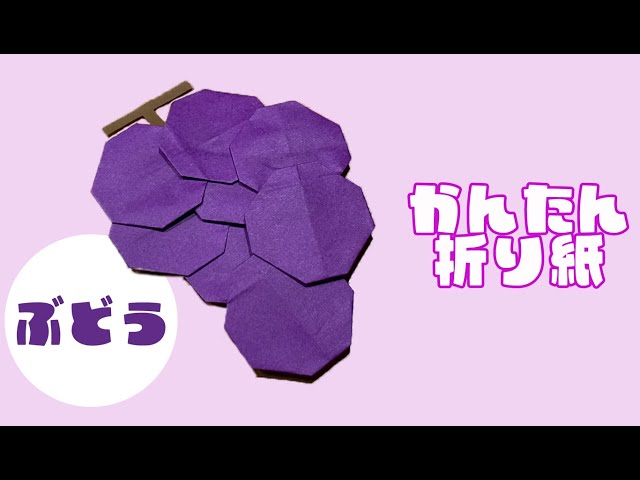
We’ll make this using sheets of origami paper cut in half.
First, fold the origami paper in half vertically, then fold all four corners in toward the crease.
Next, fold it in half so the fold is perpendicular to the first crease.
This will create two 90-degree corners; fold those corners inward toward the center to make creases.
Open it back up, then tuck along the creases to form a square.
Next, take the corner on the closed side of the square and make two small folds; when you open the square, it will look like two quadrilaterals connected together.
Finally, fold the corners to make an octagon, and you’re done.
Make four of these and glue them together to create a bunch of grapes.
Some steps may be a bit hard to understand, so please watch the video carefully as you work.
Since you’ll be making several of the same piece, the children will likely get better at it as they go!
Origami bat

Fold the origami paper twice to make a small triangle, then make a slit under the top corner, parallel to the base.
Make the slit from the side opposite the fold, being careful not to cut it off.
The upper triangular section you slit will become the bat’s head, and the lower part will be the wings.
Open the paper back into the large triangle, and fold the slit section toward the central crease to form the head shape.
Fold the same parts back to create the bat’s distinctive ears.
Use a zigzag (mountain–valley) fold for the junction between the head and body.
Finally, fold the remaining wings several times to add creases and give it a three-dimensional finish, and you’re done.
Cute when lined up! Owls

After folding the origami in half into a triangle twice to make creases, open it up and fold the bottom corner up to align with the center.
Then, fold the bottom edge up along the horizontal crease to form a triangle.
Fold the top corner down to the point where the color changes, and turn the paper over.
Fold the left and right bottom edges toward the vertical center crease, then fold the two top edges so they align just slightly outside the center line.
Fold the two top corners down, and fold the tip up so it sticks out slightly at the top.
Finally, fold the bottom corner up, draw patterns and a face with a pen, and you’re done.
Also recommended for walls! Origami cosmos

Here’s an idea for making cosmos flowers with paper cutting.
Fold a piece of origami paper into a triangle three times to create crease lines, then unfold it back to the state of being folded once.
Fold the bottom edge on the right to line up with the leftmost crease, and fold the bottom edge on the left to line up with the center crease.
Fold the remaining right section along its crease, and fold again along the next remaining crease to stack the paper.
Draw petal lines and cut them out.
When you open it, you’ll have an 8-petal flower.
Slightly overlap the spaces between the petals by folding them, and place a yellow round sticker in the center.
Finally, curve the tips of the petals to give it a three-dimensional finish.
A ginkgo leaf you can make from a single sheet of origami paper

Let’s express the ginkgo leaves that color the autumn scenery vividly using origami.
First, fold the paper into a triangle to make a crease, then unfold it and place the paper so the crease runs horizontally.
Fold the two left edges toward the crease, then rotate and place the model so that the newly formed point faces downward.
Broadly speaking, the upper triangular part will be the ginkgo leaf, and the lower part will be the petiole (leaf stem).
From here, you’ll gradually shape it by adding fine creases, so make each fold carefully and press firmly with your fingers to set crisp crease lines.