[October] Craft ideas for fall you can use in childcare

October is when you can feel autumn even more strongly, thanks to changes in nature and the climate.
This is a must-read for teachers who are thinking, “I want to enjoy autumn-specific crafts with the children!”
Here we introduce craft ideas perfect for October.
You’ll find a wide range of ideas: themes inspired by Halloween such as ghosts and pumpkins; and themes that feature autumn-only natural items and seasonal tastes like fallen leaves, acorns, mushrooms, and grapes.
We also introduce techniques that stimulate children’s five senses and curiosity, as well as fun ways to use materials that greatly expand their imaginative world—please use them for inspiration.
Because we focus on ideas for creating works that allow children to freely express their individuality, we use the term “制作 (seisaku)” as “creation” or “craft” in the text.
- Preschool: Autumn-Themed Craft Ideas Recommended for November
- [October] Craft ideas for fall you can use in childcare
- [Childcare] Perfect for October! Autumn crafts to enjoy with 5-year-olds
- Ideas for October wall decorations: an autumn wall display that makes use of children’s artwork.
- [Childcare] For 5-year-olds! Autumn craft ideas
- [Childcare] Fun for October! Craft ideas recommended for 4-year-olds
- September: Autumn crafts! Ideas you can use in childcare
- Even 1-year-olds will be captivated! A collection of craft ideas to enjoy the art-filled autumn
- Toddler-Approved Halloween Crafts: Ideas That Captivate 2-Year-Olds
- [Childcare] Perfect for 3-year-olds! October craft ideas
- [October] Craft ideas for 1-year-olds: Halloween, mushrooms, and more
- Craft ideas for 2-year-olds! A cute collection of creations to enjoy October events
- Irresistible for 5-year-olds! A collection of recommended craft ideas for Halloween
[October] Useful for childcare! Introducing autumn craft ideas (31–40)
Make a cute bagworm with kraft paper and washi tape!
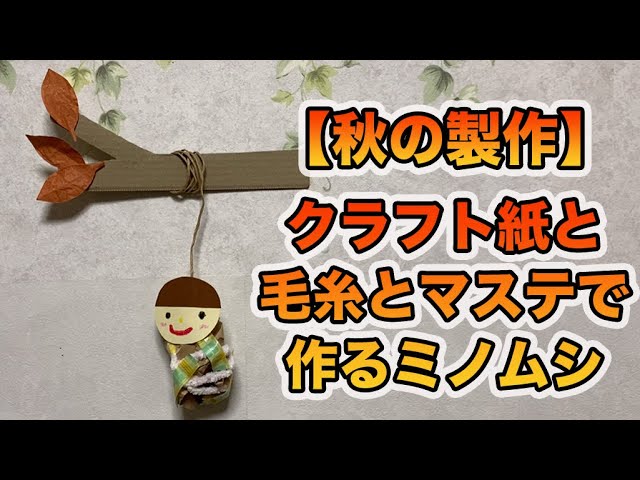
I’ll show you how to easily make a bagworm using kraft paper, yarn, and masking tape! First, roll up the kraft paper to form the body.
Wrap yarn around it and stick pieces of masking tape on randomly.
Next, draw a face on the face parts you made from colored construction paper, then attach it to the body with double-sided tape.
Finally, tape a string to the back of the face with clear tape, and you’re done! If children will be handling it, twine is recommended.
It looks super cute if you also make a tree branch out of cardboard and hang it, so give it a try!
How to fold realistic autumn leaves

Let’s make a realistic maple leaf using a single sheet of origami.
Fold the paper into a triangle twice, squash the pocketed section into a square, then add creases and squash it into a diamond.
Up to this point, it’s the same process as making a crane.
With the side where the corners are not split at the top, fold down the top layer on the front, then flip the paper top-to-bottom and turn it over.
Crease the two-pronged corner, open it up, and squash this part into a small diamond.
Make a cut in the bottom corner to split it into two prongs as well, squash it into a diamond the same way, then fold the tips to create small leaves.
Turn the paper over, fold the left and right corners of the remaining section inward, and make a step fold on the bottom corner.
Finally, fold the left and right corners once more, and you’re done.
Make and Play! Bagworm Kendama

How about turning a kendama—where you balance the ball on the top or on the side cup—into a bagworm (minomushi) version? First, crumple up some newspaper into a ball and shape it with vinyl tape to make the kendama ball.
At this time, attach one end of a piece of kite string (both ends tied in firm knots) to the ball as you tape.
Next, tape the other end of the string to the outside bottom of a paper cup.
Then cut out eyes and a fallen-leaf-like body for the bagworm from construction or origami paper, and stick them around the cup—and you’re done! The ball is easier to catch than with a regular kendama, so kids can have lots of fun playing with it.
Make it with handprints! Wobbly bagworm
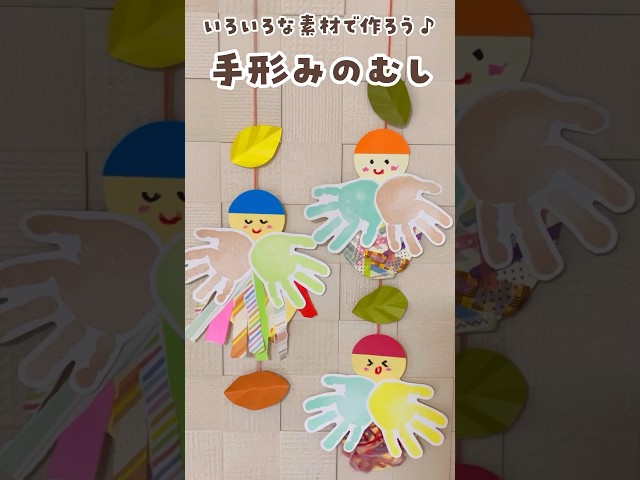
Here’s a craft idea for making bagworms using children’s handprints and footprints! First, create the bagworm’s body out of colored construction paper.
Next, take origami paper in your favorite colors and tear it into long, thin strips.
Paste the strips onto the body with glue, and use the child’s handprints to make a cute outfit.
Draw the face, attach a piece of yarn to hang it, and you’re done! You can also decorate with yarn instead of or in addition to origami paper.
Making lots in different colors and displaying them looks super cute, so it’s highly recommended.
Be sure to have fun tearing and pasting together with the kids!
Hanging grape decoration made of origami

How about an idea for grapes made with paper chains, a classic birthday decoration? Cut origami paper into long, thin strips, glue the ends together to make loops, and link them to represent the grape berries.
Once you have three chains of different lengths, thread them onto a long, thin strip of paper to gather them, add leaves, and you’re done! For the berries, we recommend purple origami in varying shades.
The paper used to gather them will be the stem, so green or brown would work.
By the way, they say grapes with a nicely green stem are the tastiest.
[October] Useful for childcare! Introducing autumn craft ideas (41–50)
Cosmos wreath you can make with origami

Use four 7.5 cm origami sheets for the cosmos and four 15 cm sheets for the base.
First, fold a 7.5 cm sheet into a triangle, then cross the left and right corners inward and fold so they overlap neatly.
Fold the folded sections back to align with the outer edges, crease well, then open those parts and squash-fold them flat.
Tuck both corners of the squashed section to the back, and cut small triangular notches into the three top corners—this completes one petal piece.
Glue four pieces together to make the cosmos, and place a round sticker in the center.
For the base, fold the top and bottom corners to the center of the paper, then fold the whole thing in half by overlapping top and bottom.
Aligning with the top left and right corners, fold the bottom edge up on each side; once creased, squash-fold those sections.
Make four of these, glue them into a circle, and attach the cosmos to finish the wreath.
Making the cosmos in different colors will look bright and festive.
Yarn Winding! Bagworm Ornament

Let’s try making a bagworm craft that also lets you have fun with yarn.
First, glue colored construction paper onto white construction paper and cut it into an egg shape.
Make small slits around the edge, then wind the yarn around and around, tucking it into the slits as you go.
Wrap gently so the paper doesn’t warp, but firmly enough that the yarn doesn’t loosen and come off.
Once you’ve finished wrapping the yarn, decorate the case with round stickers, draw the face with a pen, add a touch of pink to the cheeks with blush, and you’re done!