Let's make toys with paper cups! Simple and fun handmade toys

Let me introduce some handmade toys using paper cups!
If “store-bought toys get boring quickly” or you “want to do crafting play with your child,” try making toys with easy-to-find paper cups.
We’ve gathered ideas that children of preschool and kindergarten age are sure to love, so have fun!
Paper cups, which we usually use for drinking, can move or even become musical instruments! They’ll surely make kids’ eyes sparkle with interest.
- Paper cup crafts that elementary school kids will love! A collection of fun project ideas
- Let's play with paper cups! Crafts and indoor play
- A simple yet amazing craft using paper cups! An idea that’s also great for independent research projects.
- [Craft] How to Make a Paper Cup Rocket: Ideas to Make It Fly Far
- It's fun to spin! A collection of DIY toy ideas
- A roundup of recreational activities and games using paper cups
- Let's make toys with milk cartons! Easy and fun DIY crafts!
- Handmade games: DIY craft ideas you can make and play
- [Nursery/Kindergarten] Crafts you can play with after making them
- Fun and easy toy ideas made from empty Yakult bottles
- [For Kids] Today’s Handmade Craft Ideas
- [Make with Kids] Handmade Outdoor Play Toy Special
- Fun crafts using straws
Let's make toys with paper cups! Easy and fun handmade toys (1–10)
crane game

Many people love crane games, don’t they? That thrill of not knowing whether you’ll grab the prize or not is addictive.
There’s actually a way to make a DIY crane game using paper cups.
First, cut eight slits into a paper cup and remove four of them.
That gives you four arms.
Next, insert a straw through the bottom and connect it to another paper cup, and you’re done.
The closing motion when the arms retract into the paper cup recreates the grabbing action of a crane game.
Kendama

We’re going to make a kendama shaped like a bagworm! First, glue leaves and pieces of origami or construction paper cut into leaf shapes and bagworm eye shapes around a paper cup.
Next, crumple some newspaper into a ball and attach a piece of kite string about 30 cm long to it.
Reinforce the newspaper ball by wrapping vinyl tape or similar around it so it doesn’t fall apart.
Finally, attach the other end of the string (the end not attached to the newspaper) to the bottom of the paper cup, and you’re done!
puppet

Let’s make a cute puppet with a paper cup.
First, make a hole in the bottom of the cup so you can insert your finger and move it.
Next, use felt or colored paper to create the face and clothes.
For the eyes and mouth, it’s best to stick on round-cut paper or stickers.
If you use yarn for the hair, it will look more realistic.
Once it’s finished, come up with a story with your child and act it out together.
You’re sure to have a wonderful time.
If everyone makes them together at a nursery school or kindergarten, they can also learn the importance of cooperation.
Let's make toys with paper cups! Simple and fun handmade toys (11–20)
Gashi-Gashi Hand
Why not make a “Grabby Hand” with a uniquely addictive motion? First, prepare two paper cups.
In one cup, cut slits to match the shape of a hand; once you’ve formed five fingers, fold them back to the opposite side.
Next, make about a 2-centimeter slit at the tip of a straw and staple it to the center of the hand-shaped cup.
Finally, poke a hole in the center of the bottom of the other paper cup and thread the straw through—done! Move the straw up and down, and the paper-cup hand will open and close, letting you grab paper scraps and more.
It’s fun to use during cleanup, and if you prepare lots of paper balls, you can even have a ball-collecting race with everyone and really get the excitement going!
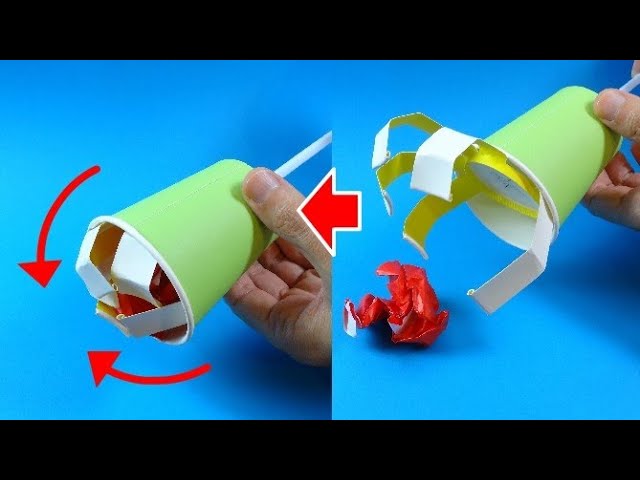
Paper cup Tyrannosaurus

Pull the tail and the mouth snaps open! This is an irresistibly cute paper-cup Tyrannosaurus! Cut the rim of a paper cup and make two slits on the side; when you open it up, it becomes the T.
rex’s wide-opening mouth.
Use an awl to make a hole in the bottom, and thread a string through.
Make holes in the bottom and side of another paper cup for the body, then thread the same string from the bottom to the side—mechanism complete.
Finish it as a dinosaur using construction paper and markers, and cover the pulling section to look like a tail with construction paper, etc.
[With paper cups] Moving Orihime and Hikoboshi
![[With paper cups] Moving Orihime and Hikoboshi](https://i.ytimg.com/vi/m0xYaXTZ9zw/sddefault.jpg)
How about making Orihime and Hikoboshi figures that wobble and sway so you can play with them after you make them? Prepare two paper cups, flatten and fold the rims of each.
Tape the flattened parts so they don’t spread, then cover the cups with your favorite patterned origami paper from the top to create their kimonos.
Next, make the faces and stick them onto the cups—and you’re done! You’ll have cute little roly-poly dolls.
Depending on the children’s ages, teachers should handle preparing small parts and some of the steps in the process.
Paper Cup Bowling

How about an easy-to-make bowling game using paper cups? You could simply place the cups upside down, but they don’t knock over easily that way, so let’s make pins by connecting two paper cups at their rims.
It’s a good idea to put a few marbles or small stones inside as weights.
Then decorate them however you like—draw pictures, add stickers, or glue on origami paper! For the ball, crumple up newspaper or flyers into a ball and wrap it with tape or origami paper to finish.