Let's make toys with paper cups! Simple and fun handmade toys

Let me introduce some handmade toys using paper cups!
If “store-bought toys get boring quickly” or you “want to do crafting play with your child,” try making toys with easy-to-find paper cups.
We’ve gathered ideas that children of preschool and kindergarten age are sure to love, so have fun!
Paper cups, which we usually use for drinking, can move or even become musical instruments! They’ll surely make kids’ eyes sparkle with interest.
- Paper cup crafts that elementary school kids will love! A collection of fun project ideas
- Let's play with paper cups! Crafts and indoor play
- A simple yet amazing craft using paper cups! An idea that’s also great for independent research projects.
- [Craft] How to Make a Paper Cup Rocket: Ideas to Make It Fly Far
- It's fun to spin! A collection of DIY toy ideas
- A roundup of recreational activities and games using paper cups
- Let's make toys with milk cartons! Easy and fun DIY crafts!
- Handmade games: DIY craft ideas you can make and play
- [Nursery/Kindergarten] Crafts you can play with after making them
- Fun and easy toy ideas made from empty Yakult bottles
- [For Kids] Today’s Handmade Craft Ideas
- [Make with Kids] Handmade Outdoor Play Toy Special
- Fun crafts using straws
Let’s make toys with paper cups! Simple and fun handmade toys (21–30)
frolicking paper cup ghost

The moment you saw “a frolicking paper cup,” you probably thought, “What on earth is that?” But if you actually make one, it’s exactly that—and it’s really fun! First, make two slits on opposite sides near the rim of the paper cup.
Next, loop a rubber band around a battery and secure it with tape.
Then hook the rubber band attached to the battery onto the slits in the cup, and you’re done.
Twist the battery to wind up the rubber band, set the cup on a table, and let go of the battery… The paper cup frolics around beautifully.
If you draw a ghost or an animal on the cup, it looks adorable and somehow even more excited—you won’t be able to help laughing! Be sure to try it with your child and have fun together.
Kids and adults alike will get hooked! Paper cup claw machine
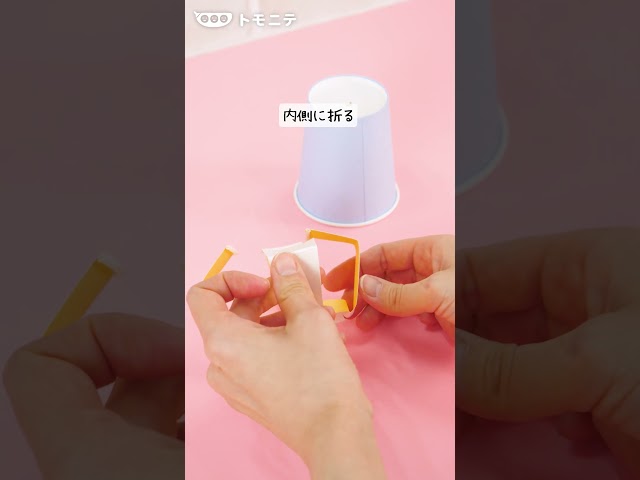
A crane game you can make with paper cups that fascinates both kids and adults.
Punch small holes in the bottoms of two paper cups, fold them into eight equal sections, and alternate the folds back and forth.
Leave four of the sections as slits to create movable parts.
Next, insert a straw with cuts in it to act as the arms and provide movement.
Connect that straw section to the other paper cup, and you’ve completed a mechanism that can be operated like a crane.
By adjusting how you move it, you can enjoy grabbing prizes.
It’s relatively easy even for beginners at crafting, and the materials are simple to prepare.
It’s a fun idea that you can get excited about making together with kids—and have a great time playing with afterward.
Let's make toys with paper cups! Simple and fun handmade toys (31–40)
paper cup light
@chooobo2 This time, I’m introducing how to make the “Original Light from a Paper Cup 💡” that we’ll create in the workshop on November 16 ✨ The picture you draw will glow in the dark 😳! Since Christmas is coming, I drew a tree! Depending on age, just coloring and adding stickers is enough—the pen colors and sticker shadows glow and look so cute 🩷 This time I drew on a clear file, but drawing directly on plastic wrap is also OK 🙆♀️◎ (Use a transparent clear file.) Using a clear file makes it easier to draw than on plastic wrap, and the finished piece is less likely to break! Workshop details are posted in the Instagram Highlights!Made in DecemberChristmas craftsChristmas partyTranslation#HandmadeToysPaper cup craft
♬ All I Want for Christmas Is You – Mariah Carey
Let’s make an exciting item using a paper cup! First, cut a piece of a clear file (plastic folder) to match the size of the paper cup’s rim.
Use a permanent marker to draw any picture you like.
Next, cut out the bottom of the paper cup and decorate the sides with stickers, etc.
Finally, place the drawing you made on the rim side of the paper cup, cover it with plastic wrap from above, and secure it with a rubber band—that’s it! If you shine a light through the hole where you cut out the bottom and aim it at a wall, your picture will be projected on the wall.
It looks perfect for Halloween or Christmas too.
Try playing with it in a dark room!
a button that makes you want to press it

We’ll make a “you just can’t help pressing it” button out of paper cups.
Wrap a thin strip of masking tape all the way around the middle of a paper cup, then cut along the top and bottom edges of the tape to separate the cup into two parts.
Take the ring where the tape was and attach it vertically to the side with the bottom.
Finally, insert the other paper cup from its wide opening—and you’re done!
Rubber Band Crane Game
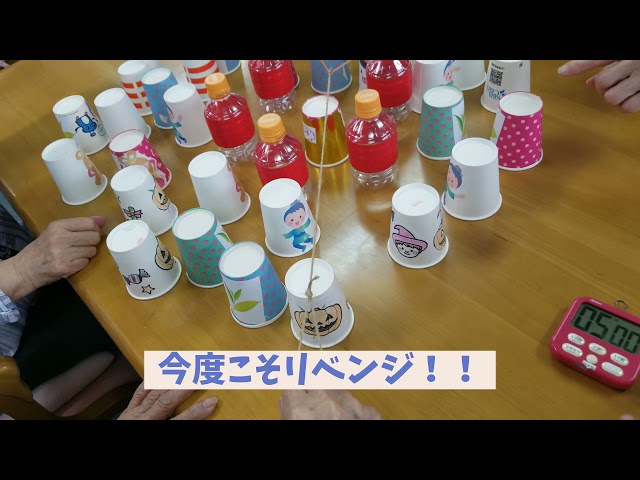
It’s a game where several people hold a tool made by connecting rubber bands and strings, and thread a paper cup through its end to operate it like a crane.
Participants pull the strings together, lifting the paper cup while keeping their balance.
Placing the cup in a target spot or stacking it is challenging, requiring cooperation and concentration.
It can be enjoyed by large groups, making it great for parties and school events, and it also helps spark communication.
Although it’s made from simple, everyday materials, it’s captivating and works as a hands-on crafting game—an engaging and appealing idea.
“Wankoppu,” which sounds like a dog’s bark

This is a craft project: a dog mascot made from a paper cup that emits a sound like a real dog when you pull a chopstick attached to its tail.
The key is how to attach the pipe cleaner tail.
Attach a clip to the end of the pipe cleaner, thread it through a hole made in the paper cup, and secure it so that impacts resonate through the cup.
Once this part is complete, decorate the rest using a small paper cup, origami paper, and so on to create the dog’s appearance.
Then, by pinching the pipe cleaner in the gap between the chopsticks and pulling, the pipe cleaner’s vibrations are transmitted to the paper cup, producing a sound that resembles a dog’s bark.
A UFO catcher made with two paper cups
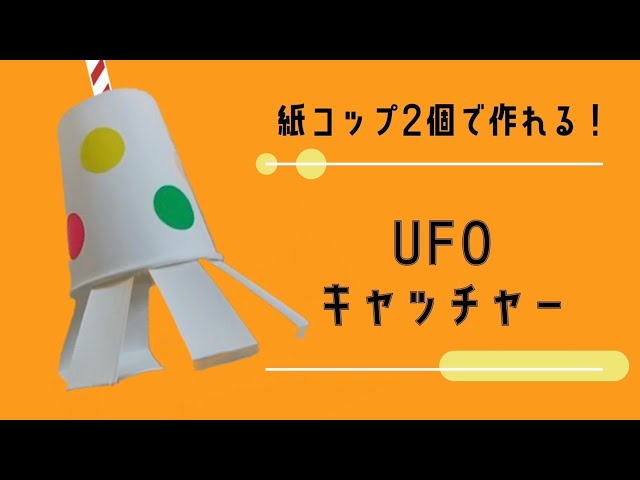
This is a paper-cup craft that lets you enjoy an arcade-like experience using only everyday materials.
Cut slits into the first paper cup, spread them open, and fix a straw in place to create an arm-like mechanism.
Punch a hole in the second paper cup and thread the straw through it to complete a movable arm.
Set lightweight toys or paper-made prizes in place, and kids can enjoy the excitement of aiming and catching them.
Playing with a device they made themselves boosts their sense of accomplishment and helps develop observation and problem-solving skills.
It’s a unique idea that’s both fun and educational, guaranteed to get everyone engaged.