Let's make toys with paper cups! Simple and fun handmade toys

Let me introduce some handmade toys using paper cups!
If “store-bought toys get boring quickly” or you “want to do crafting play with your child,” try making toys with easy-to-find paper cups.
We’ve gathered ideas that children of preschool and kindergarten age are sure to love, so have fun!
Paper cups, which we usually use for drinking, can move or even become musical instruments! They’ll surely make kids’ eyes sparkle with interest.
- Paper cup crafts that elementary school kids will love! A collection of fun project ideas
- Let's play with paper cups! Crafts and indoor play
- A simple yet amazing craft using paper cups! An idea that’s also great for independent research projects.
- [Craft] How to Make a Paper Cup Rocket: Ideas to Make It Fly Far
- It's fun to spin! A collection of DIY toy ideas
- A roundup of recreational activities and games using paper cups
- Let's make toys with milk cartons! Easy and fun DIY crafts!
- Handmade games: DIY craft ideas you can make and play
- [Nursery/Kindergarten] Crafts you can play with after making them
- Fun and easy toy ideas made from empty Yakult bottles
- [For Kids] Today’s Handmade Craft Ideas
- [Make with Kids] Handmade Outdoor Play Toy Special
- Fun crafts using straws
Let’s make toys with paper cups! Simple and fun handmade toys (21–30)
A playable spinning top made from a paper cup

How about making your own traditional New Year’s spinning top this year and playing with it? You can easily make one with a paper cup, a straw, and a plastic bottle cap, so give it a try.
Leave about 5 millimeters of the bottom of the paper cup and cut around it with scissors.
If a child is making it, please have a guardian watch to prevent any cuts.
Once you’ve made slits all the way around, spread them out and draw your favorite patterns.
Make a hole in the bottom of the paper cup, insert a straw cut to about 6 centimeters, and secure it to the cap—that’s it! Spend a fun New Year with a one-of-a-kind spinning top!
Paper Cup Merry-Go-Round

This is a project to make a merry-go-round that spins when you twist a bar sticking out from the side! Make holes in the side and bottom of a paper cup large enough for a straw to pass through, then insert a bendable straw from the side and out through the bottom.
Cut the protruding end into four equal sections, spread them open, and attach a circular piece of paper—now you’ve created the spinning mechanism.
Make the roof and pillar parts from construction paper, hang drawings of characters the children made from the roof, and assemble.
Twist the straw to spin your handmade merry-go-round!
A turtle that runs on rubber power!

Moving toys are appealing no matter how old you are, and they’re especially popular with lower-grade elementary school kids.
This is a paper cup turtle craft that zooms forward using rubber-band power hidden in its shell.
First, cut slits halfway down a paper cup and fold them in to make the legs.
The remaining part becomes the body.
For the face, stick round stickers on as eyes to make it cute.
Take a used AA battery, wrap a rubber band around it, attach kite string with cellophane tape, and set the mechanism inside the turtle’s shell.
Even though it’s a turtle, it moves surprisingly fast and with big motions—so much fun!
clock

You can make a wristwatch with a paper cup! Draw three lines on the side of the paper cup so that they face each other in pairs, and make cuts along the two outer lines.
Cut off the wide outer sections where you made the cuts.
Match the remaining strip to the length of your wrist and add slits.
Use the pieces you cut off earlier to make the second hand and hour hand, and thread them onto twine with a bell attached.
Draw a clock face on the bottom of the paper cup, make a hole in the center, and pass the twine with the bell through it to finish!
A moving ghost toy
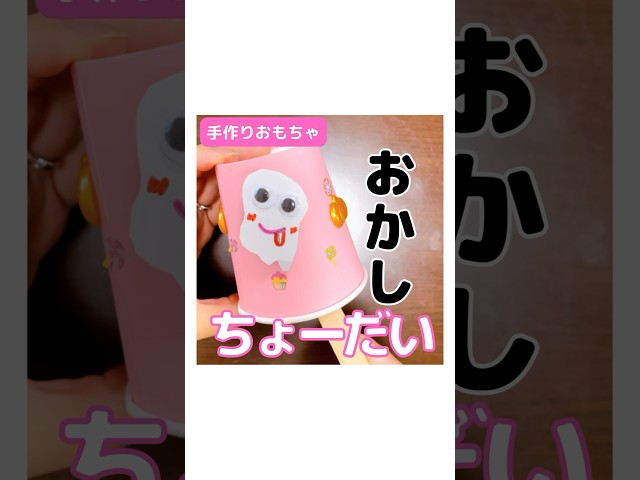
This is a handmade, cute ghost toy that you can move around freely.
It’s very easy to make.
First, decorate a paper cup to create the stage where the ghost will move.
Color it, draw illustrations, and finish it off with stickers if you like.
Next, cut out a ghost from construction paper.
Attach magnets to both a wooden spatula and the ghost.
Make sure to check the orientation of the magnets’ north and south poles so they don’t repel each other.
Once the ghost and the spatula stick together with the paper cup in between, your ghost is ready to fly freely around the world of the paper cup.
It’s also safe to make since it doesn’t involve any cutting with blades.
Snug Little Caterpillar

Let me introduce the Peekaboo Caterpillar that pops out when it sticks with a magnet.
Have the children help by threading pipe cleaners through the holes you make in the decorative balls with an awl.
They can create an original look by choosing the color order of the decorative balls, too.
Cut a plastic wrap tube into different lengths to make cylinders, then cover the outside with construction paper.
Stand the tubes upright on the construction paper, arrange them, and use glue to attach and secure them so they won’t fall over.
Put a magnet into a “Pita” pen (a magnetic pen) to finish—and you’re done! Give it a try!
Frisbee

This is a handmade frisbee made by cutting open paper cups.
Divide the circumference of two paper cups into five equal parts each, and make straight slits down the sides.
Open them out into flower shapes, then decorate one with patterns using pens or stickers.
Place the other paper cup over the opposite side (the side without the drawing) and staple them together to complete a colorful frisbee! Be careful not to pinch your fingers when using the stapler.
Once you’re done, have fun with the frisbee’s unpredictable and amusing movements.