Paper cup crafts that elementary school kids will love! A collection of fun project ideas


By using familiar materials like paper cups, you can easily create projects that make people say “Wow!” There are lots of fun crafts that also let you learn about the wonders of science, such as beads that bounce with sound, pinwheels that spin, and planes that float gently through the air.
They’re perfect for summer vacation research projects, too! Even kids who aren’t good at crafts can make wonderful creations by following the steps.
Here, we introduce a variety of fun and mysterious crafts made with paper cups.
Be sure to read to the end!
- Let's play with paper cups! Crafts and indoor play
- Let's make toys with paper cups! Simple and fun handmade toys
- [Craft] How to Make a Paper Cup Rocket: Ideas to Make It Fly Far
- A simple yet amazing craft using paper cups! An idea that’s also great for independent research projects.
- Fun crafts using straws
- For summer vacation homework! Simple and amazing crafts for elementary school students that you’ll want to make after seeing them
- Simple yet amazing crafts: craft ideas that elementary school students will want to make
- Craft ideas using plastic bottle caps [for boys]
- [Nursery/Kindergarten] Crafts you can play with after making them
- [For Adults] Simple yet Impressive Crafts: A Stylish, Eye-Catching Collection
- Crafts parents and kids can enjoy together. Recommended craft ideas to keep children entertained.
- [Milk Carton Crafts] Fun ideas for elementary school kids. Perfect for summer vacation homework!
- [For toddlers] Simple but amazing craft ideas — including toys they can play with
Paper Cup Crafts That Captivate Elementary School Kids! A Collection of Fun Project Ideas (1–10)
A flying octopus? Tako-copter
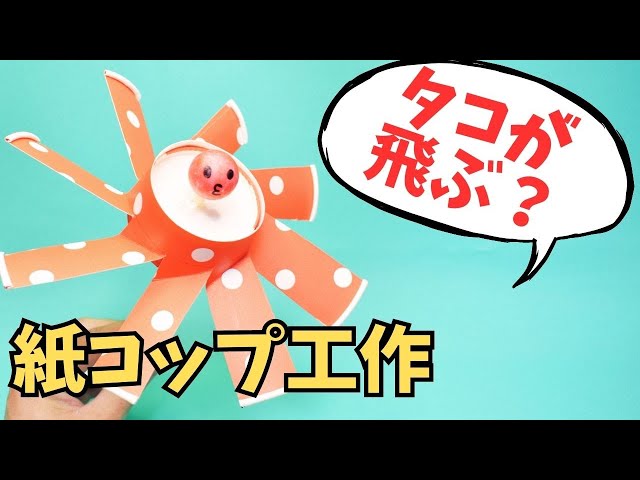
It’s a toy that combines paper cups and a round chopstick to spin like a bamboo-copter and soar into the sky.
By spreading “wings” that catch the wind and coloring it mainly red, it takes on a curious form—a flying octopus.
You’ll use two paper cups and a round chopstick: attach the chopstick and the octopus’s facial parts to a paper cup with only the bottom left to create a launcher.
Then cut slits into the other paper cup, spread it out to form propeller-like blades, and attach it to the launcher to finish.
Fine-tune the propeller angles to make your octopus fly even higher.
Well-spinning paper cup top
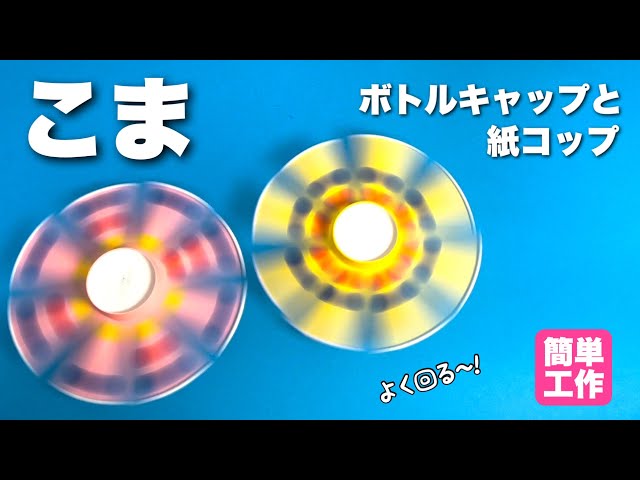
This is a spinning top made with a paper cup that spins well and is fun to watch because of its colorful look.
All you need are a paper cup and two plastic bottle caps.
First, cut slits into the paper cup and spread them out like propeller blades, then attach an axle made by combining the two caps.
That’s enough to complete the basic shape, but it’s recommended to decorate the “propellers” with an eye toward how it will look while spinning.
The impression changes depending on whether you spread the propellers before decorating or decorate first and then cut the slits, so try out various patterns.
Flapping Owl

Let’s make a cute owl with flapping wings! Cut two slits on the sides of a paper cup to form the wings.
Stack another paper cup inside or over it, and cut matching slits in the lower cup so they align with the wings, then attach the two cups together.
Next, cut out eyes, a beak, and properly shaped wings from construction paper, and glue them on to finish.
If you move the lower part of the stacked cups, the wings will flap!
Paper Cup Crafts That Captivate Elementary School Kids! A Collection of Fun Project Ideas (11–20)
Paper Cup UFO Catcher

The “Paper Cup UFO Catcher” is a popular DIY recreation idea you can enjoy with elementary school kids.
Cut eight slits into a paper cup to make tentacle-like arms, then insert a straw through the center to move it.
Place another paper cup over the top and move it up and down—this opens and closes the arms.
The moment it grabs the target is super exciting! It’s easy to make with everyday materials, yet the movement feels authentic and makes it really fun to play.
Figuring out the controls is part of the charm, and it gets even more exciting when friends compete.
It’s a recommended activity that combines the joy of crafting with the sense of achievement from a game.
basket

For children who like papercraft, making a basket using paper cups is recommended.
First, prepare white and brown paper cups.
After cutting slits into each one, weave them together to form the shape of a basket.
It’s a delicate process, but the result is a finely crafted piece.
Using red or blue instead of brown can create a more playful, pop impression.
By the way, the finished basket is perfect for holding small items or displaying artificial flowers.
Paper Cup Frog Puppet

Easy to make! Here’s an idea for a paper cup frog puppet.
Paper cups are familiar items often used in preschools and at home, right? This time, let’s make a frog puppet using a paper cup.
You’ll need a paper cup, a pen, glue or adhesive, round stickers, and scissors.
If you want to be particular about the cup’s color, you can attach construction paper or origami paper to the cup.
By getting creative with how you draw the facial expression, you can make frogs that look different even with the same basic method.
Guitar

A cool, realistic guitar you can make from everyday materials like paper cups and toilet paper rolls! It’s a fun instrument craft that even lower elementary school kids can enjoy, so it’s perfect for a summer vacation project.
Combine a paper cup and a cardboard tube to build the guitar’s base, then hook rubber bands into slits to make the strings.
If you have time, try adding a mechanism that changes the guitar’s sound or make a pick! Use patterned paper cups or decorate it however you like, and you’ll have a one-of-a-kind, special guitar.