Elementary School Students: Simple One-Day Science Project and Craft Ideas


For elementary school summer break projects and crafts, we recommend starting with something your child is already interested in.
When it’s something they like, they can enjoy working on it.
Here, we introduce simple ideas for elementary school students! These are experiments and crafts you can do in a single day.
The materials are things you already have at home or can get quickly, so even if you’re short on time, no worries.
Perfect for those who are “stuck on a theme” or “looking for an easy and fun project”! Find your favorite and give it a try.
- Simple yet amazing crafts: craft ideas that elementary school students will want to make
- For summer vacation homework! Simple and amazing crafts for elementary school students that you’ll want to make after seeing them
- Recommended for elementary school students! Science fair topics & craft ideas
- For upper-grade boys! Simple yet awesome craft project [Don’t call it lazy]
- Simple but awesome! Craft ideas for upper-grade girls
- DIY science projects that elementary school boys will love: ideas you can make with everyday materials
- Simple and cute summer project crafts! A collection of ideas for girls that will make you want to create
- Fun crafts using straws
- [Middle School Students] Easy One-Day Science Projects and Crafts Ideas
- Recommended Independent Research Projects for 5th Graders [Elementary School Students]
- Recommended for lower elementary school students! A collection of plastic bottle craft ideas made with everyday materials.
- Paper cup crafts that elementary school kids will love! A collection of fun project ideas
- Toys you can make from cardboard crafts! Authentic ideas you can build and play with
[Elementary School] Easy One-Day Independent Research & Craft Ideas (41–50)
Sweets Bath Bomb
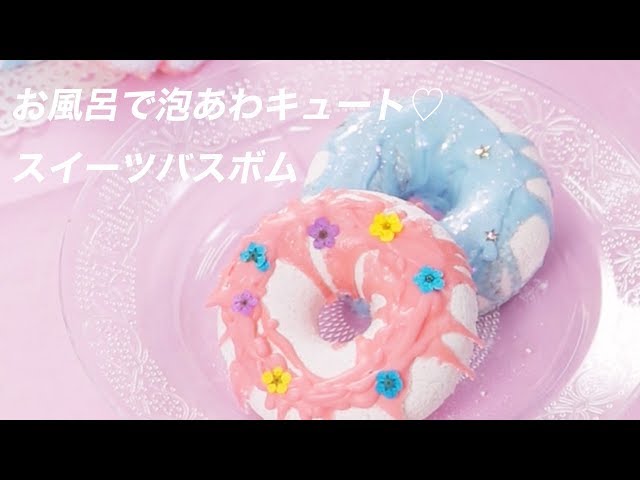
A bath bomb you drop in the tub to enjoy bubbles and fragrance.
How about making bath bombs that look like fake sweets, with attention to appearance? The ingredients for bath bombs are baking soda, citric acid, cornstarch, aromatic oil, and food coloring.
Mix everything thoroughly, then mist with water to moisten until it holds together.
Next, press the mixture into silicone molds, let it set, and dry.
Then melt glycerin soap in the microwave, tint it with food coloring to mimic chocolate sauce, and drizzle it over the set bath bombs.
Try making a variety of sweet-inspired bath bombs—like donut shapes or chocolate shapes—and have fun!
Let’s make Colorful Joy!

Here’s a science project idea using dishwashing detergent that both kids and adults can enjoy! Let’s make “Colorful Joy” using the well-known dishwashing detergent Joy from the commercials.
The key to this project is combining the heavier, double-sanitizing Joy with the lighter, regular Joy.
Pour the heavier one into a glass or plastic bottle first, then gently add the lighter one afterward to create beautiful layers! You can try different color combinations, and it’s also lovely to add dried flowers in advance, like a herbarium.
The best part is that after you’re done, you can still use it at home as detergent!
An atmospheric pressure experiment using eggs

This is an experiment where you can learn how air pressure works using a hard-boiled egg and a bottle! What you need are ice water, a bottle, hot water, and a hard-boiled egg.
Here are the steps: First, place the bottle in hot water to warm it up.
The bottle will become very hot, so when you take it out, be sure to use tongs or something similar so you don’t touch it directly.
Take the bottle out and place the hard-boiled egg over the mouth of the bottle.
While keeping the egg on top, put the bottle into the ice water to cool it down.
As you do this, the air pressure inside the bottle changes, and the egg gets sucked into the bottle.
Watching the egg get pulled in is fascinating and makes for a really fun experiment!
Fun-to-shake shaker
Here’s a fun shaker made from a plastic wrap core.
Use origami made of film.
Wrap double-sided tape around the core and seal one end with the origami.
From the other side, add beads or similar fillings and seal it the same way with origami.
Wrap washi tape around it, then cut the origami into strips and wrap them on.
Add googly-eye stickers and a mouth to finish! It’s fun to dance with to music, too.
Little kids will enjoy it, so be sure to make it together and have a great time!
Maze ideas
@tomonite_official A handmade maze using a wrap core! This looks fun for both kids and adults♪ Try making it together with your child 😊 Please use this idea with adult supervision and with safety in mind. Featured from Instagram: a post by @mimita_asobi ✨ Thank you for the wonderful post. ↓↓↓ ───────────────── 【Not trash: A Spinny Maze with a Wrap Core】 Today’s post is a “spinny maze”! The child was super focused! But then they said, “Make a harder one next time,” 🫣 I guess it was a bit too easy for a five-year-old! You can make lots of different versions☺️ The child was able to make it themselves too, so everyone, try making it with your kiddo 👍🏻 ̖́- ▷Materials for today 〇 Wrap core (cardboard tube from plastic wrap) 〇 Paper (construction paper or copy paper is fine) 〇 Wrapping film 〇 Double-sided tape 〇 Stickers (or draw directly on the film) 〇 Pens/markers for drawing ───────────────── This is Tomonite @tomonite_official. Even on busy days, we want family time to be full of smiles! We share: 🏠 Time-saving housework and parenting hacks 💎 Convenient items with great time and cost performance 👶 Relatable parenting moments and heartwarming videos ✨ A favor ✨ Likes and comments really encourage us! If you found this post helpful or enjoyed it, we’d be happy if you leave a 👶 in the comments! All posts introduced by Tomonite are shared with permission from the original creators. Comments that may hurt others may be hidden by our team. We’d love for everyone to enjoy comfortable conversations and to connect a lot here ✨#AtHomePlayworkSimple craftMaze
♬ Bling-Bang-Bang-Born – Creepy Nuts
You can make a fun maze with a cardboard wrap core! Here’s a simple way to do it.
First, cut construction paper to the length of the wrap core, and draw a maze on it using any writing tools you like.
Attach double-sided tape to the paper with the maze and wrap it around the core.
Next, cut a piece of wrapping film to about 5 cm and stick your favorite stickers on it—that’s it! Thread it through the wrap core to play the maze game.
If you make the construction paper removable, you can enjoy original mazes over and over again.
It’s also recommended to use stickers of your favorite characters to enjoy a themed world.
Fly! Core Rocket

Here’s how to make an easy “core rocket.” You’ll need a plastic wrap core, a toilet paper core, two rubber bands, and a straw.
First, cut the straw so it’s just a little longer than the opening of the toilet paper core.
Link the two rubber bands by looping them together.
Tape the rubber bands to the straw, then tape the straw onto the plastic wrap core with cellophane tape.
Once it’s set up so the toilet paper core can be launched, you’re done! Decorate the toilet paper core however you like to make your own original rocket.
Have fun and get creative!