[For Seniors] Heartwarming and Cozy: Perfect Wall Decoration Ideas for Winter in Care Facilities


Winter is a season that lifts the spirits, with plenty of exciting events like Christmas, New Year’s, and Setsubun.
Many care facilities plan recreation activities to match these holidays and events.
Here, we’ll introduce wall decoration ideas that help older adults enjoy the feeling of winter even more.
They’re also perfect as craft-based recreation to make together with seniors.
We’ve gathered many pieces that capture the unique feeling of the winter season, packed with creative ideas for designs, instructions, and materials! Use these ideas as inspiration and enjoy a wonderful time indoors where it’s warm.
- Recommended winter wall decorations for seniors: heartwarming ideas
- [For Seniors] Recommended Wall Decorations and Crafts for January
- For seniors: Decorate the December wall with a tree. Easy ideas using origami and yarn.
- [For Seniors] Decorate your January wall with rabbits! Packed with ideas like snowball fights, New Year’s festivities, and rice cake pounding
- [For Seniors] Recommended Wall Decorations for December: Ideas Collection
- For seniors: Year-round ideas for wall decorations
- For seniors: Snowman crafts to brighten January wall displays—fun ideas using origami, paper plates, and papercutting.
- [For Seniors] Perfect for winter events! Easy craft ideas
- [For Seniors] Ideas for Winter Wall Decorations and Hanging Ornaments: Introducing Projects That Are Easy to Try
- [For Seniors] January Craft Ideas: Boost Your Luck with New Year Decorations and Good-Luck Charms
- For Seniors: Wall Decorations to Brighten Up February — Festive Ideas for Setsubun, Valentine’s Day, Plum Blossoms, and More
- [For Seniors] Fun February Crafts: Ideas Inspired by Setsubun, Valentine’s Day, and Other Events
- [For Seniors] Let’s Make New Year Decorations by Hand! A Collection of Easy Ideas Using Everyday Materials
For Seniors: Heartwarming Wall Decoration Ideas Perfect for Winter Care Facilities (41–50)
Bill of Exchange Tree

Let’s use handprint stamps to create a stylish tree.
Stamp your handprints in green ink on the base paper.
The handprints will form the tree, so keep that image in mind as you stamp.
Place a star above the middle finger, draw a cord wrapping around the hand with a black pen, and add colorful lights using fingertip stamps.
Finish by attaching a paper flowerpot made from construction paper.
How about making a large wall decoration using everyone’s handprints? It also seems like a great idea for a Christmas card.
[For Seniors] Heartwarming: Perfect Wall Decoration Ideas for Winter in Care Facilities (51–60)
Christmas boots made from paper cartons

Here’s an idea for Christmas boots that are perfect for decorations.
You’ll need two small paper cartons, red and white felt, any origami paper you like, and white cotton balls.
The base of the boot is made by combining the two paper cartons.
Use the first carton to form the vertical part of the boot and the second carton to form the rounded toe.
Before assembling, decorate the inside of the first carton with the origami paper.
Once you’ve combined the cartons into a boot shape, attach the red and white felt to the outside, then finish by decorating with the cotton balls.
Snowman ornament
@kazuyo_u Snowman ornamentOrnament#Christmaswork#Kindergarten#Nursery schoolHandmadeChristmas decorations
♬ Take a picture – NiziU
Let me show you how to make a cute snowman ornament with just a few simple steps.
Fold the two bottom corners of a clear bag into triangles and tape them down, then stuff the bag with white cotton and seal the opening.
Fold the left and right corners of the sealed opening into triangles and tape them as well.
Next, twist two pipe cleaners together to make a scarf, wrap it around the middle to cinch the bag, and shape it into a snowman.
Use round stickers for the eyes and nose, draw the mouth with a pen, and finish by adding a paper hat.
Thread a string through the scarf, and you can hang it on your tree.
Three-dimensional wall-mounted Christmas tree
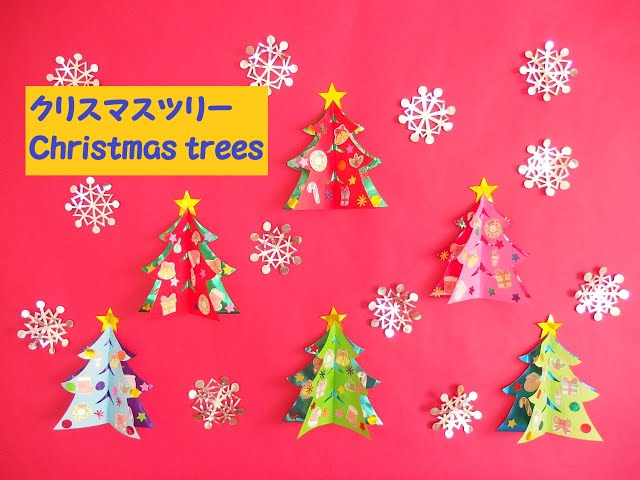
Here are some ideas for a three-dimensional wall-mounted Christmas tree that you can also enjoy decorating.
First, prepare green origami paper and double-sided colored origami paper.
Stack these two sheets, fold them in half, and cut along a Christmas tree template you prepared separately.
This will create a shape that looks like a Christmas tree cut in half.
Attach the flat side to the wall and display it.
You can also decorate the tree as you like.
By the way, templates are available for download online.
A Christmas tree you can make with 100-yen shop items

This craft involves arranging small tree ornaments to make them look like one large, dazzling tree.
The base of each small tree is simple: just cut a circle from construction paper, add a few slits, and roll it up.
That way, even people who find complex scissor work challenging can enjoy it easily.
Including pom-pom decorations, it’s also recommended to have everyone focus on making their own small tree and then display all the creations together as a single tree.
Encourage participants to think about how to make their own tree stand out among the arranged trees, and bring together a variety of unique styles to create a tree full of individuality.
cardboard ema (votive tablet)
Cut cardboard into the shape of ema (votive plaques), then decorate them with New Year–themed illustrations such as the zodiac animals and with each person’s wishes.
By making use of the cardboard’s natural brown color, you can evoke the soft, wooden feel of real ema.
You can certainly have everyone draw their own design on the front, but if you prepare illustrations in advance and let participants choose from them, they can focus more on thinking about their wishes and writing the text.
Selecting an illustration that perfectly matches each wish is another enjoyable part of the process.
Mini shikishi decorations for Setsubun from the 100-yen shop

This is a wall decoration themed around the oni (ogres) that appear in Setsubun, a traditional Japanese seasonal event.
Why not make a seasonal decoration using items you can buy at a 100-yen shop? Create the oni’s facial parts from construction paper and attach a soft string to both sides of the assembled face.
Represent the beans using Lezac paper or colored paper, adhere them to mini square boards, then use double-sided tape to add the oni parts as decorations.
Scatter beans and other elements used in oni-chasing scenes across the boards, attach a ribbon at the top, and it’s complete.
Working on these detailed steps also helps train fine motor skills by engaging your fingertips.