[Part 2] Handmade Halloween Costumes and Items for Babies

Halloween that excites both adults and kids.
Around this time of year, you see pumpkin-themed items and costume accessories in all kinds of shops.
Among them, costumes are especially adorable on babies, and you can’t help wanting them to try on lots of different outfits.
So this time, we’ve gathered ideas for handmade baby costumes perfect for Halloween.
Many use everyday materials or supplies from 100-yen shops, so even if you’re not good at sewing, you’ll find plenty of ideas you’ll want to try.
Make a variety and enjoy Halloween!
- Cute and handmade! A collection of Halloween costume ideas recommended for babies
- Handmade Halloween costume ideas! A roundup of outfits you can make with everyday materials.
- [Age 2] Have fun with Halloween crafts! A collection of ideas perfect for October
- At daycare and kindergarten! A collection of Halloween decoration ideas
- Toddler-Approved Halloween Crafts: Ideas That Captivate 2-Year-Olds
- Get the Crowd Excited! Perfect Performance Ideas for Halloween at Daycare and Kindergarten
- Fun for 1-year-olds! A collection of Halloween craft ideas you can make while playing
- Get kids excited in childcare! A collection of ideas for making Halloween treat bags
- Halloween gets even more exciting! A collection of DIY mask ideas using a variety of materials
- Halloween origami that captivates 2-year-olds! A fun collection of ideas to make together with your child
- Fun Halloween Game Ideas for Preschools and Kindergartens
- Even 1-year-olds will be captivated! A collection of craft ideas to enjoy the art-filled autumn
- [For 4-Year-Olds] Fun to Make! A Collection of Halloween Craft Ideas
[Part 2] Handmade Halloween Costumes and Items for Babies (1–10)
Origami Ribbon Headband

Let’s make a ribbon headband using origami! First, cut the origami paper in half.
Stack the two pieces, fold them in half lengthwise to make a long rectangle, then unfold.
Fold the top and bottom edges in to meet the center crease, slide the pieces to extend the length, secure with tape, fold in half again to make it long and narrow, and glue it together.
The base is done! For the ribbon, stack two sheets of origami, cut off one quarter, then accordion-fold the remaining piece.
Tape the center and fan it out to form the ribbon shape.
Fold the cut-off strip into a long narrow piece and wrap it around the center together with the base.
Finally, punch holes in both ends of the base, thread a rubber band through, and your ribbon headband is complete!
Pumpkins made with colored plastic bags
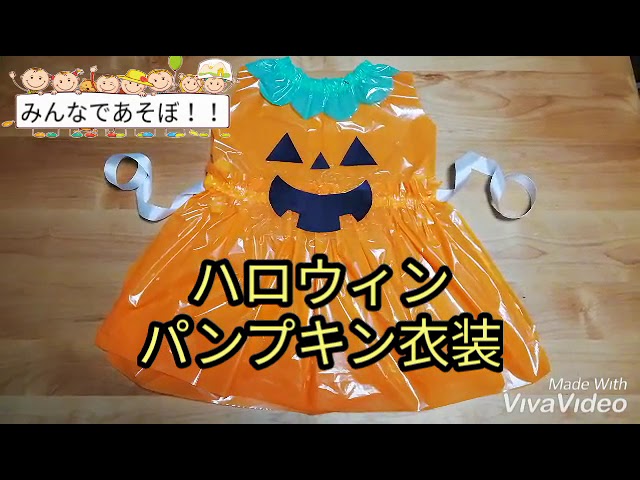
Here’s how to make a pumpkin costume that you can even use for a recital.
Prepare colored plastic bags, a pumpkin face, tape, and vinyl tape.
Cut the plastic bag at the top and bottom; at the top, cut out the neckline and sleeve openings.
For the skirt at the bottom, use vinyl tape to create gathers.
Once the top and bottom are ready, attach them together with double-sided tape.
Round off the edges of the plastic bag as you cut, and make the gathered pumpkin collar a focal point.
Stick the pumpkin face wherever you like, add a ribbon at the waist, and you’re done.
Halloween vest

Here’s how to make a Halloween vest.
You’ll cut felt into the shape of the vest you want, but it can be tricky without a pattern.
In that case, try making a pattern using the method shown in the video.
Sandwich a child’s piece of clothing inside a clear file, trace the clothing with a pen from above, and cut along the lines with scissors.
That completes your pattern—super simple! Next, place the pattern on the felt and cut two identical pieces for the front and back.
If you leave a little extra room at the shoulders and waist, it will be easier to put on and take off.
Sew the two pieces together, then cut down the center of the back with scissors.
Attach buttons or hook-and-loop tape there to make it easy to put on and take off.
Finally, decorate it however you like, and you’re done!
[Part 2] Handmade Halloween Costumes and Items for Babies (11–20)
Halloween cape

Here’s how to make an orange cape that will make Halloween even more fun.
Prepare an orange drawstring bag, a jack-o’-lantern face, and masking tape.
First, round off the bottom of the drawstring bag with a cut.
Remove the drawstring, and, paying attention to the bag’s top and bottom, stick the face wherever you like.
Finally, thread just one string through, attach tape to both ends, and your cape is complete.
It’s also great for taking commemorative Halloween photos.
The steps are simple, so give it a try!
Kintaro Made with Felt

Let’s make a costume of the very strong Kintaro.
You can make it with felt and string! When you think of Kintaro, you picture his distinctive apron-like outfit, right? We’ll make this apron out of red felt.
Place a red square of felt so that a corner points upward, and sew a piece of felt cut into a rectangle about 5 cm long onto the very top corner.
Once that’s done, you’ll attach a string around the neck for adjustment, so please sew on the string as well.
Next, to tie a string at the back around the waist, sew strings onto the left and right corners, too.
Finally, cut out the gold character and circle from felt, and attach them in the center of the costume with fabric adhesive to finish.
If you make a toy axe as a prop, it’ll look even more like an authentic Kintaro!
Skirt made from plastic bags

Here’s an introduction to a cute handmade skirt that’s perfect for Halloween.
Prepare ten 45-liter black bags and some elastic for the waist.
Tie the elastic into a loop to fit the child’s waist.
Then tie the black bags onto the elastic one by one.
After tying on ten bags, your adorable skirt is complete! For small children, you can adjust the size of the black bags before tying them, and it’s also fun to transform into a black cat and wear the black skirt.
The instructions are simple and easy to follow, so if you’re unsure about what costume to make, give this a try!
wizard

We’ll show you how to make a cute costume using colored plastic bags.
Prepare colored plastic bags, vinyl tape, and glitter tape.
Cut the bag into top and bottom pieces; for the top, it’s best to use a child’s everyday clothing as a reference to get the sizing right.
For the skirt portion, the key is to stretch the vinyl tape as you attach it so it creates gathers.
Once both the top and bottom are finished, stick them together, then decorate the collar with origami paper.
Your adorable Halloween costume is complete!