[Age 3] Simple summer origami ideas. A roundup of classic summer motifs.


Three-year-olds are getting better with their hands.
They’re starting to enjoy all kinds of origami, aren’t they? How about adults making some fun creations together with them? Here, we’ll introduce simple origami ideas perfect for summer, designed for three-year-olds.
There are lots of motifs kids love, like ice cream, bugs, and summer festival items.
We also recommend displaying the finished pieces or using them for pretend shop play.
Enjoy origami in different ways and make wonderful summer memories!
- Origami for 2-Year-Olds: Fun and Educational! Origami Ideas for Toddlers
- [For 3-year-olds] A fun collection of easy origami fish to make!
- For three-year-olds: A collection of craft ideas featuring spring events and creatures that you’ll want to make with your three-year-old
- [Childcare] A roundup of easy summer origami ideas to enjoy with 5-year-olds
- Origami perfect for summer. Fun and easy for kids to make!
- Fun July Craft Ideas for 2-Year-Olds: Summer Wall Decorations
- [For 3-year-olds] Easy-to-make origami rabbit ideas collection
- [For Preschoolers] Fold with Fun! January Origami Ideas for Little Ones
- [For 3-year-olds] Perfect for September! A Collection of Craft Ideas to Enjoy Autumn Nature
- Enjoy August with preschoolers using origami! A collection of summer-perfect ideas
- [Age 4] Easy origami ideas perfect for summer! A collection of cool, refreshing motifs
- [For 3-year-olds] A roundup of craft ideas to enjoy in summer! Introducing various motifs and techniques
- Toddlers will love it! Fun-to-make July origami recommendations
[Age 3] Simple summer origami ideas. Classic summer motifs roundup (81–90)
Snail

Let me introduce a snail you often see when it rains.
Prepare one sheet of origami paper and let’s make it.
With the colored side of the snail facing inward, fold the paper into a triangle twice.
Make sharp creases.
Open it again, then fold the corners to the creases you just made to form small triangles.
Using the existing creases as guides, fold three times toward the center.
Align with the center line to form the snail’s body, flip it over, and fold the corner on the side that isn’t yet the body toward the center.
A small pocket will form—inflate it by folding to puff it up.
Fold the top corner down in half to make the tail.
Adjust the overall shape, and you’ll have a cute little snail.
Cute cicada origami

Cicada catching is one of the fun summer activities for children, isn’t it? So let’s make a cicada with origami! Fold the origami paper into a triangle twice, then open it back up once.
Fold the left and right corners up to meet the top corner.
Fold both corners diagonally downward to make the wings, then fold one layer of the top corner down.
Next, fold the bottom layer down slightly offset, flip the paper over, and fold both corners inward.
Draw eyes on the cicada to finish.
Try using origami paper in various colors to make different species like the large brown cicada, kumazemi, and minminzemi.
Simple goldfish
Let’s make it with scissors! Here’s a simple goldfish craft idea.
All you need is origami paper in your favorite color and a pair of scissors.
It’s a fun activity for both kids and adults to enjoy together! The process of making a goldfish with your favorite colored origami paper and scissors is simple yet helps build concentration.
In particular, after cutting the origami, it’s important to fold carefully so you don’t tear the paper—this is a key point.
This step will help develop dexterity and focus.
The finished goldfish is adorable and fun to display!
Perfect fan for summer

An uchiwa is a tool for sending a breeze to beat the summer heat.
Have the children used one before? Here, we’re introducing an idea for making an uchiwa using a single sheet of origami.
Choose your origami while thinking about what color you want your uchiwa to be.
First, fold the origami into a triangle and open it, then fold two adjacent edges to meet along the crease.
Open the folded corners to the left and right, and tuck those corners to the back.
The colored part will be the fan area you wave, and the white part will be the handle.
There are a few finer folds until it takes the shape of an uchiwa, but take your time and fold each step carefully.
Summer classic! Watermelon origami

Watermelon is also popular as a snack for kids.
With this idea, you can make a sliced triangular watermelon.
Prepare double-sided origami in red and green, or glue red and green sheets together.
First, fold the origami into a triangle and cut it in half.
Place the triangular piece with the red side facing up, and fold up the base by about 1 cm.
Match the left and right corners to mark the center, then fold the left and right sides of the triangle toward the center line.
Flip the paper over and fold up the part that sticks out from the triangle, then flip it back again and tuck in the part that sticks out on the inside to finish.
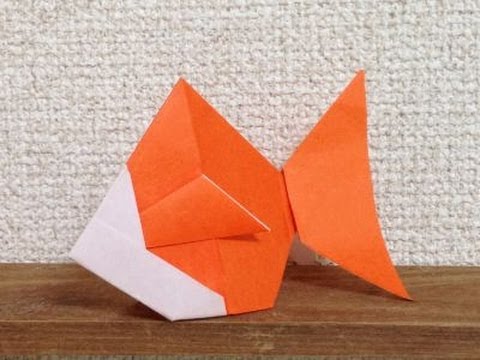
A goldfish with a large tail fin

Let’s make it with simple steps! Here’s an idea for a goldfish with a big tail fin.
All you need are one sheet of origami paper in your favorite color and some round stickers.
Since the materials are just one sheet of origami paper and round stickers, it’s an easy, casual way to make a goldfish.
The large tail fin design is unique, and using stickers for the eyes and patterns makes it even cuter.
There are no difficult steps, so you can enjoy it with children.
The finished goldfish is filled with your child’s hard work, and just looking at it will warm your heart.
[Age 3] Simple summer origami ideas. A roundup of classic summer motifs (91–100)
A goldfish with a cute shape

Among origami goldfish, this one is relatively easy to fold.
First, fold the paper in half along the diagonal, then bring the bottom corner up to the center.
After that, the folding method is somewhat similar to making a samurai helmet.
If you use patterned paper with a gradient, it creates a lovely effect.
It looks nice as is, but adding eyes can make it even cuter.
Make goldfish in various colors and stick them on a wall or on light-blue construction paper—they’ll look adorable.
Give it a try!