[Age 3] Simple summer origami ideas. A roundup of classic summer motifs.


Three-year-olds are getting better with their hands.
They’re starting to enjoy all kinds of origami, aren’t they? How about adults making some fun creations together with them? Here, we’ll introduce simple origami ideas perfect for summer, designed for three-year-olds.
There are lots of motifs kids love, like ice cream, bugs, and summer festival items.
We also recommend displaying the finished pieces or using them for pretend shop play.
Enjoy origami in different ways and make wonderful summer memories!
- Origami for 2-Year-Olds: Fun and Educational! Origami Ideas for Toddlers
- [For 3-year-olds] A fun collection of easy origami fish to make!
- For three-year-olds: A collection of craft ideas featuring spring events and creatures that you’ll want to make with your three-year-old
- [Childcare] A roundup of easy summer origami ideas to enjoy with 5-year-olds
- Origami perfect for summer. Fun and easy for kids to make!
- Fun July Craft Ideas for 2-Year-Olds: Summer Wall Decorations
- [For 3-year-olds] Easy-to-make origami rabbit ideas collection
- [For Preschoolers] Fold with Fun! January Origami Ideas for Little Ones
- [For 3-year-olds] Perfect for September! A Collection of Craft Ideas to Enjoy Autumn Nature
- Enjoy August with preschoolers using origami! A collection of summer-perfect ideas
- [Age 4] Easy origami ideas perfect for summer! A collection of cool, refreshing motifs
- [For 3-year-olds] A roundup of craft ideas to enjoy in summer! Introducing various motifs and techniques
- Toddlers will love it! Fun-to-make July origami recommendations
[Age 3] Simple summer origami ideas. Classic summer motifs roundup (21–30)
Cute cicada

When you hear cicadas chirping, many kids will say, “I want to go catch cicadas!” Catching cicadas has always been a classic summer activity.
Here’s an idea for making a cicada out of a single sheet of origami paper.
If you like cicadas, give it a try! First, fold the origami paper into a triangle.
Fold the left and right corners up to meet the top corner, then fold both corners downward diagonally toward the outside.
This will form the cicada’s wings.
Lift one layer of the top corner and fold it down, then offset it slightly and fold the remaining layer down as well.
Flip the paper over, fold the left and right corners inward, and you’re done.
It looks cute if you add eyes using round stickers.
Goldfish scooping

Let’s make an origami goldfish you can use for a goldfish-fishing game.
This idea uses scissors, so be sure to have them ready before you start.
Fold the origami paper in half, then fold the left and right edges to meet the center crease.
Open those folds, and fold the paper in half again.
On the upper part of the folded edge, cut a rounded notch to form the goldfish’s tail.
An adult should handle this step.
Use the creases to form the paper into a triangular prism, secure it with tape, and fold the tail upward to the outside.
Add eyes with stickers, and your goldfish is complete.
When you go to “fish” it, hook it through the hole in the tail.
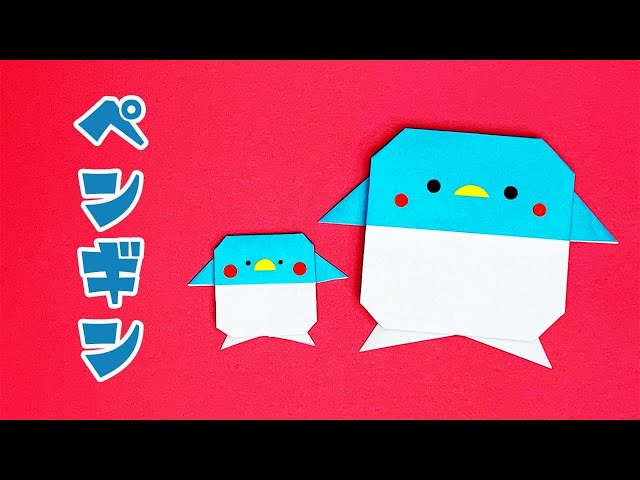
Peekaboo Penguin

Here’s a super cute way to fold a penguin that’s perfect to attach to letters or cards! First, place the origami paper with the back side facing up and fold it into a triangle twice to make crease lines.
Lift one corner up to just slightly before the center line, then fold both edges of the lifted section upward at a slight diagonal.
Fold both corners of that folded section inward.
Turn it over so the white side is facing you, and fold along the center line twice to shape the face.
Next, use a 2.5 cm piece of origami paper to make the hands.
Start with a basic “zabuton” fold, then fold both corners diagonally to shape the hands.
Make two of these.
Finally, glue the hands on, and add eyes and a mouth with round stickers or similar—done!
a round and laid-back penguin
This is an easy and cute origami penguin.
First, turn the paper over and make two creases by folding it in half both ways into a square.
Fold one edge down to align with the center crease.
Flip it over, then fold the left and right edges to the center line.
Open the colored corner and squash-fold it.
Fold the bottom edge up to the center to make a crease, open it once, then fold the bottom tip inward along that crease.
Fold the corners to form the feet.
Fold the protruding colored corner to suggest the hands.
Finally, round off the colored tip to finish! Decorate it cutely with round stickers or a pen.
Origami Whale

Perfect for summer! Here are some origami whale ideas.
How about making a whale gliding gracefully through the sea—you can almost hear the splash! Displaying your finished creation in a room will give it a cool, refreshing feel.
What you’ll need: blue-toned origami paper (like light blue), pens or crayons, and construction paper.
It also sounds fun to let your finished whale swim in the ocean you imagine and to draw its expression.
You’ll probably see creations full of the children’s unique touches.
watermelon

Let’s make a watermelon—one of the symbols of summer—out of origami! In this video, two sheets of red and green origami paper are glued together, but if you have double-sided origami with the right colors, that will be easier for kids to use.
First, fold the paper into a triangle, then cut it in half along the crease.
Keep just one piece and place it with the red side facing up.
Fold up the bottom by about 1 cm, then fold the paper in half so the left and right corners meet, crease well, and open it back up.
Turn it over, and fold the left and right edges in to meet the center crease.
Finally, tuck in any parts sticking out from the watermelon shape, and you’re done! Adults should help with the 1 cm fold and with tucking in the extra parts.
Cozy Penguin

Here’s how to fold an origami penguin that can also wear a hat and scarf.
First, fold it into a triangle twice, then open it once.
With a corner pointing down, fold up the top layer so about 2 centimeters stick out, then fold it down along the edge.
Fold the edge you just made in half to make a crease, then fold the bottom corner up to that crease to set a guideline.
Next, fold the other corner up toward the front crease.
Fold the tip of the corner down just a little.
Fold up along the crease you made earlier, align the edges, and fold the whole piece in half.
Finally, adjust the shape to look like a penguin and draw the eyes with a pen to finish.
Try making a hat and scarf for it, too!