[Childcare] [Origami for 4-year-olds] Introducing origami for 4-year-old children!


Origami for 4-year-olds is full of fun discoveries!
Here, we’ve gathered origami ideas recommended for 4-year-olds.
Using colorful paper and folding freely helps expand children’s imagination.
Working with their hands and creating together with friends also deepens communication.
Origami is a play activity that nurtures concentration and patience, and the sense of achievement when they succeed is exceptional!
In the moment they think “Let’s fold!” and start moving their hands, they can also feel the joy of creating a one-of-a-kind piece.
Be sure to incorporate it into your childcare activities.
- [Childcare] For 4-year-olds! Easy winter origami ideas
- Simple Origami Ideas to Enjoy in Autumn (For 4-Year-Olds)
- [For 4-year-olds] Let's fold! A collection of simple rabbit origami ideas
- [For 3-year-olds] Let’s make strawberries with origami! A collection of easy strawberry folding ideas
- [For 5-year-olds] Let’s make origami! A collection of fun folding ideas
- Origami Ideas for 4-Year-Olds: Halloween Edition
- [For Preschoolers] Let’s Make It Together with the Kids! Origami Ideas for February
- [Origami] Easy spring-themed origami ideas to enjoy with 4-year-olds
- [For 4–5 year olds] A collection of recommended origami ideas for March—featuring seasonal events and natural motifs
- Origami Butterfly Ideas That Are Easy for 3-Year-Olds
- [For 4-5-year-olds] Folding is fun! A collection of January origami ideas to enjoy with preschoolers
- [For 3-year-olds] Easy-to-make origami rabbit ideas collection
- [For 3-year-olds] A fun collection of easy origami fish to make!
[Childcare] [Origami for 4-year-olds] Introducing origami for 4-year-old children! (11–20)
How to fold a mushroom

Here’s how to make a cute, plump mushroom using a single sheet of origami paper.
First, fold the paper into rectangles vertically and horizontally to create a cross-shaped crease.
Open it, then fold the top two corners toward the center.
Flip it over and fold the bottom edge up toward the center crease.
Flip it over again and fold the left and right sides toward the center crease.
Fold the triangular tip down to the center and open it back up.
On the white side, make a valley fold along the top edge toward the crease you just made.
Slightly fold down the top left and right corners of the white side.
Insert your finger into the pocketed section to open it up.
Fold the five points—one at the top and two on each side—slightly inward to shape the mushroom, and you’re done.
It’s the perfect origami for autumn!
How to fold a whale (origami)

Let’s try folding a whale—an ocean creature that kids absolutely love—using origami.
The mouth part of the whale is a bit tricky, but take your time and carefully line up the edges.
Once you’re finished, draw the whale’s eyes and mouth.
Each child will end up with their own original, cute whale.
After they’re done, it would be fun to make a big ocean on a large sheet of paper and let the children’s whales swim in it.
Finally, posting them on the classroom wall so everyone can look at them together can lead to new discoveries and be a lot of fun, too.
How to fold a cat (origami)
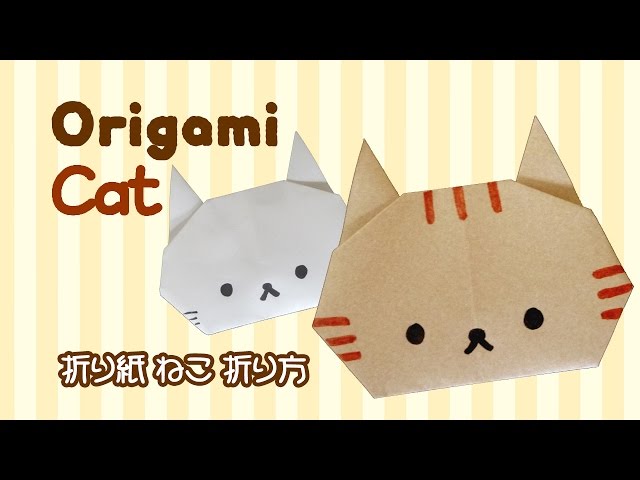
Would you like to make a cute cat out of origami? The steps are very simple.
First, fold the paper in half to make a triangle.
Fold the tip of the triangle down toward the bottom edge.
Turn the paper upside down, then fold the top left and right corners downward, using the ends of the small triangle’s bottom edge in the center as your guide.
Next, fold those two tips upward to form the cat’s ears.
Finally, fold the left and right edges of the face inward, and you’re done.
Draw the face, whiskers, and patterns to create a whole group of uniquely charming cat friends!
star

Here’s how to make a star that shines in the sky.
Prepare one sheet of origami paper and let’s get started.
Fold it into a square and make creases.
Open the paper to puff it up and fold both sides into a triangle.
Fold the left edge toward the center, flip it over, and fold the left edge toward the center on the other side as well.
Pull and spread the left corner, and you’ll get half of a star shape.
Fold the remaining top, left, and right triangles inward by about one third to form the star shape.
Adjust the overall balance, and you’re done! By changing the color and size of the origami paper, you can enjoy stars of different colors and sizes.
Give it a try!
ghost

Here’s how to make a ghost.
Prepare one sheet of origami paper and let’s get started.
Fold the paper into a square and crease it to make a cross.
Fold the left and right sides toward the center, then fold the top and bottom corners toward the creases.
Add diagonal creases and unfold.
Using the creases as guides, fold each half while gently puffing it up.
Open the top-right triangle to puff it up and fold, then fold the ghost’s arms.
The key is to fold the left and right arms so they puff out and form trapezoid shapes.
Fold the top and bottom corners, flip it over, tuck both arms inward, and you’re done.
Give it a try!
Infinite Cube

Let me introduce an infinity cube that moves like a funny snake.
Prepare one and a half sheets of origami paper.
Cut one full sheet lengthwise into eight equal strips, and cut the half sheet into four equal strips.
Apply glue to the corner of one strip and attach another strip at a right angle.
Fold the lower strip upward, and fold the other strip over the top.
Keep repeating the same folding motion, using your fingernail to crease firmly each time.
At the end, glue it to secure everything in place, and it’s done.
To make it tumble down stairs, stack and glue together five pieces of cardstock cut to the same shape on the front and back to add weight.
Give the infinity cube a try!
[Childcare] [Origami for 4-Year-Olds] Introducing origami for 4-year-olds! (21–30)
stretchy toy

Introducing a no-scissors, make-and-play idea: a stretchable toy! Wouldn’t it be fun if origami could expand and contract like a spring? By tweaking the folding method and gluing pieces of origami together, you can create a spring-like toy—such a unique idea.
All you need is origami in your favorite colors or patterns, plus glue or double-sided tape.
There aren’t any complicated folds in the process, but the direction of the folds is very important, so it’s best to work on it together with a teacher or guardian.