[Childcare] [Origami for 4-year-olds] Introducing origami for 4-year-old children!


Origami for 4-year-olds is full of fun discoveries!
Here, we’ve gathered origami ideas recommended for 4-year-olds.
Using colorful paper and folding freely helps expand children’s imagination.
Working with their hands and creating together with friends also deepens communication.
Origami is a play activity that nurtures concentration and patience, and the sense of achievement when they succeed is exceptional!
In the moment they think “Let’s fold!” and start moving their hands, they can also feel the joy of creating a one-of-a-kind piece.
Be sure to incorporate it into your childcare activities.
- [Childcare] For 4-year-olds! Easy winter origami ideas
- Simple Origami Ideas to Enjoy in Autumn (For 4-Year-Olds)
- [For 4-year-olds] Let's fold! A collection of simple rabbit origami ideas
- [For 3-year-olds] Let’s make strawberries with origami! A collection of easy strawberry folding ideas
- [For 5-year-olds] Let’s make origami! A collection of fun folding ideas
- Origami Ideas for 4-Year-Olds: Halloween Edition
- [For Preschoolers] Let’s Make It Together with the Kids! Origami Ideas for February
- [Origami] Easy spring-themed origami ideas to enjoy with 4-year-olds
- [For 4–5 year olds] A collection of recommended origami ideas for March—featuring seasonal events and natural motifs
- Origami Butterfly Ideas That Are Easy for 3-Year-Olds
- [For 4-5-year-olds] Folding is fun! A collection of January origami ideas to enjoy with preschoolers
- [For 3-year-olds] Easy-to-make origami rabbit ideas collection
- [For 3-year-olds] A fun collection of easy origami fish to make!
[Childcare] [Origami for 4-Year-Olds] Introducing origami for 4-year-olds! (21–30)
Face of a horse with long ears
@mushitarou today one year agoMemoriesOrigami#OrigamiorigamihorseHorse#horse
♪ Original Music – Mushitaro | Origami Design – Mushitaro | Origami Design
If you can fold a crane, you can make this! Here’s an origami horse idea.
First, fold the top and bottom corners of the paper together to make a triangle, then fold the left and right corners together to make another triangle.
Next, squash the open pocket into a square.
Place the paper so the flippable corner is at the bottom, then fold the lower left and right edges to the center line to crease them.
Using those creases, squash the squares on both sides into diamond shapes.
Lift one corner of the diamond to flip the layer, and you should end up on the side where the tip is split into two.
Gently open the middle of that split to indent it and form the ears.
Finally, make a curled fold on the remaining lower tip, and your horse is complete.
Strawberry Gift

So cute you’ll want to make lots of them! Here are some strawberry-themed gift ideas.
You’ll need red construction paper, scissors, green origami paper, glue or double‑sided tape, a hole punch, and a thin ribbon.
Let’s make an adorable, realistic gift box with a fun open-and-close mechanism that you’ll find addictive! For steps that involve cutting stacked, thick paper or origami, it’s safer for a parent or teacher to handle them.
Drawing patterns and threading the ribbon can help develop fine motor skills, too!
[Childcare] [Origami for 4-Year-Olds] Introducing Origami for 4-Year-Olds! (31–40)
Penguin parent and child
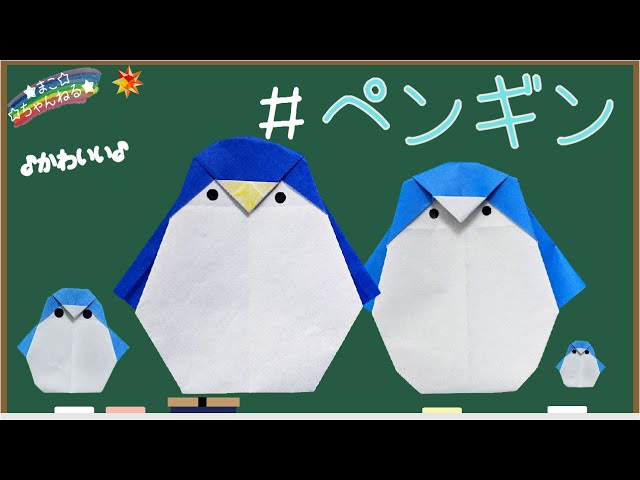
Here’s how to fold cute parent-and-child penguins.
First, turn the origami paper to the back and fold it into a triangle twice to make creases.
Fold one corner to align with the center line, open it, then fold along the creases two more times to set the folds.
Fold the corner up twice.
Next, fold both corners at the folded section toward the center line.
Fold the tip up to the front crease, then flip it over.
After flipping, fold the outer corners diagonally upward toward the center line.
Then, fold both corners outward so they stick out, like in the image of hands.
Finally, adjust the corners to shape them into penguins, and you’re done! If you make them with small origami paper as well, you’ll have a parent and child penguin set.
Decorate the eyes with round stickers or a pen.
How to fold a paper cup

We’ll show you how to fold a cup that’s not only perfect as a cup, but can also be turned into a wallet or a bag by adding a string—super easy to make and fun to play with in lots of ways.
First, fold the paper in half to make a large triangle.
Next, place the triangle upright, lift one layer of the vertex with the largest angle, fold it over so it lines up neatly with the side, then unfold.
Return the triangle to its original orientation, and fold both corners in toward the crease you just made.
Finally, fold one layer of the tip of the triangle toward you and the other layer outward, and you’re done.
It looks like it’ll be a big hit for pretend play or playing shop!
Also great for Christmas! Easy way to fold a star

This idea starts with making creases.
By making firm, precise creases first, the following steps will be easier, so proceed carefully.
After creasing, fold the origami twice to make a small square, then squash the pocket to form two triangles.
Take only the top layer of the triangle and fold the right edge to align with the center line.
Turn the paper over and fold the other side the same way.
In this state, hold the remaining right corner and slowly pull the left corner; the folded sections will swap sides, creating the two bottom points of the star.
Finally, adjust for balance and make step folds with the remaining corners to finish.
Snowflake paper ornament

Here’s an idea for making a papercut design with origami.
First, fold the paper into a triangle by bringing the top and bottom corners together.
Then rotate the paper and flip the top and bottom.
Cross the two triangle corners inward and fold where they overlap neatly.
Draw a crystal-like pattern and cut it with scissors.
Open the paper to reveal your design.
The crystal’s look changes depending on how you make the cuts, so try different variations.
The moment you open it and wonder, “What pattern will it be?” is so exciting and fun.
Origami Squirrel for Autumn
@hoikushi_worker Produced in OctoberNovember productionAutumn CraftsorigamiOrigamiOrigami folding instructionssquirrelNursery teacher / Childcare worker#Childcare Crafting#Nursery School CraftKindergarten craftMaking and crafting play#Making Play#Childcare topic#HandmadeToysInfant CraftNursery Teacher Worker
♬ LAZY DANCE – BiS
After folding the origami paper into a triangle twice to make creases, open it up.
Fold the top corner down to meet the center, flip the paper over, and fold the top edge down so that it aligns just above the horizontal crease.
Open it after folding the top left and right edges to match the vertical creases, then valley-fold along the diagonal creases created at the top while collapsing the paper to form the squirrel’s ears.
Flip the paper over and make two roll folds on the bottom corner.
Make a pleat fold at the center of the paper to separate the head and body, then flip it over.
Cut a slit to separate the top left single layer of the pleated section, fold the left and right sides toward the central crease, and shape the tail using the separated section to finish.