[For 4th Graders] Fun Independent Research Ideas You Can Do With Everyday Materials


Many fourth graders are probably struggling to choose a summer break independent research topic that’s “fun but not too difficult.” In fact, you can create a project that makes your friends say “Wow!” using simple experiments and crafts with everyday materials.
Here, independent research pros introduce exciting ideas you can dive into, like a shiny coin experiment with 10-yen pieces, making kohakutou (amber sugar candy), and crafting hydrangeas.
Plus, everything from preparation to record-keeping is explained carefully, so you can take on the challenge with confidence.
Find a special independent research project that will become a lasting summer vacation memory!
- DIY science projects that elementary school boys will love: ideas you can make with everyday materials
- Simple and cute summer project crafts! A collection of ideas for girls that will make you want to create
- Recommended for elementary school students! Science fair topics & craft ideas
- Simple yet amazing crafts: craft ideas that elementary school students will want to make
- Recommended for elementary school students' independent research! Experiment and observation ideas using everyday materials
- [For Kids] Today’s Handmade Craft Ideas
- Simple but awesome! Craft ideas for upper-grade girls
- [Middle School Students] Easy One-Day Science Projects and Crafts Ideas
- Recommended Independent Research Projects for 5th Graders [Elementary School Students]
- Craft ideas using plastic bottle caps [for boys]
- Recommended for Elementary Students! A Collection of Fun Craft Ideas for 4th Graders
- Recommended for 4th graders! A collection of easy self-study ideas to try
- Amazing discoveries with everyday materials! Fun summer vacation independent research ideas
[4th Grade] Fun Independent Research Ideas Using Everyday Materials (41–50)
Cute lantern made with disposable chopsticks
@mami_toys #CapCut#tiktok#handmadeHandmadeHandmadework#fyp#foryou#share#diyLightlike#Healing#epResource Recovery#cute#😍#💖#🌈
Looping Through the Night – Chiahi Sato
Let me introduce a cute lantern you can make with disposable chopsticks—fun to display and enjoy.
Prepare chopsticks, glue, and washi paper.
Cut the chopsticks and build the lantern’s frame.
The key is to keep an eye on the balance so the frame doesn’t shift out of place.
Attach washi paper from the back to create the lantern’s window sections.
Finally, glue the frames together to finish.
It’s also recommended to use your favorite colors for the window sections.
The light that leaks through the gaps between the chopsticks looks absolutely beautiful.
Disposable Chopsticks Chomping Crocodile
@habii.jp Simple Crafts Series: Chopstick Chomping Crocodile. “Habi,” the official Child Development Support and After-School Day Service that supports the growth of children with developmental concerns. <Posts around 7 p.m. on Tue/Thu/Sat> The official account of Wellbe for Employment Support is here → @Wellbe Employment Support [Official]#NeurodevelopmentalDisordersParenting# developmental support (ryōiku)Habi
♬ All the Fun We Had Together – Official Sound Studio
Let me introduce the Chopstick Chomping Crocodile—its moving face is super fun! Get some chopsticks, rubber bands, and origami, and let’s make it.
First, split two pairs of chopsticks.
Align each pair lengthwise and secure them with rubber bands.
Once you have two secured sticks, attach them together top and bottom with rubber bands so they can open and close.
Finally, glue or tape a face and mouth to the tips of the chopsticks, and you’re done.
Give it a try for some chomp-chomp fun! Since the method is simple, it could also be fun to swap the crocodile for another animal.
Snowflakes made of yarn
@hoikushisatomi [From around age 4] Snowflakes with yarnNursery teacher / Childcare workerKids will love it#NurseryTeacherDailyLifeHand gamesworkTranslation#NurseryTeacherThingsKnitting yarn#YarnPlay
♬ Stylish cafe-style BGM – Hiro Hattori
After cutting three disposable chopsticks short, use two of them to make an X shape, then place it over the remaining stick set vertically and secure them with yarn.
Next, wrap more yarn around them to create a snowflake.
When wrapping, go one stick at a time: loop the yarn once around a stick, then move on to the next chopstick.
The yarn doesn’t have to be the same color—switching to a different yarn partway through creates a pretty pattern.
You’ll get a variety of snowflakes depending on how many wraps you make and the types of yarn you use, so try making several kinds.
A beanbag-toss game using ping-pong balls

Here’s a fun and engaging game using ping-pong balls: a ball-toss challenge.
Gather chopsticks, clothespins, tape, and paper cups to make it.
When building the launcher, be mindful of the angle as you fix the chopsticks in place with tape.
Secure them firmly with tape and test to make sure it works properly as you build.
Attach a pair of plastic bottle caps to the back end of the chopsticks, and it’s complete.
You can decorate it however you like.
Stick paper cups on the wall to create goals, then try shooting from the launcher and have fun playing!
Paper yo-yo made from disposable chopsticks and wrapping paper

Let me introduce a paper yo-yo made from chopsticks and wrapping paper that’s fun to stretch and snap back.
Prepare some chopsticks and wrapping paper, and let’s get started.
Measure the length and cut the wrapping paper into a rectangle, then join the pieces with glue or tape.
Secure a chopstick with tape and roll the paper around it.
The key is to roll it tightly so there are no gaps.
Finish with decorations, and it’s done.
Try different wrapping papers to make your own original paper yo-yo and have fun! Be safe and don’t aim it at people.
Target-throwing game with disposable chopsticks and clothespins

Let me introduce a target-shooting game that launches with a burst of energy using chopsticks and a clothespin.
Prepare two chopsticks, a clothespin, tape, and a plastic bottle cap to make it.
For the launcher, clip the clothespin’s metal spring onto a chopstick, then tape the clothespin’s handle and the chopstick together to form the base.
Cut a slit in the plastic bottle cap and fasten it to the chopstick with a rubber band.
Make a target out of a milk carton and draw point values on it.
Set a marble-sized ball on the finished launcher and try aiming at the target.
Have fun seeing how many points you can score!
How to make a chopstick tree
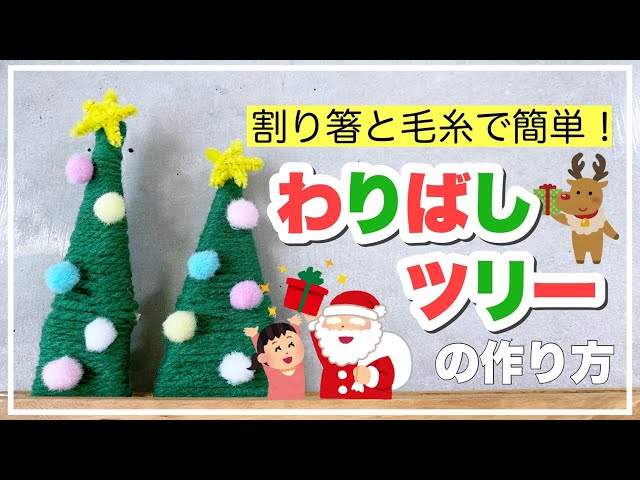
Here’s how to make a chopstick tree that lets you enjoy a cozy nighttime atmosphere when you light it up.
Prepare chopsticks, yarn, glue, and decorations like beads, then get started.
First, build the tree’s frame with chopsticks.
Wrap yarn evenly around the base.
For a summery feel, you could use colors like light blue or pale green.
Once you decorate it with summer-themed items such as watermelon or fish-shaped wind chimes, your chopstick tree is complete.
It’s sure to captivate elementary school kids, too.
Try changing the seasonal theme as you make it—you might discover something new each time.