[Childcare] A roundup of easy summer origami ideas to enjoy with 5-year-olds


As the number of hot days increases, children at daycare and kindergarten tend to spend more time playing indoors.
Here, we’ll introduce some simple origami perfect for summer that five-year-olds can enjoy.
Origami involves using the hands, which helps develop dexterity, and turning favorite things into shapes also nurtures thinking skills.
While playing, children can also learn the joy of cooperation.
Brainstorm ideas with your child and try making a variety of creations.
Spend a fun summer with the children using origami that brings a sense of coolness!
- [For 5-year-olds] Let’s make origami! A collection of fun folding ideas
- For 5-Year-Olds: Enjoy Autumn! Easy Origami Ideas
- [For 5-year-olds] Let’s enjoy summer! Summer craft ideas for 5-year-olds
- [Age 4] Easy origami ideas perfect for summer! A collection of cool, refreshing motifs
- [5-Year-Olds] Creative Project Ideas to Try in June! Let's Broaden Their Range of Expression
- [Childcare] August origami: simple and cute ideas
- Easy Winter-Themed Origami Ideas for 5-Year-Olds
- Origami perfect for summer. Fun and easy for kids to make!
- For older kindergarteners: Let’s make it! A collection of recommended origami ideas for February
- [Age 2] Summer Fun! Simple Origami Toys Perfect for Indoor Play
- [For 5-year-olds] Crafts to try in July! Ideas that capture the season
- August Craft Ideas for 5-Year-Olds
- For 5-Year-Olds: Let’s Make It! A Collection of Craft Ideas to Feel the Spring
[Childcare] A collection of easy summer origami ideas to enjoy with 5-year-olds (91–100)
beetle (specifically, a rhinoceros beetle)

Cool big horns! Here are some ideas for making a rhinoceros beetle.
Speaking of rhinoceros beetles, they’re incredibly popular insects with children as a symbol of summer! Many kids have fond memories of catching them or carefully raising them.
Let’s try making a rhinoceros beetle out of origami—its distinctive large horn and powerful form are especially appealing.
You’ll need brown origami paper, white round stickers, and a black pen or black round stickers.
Take this opportunity to give it a try!
Simple goldfish
Let’s make it with scissors! Here’s a simple goldfish craft idea.
All you need is origami paper in your favorite color and a pair of scissors.
It’s a fun activity for both kids and adults to enjoy together! The process of making a goldfish with your favorite colored origami paper and scissors is simple yet helps build concentration.
In particular, after cutting the origami, it’s important to fold carefully so you don’t tear the paper—this is a key point.
This step will help develop dexterity and focus.
The finished goldfish is adorable and fun to display!
[Childcare] A collection of simple summer origami ideas to enjoy with 5-year-olds (101–110)
Pac-Pac Fish

Let me show you an easy way to fold a fish whose mouth opens and closes.
Fold the origami paper into thirds both vertically and horizontally to make crease lines, then unfold.
If you have a 3×3 grid of squares, you’re set.
Fold the paper into a triangle twice to make creases and unfold, then add one vertical crease on each side of the center line and unfold again.
Fold the top and bottom corners inward along the three vertical creases to form the protruding parts.
Pinch the left and right corners and fold along the creases—like magic, it turns into a fish shape! Fold the tail fin and dorsal fin inward, puff it up slightly, and it’s done.
If you pinch it top and bottom, the mouth opens and closes—very fun!
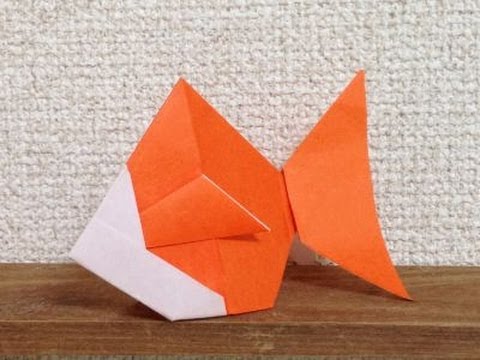
Goldfish with fluttering tail fins

This origami is a goldfish with fluttery, very glamorous tail fins.
It looks even cuter when combined with a heart-shaped origami, so be sure to make them as a set.
You’ll use two quarter-size pieces of origami paper to make the goldfish.
One piece is for the body, and the other is for the tail fin.
Once both are folded, glue them together.
For the eyes, use round stickers or similar.
After making the heart pocket, the back side of the goldfish can be inserted into the pocket—slide it in, and it’s complete.
Ranchu (a breed of fancy goldfish)

Among goldfish, the ranchu is especially gorgeous—let’s try folding one with origami.
First, fold the paper into a triangle along the diagonal twice.
Next, fold one corner toward the center.
Then flip it over, fold both sides along the middle, and fold the whole piece in half along the center.
After that, make a reverse fold at the tip.
Then make a few more reverse folds.
This part is a bit tricky, so if it’s difficult, please proceed together with a parent or guardian.
Red or orange paper will probably suit it best.
Goldfish viewed from above
Let’s make it with origami in your favorite colors and patterns! Here’s an idea for a goldfish seen from above.
What you’ll need: one sheet of origami paper, a quarter-size piece of origami paper, and round stickers.
It’s an idea that’s full of cuteness! Use the full sheet to make the goldfish’s body, and the quarter-size piece to make the tail fin.
By gluing them together, you’ll create a goldfish with a three-dimensional look.
Add round sticker eyes and it will look just like a goldfish swimming! Since you can freely choose the colors and patterns of the origami paper, each goldfish will have its own unique personality—and it’s fun just to look at them.
fish with a big mouth

The wide-open mouth is so cute! Here’s an idea for a big-mouthed fish craft.
You’ll need origami paper, round stickers, and a pen.
You can make the distinctive large mouth by inserting and connecting the origami into a circle, which is perfect for developing fine motor skills.
By adjusting the size of the origami, you can create fish in any size and add your own touch.
Finish by using round stickers and a pen to draw the eyes and patterns, and you’ll have an even more charming fish! It’s simple, yet with a little creativity you can enjoy lots of variations—highly recommended.