Recommended for elementary students! A collection of fun craft ideas to make for 6th graders

Sixth graders grow rapidly and begin to develop their own opinions.
As they discover the joy of cooperating with friends, they also start to value their friendships even more.
Their interest in learning increases, making them eager to try many new things.
This is also a time when their creativity flourishes, so crafts are a great way to draw out those feelings.
Here, we’ve gathered unique projects that use a variety of materials and ideas.
We hope they’ll enjoy both the fun of making things and the fun of playing with friends using what they’ve made.
- Recommended for elementary schoolers! A fun collection of craft ideas for 5th graders
- [Indoor Activities] A Collection of Craft Ideas Recommended for Elementary School Students
- Recommended for Elementary Students! A Collection of Fun Craft Ideas for 4th Graders
- Recommended for elementary students! A collection of fun craft ideas for 3rd graders
- For 6th Graders: Unique and Fun Ideas for Independent Research Projects
- Recommended for elementary school kids! A collection of fun craft ideas for 2nd graders
- Recommended for elementary school students! A fun collection of craft ideas for first graders
- Recommended for 6th graders! A collection of easy self-study ideas you can enjoy while learning
- [For Elementary School Kids] Handmade Toy Craft Ideas
- [For Elementary School Students] A Fun Collection of Paper Clay Craft Ideas
- Simple but awesome! Craft ideas for upper-grade girls
- Play ideas kids can enjoy from 1st to 6th grade [indoors & outdoors]
- Crafts you can make with 100-yen shop items! A collection of fun project ideas that elementary school kids will love
Recommended for elementary school kids! A fun craft idea collection for 6th graders (101–110)
Handmade chenille keychain
@n.annlee321 Yuraaan♪ It looks so cute when you display it 🥹💕ParentingChildcaretranslation#Kindergarten#HandmadeToysChildcare
♬ Monkeys Spinning Monkeys – Kevin MacLeod & Kevin The Monkey
Let’s make a cute bee keychain.
First, stick double-sided tape all over a chenille stem and shape it into a rectangle.
Wrap a yellow chenille stem around it, then wrap a brown one to create the stripes.
Make wings from a clear file sheet, attach them to the body with the brown chenille stem, and add eyes.
Finally, attach the keychain hardware and you’re done! With a bit of creativity, you can make all kinds of insects and animals, so try making your own original keychains.
Handmade Happy Noodles
@n.annlee321 A pretty surprising way to make noodles 🤣 The packaging turned out so cute 🥹💓#DesignedWithCanva#CanvaPartner
♬ Electro Swing with retro cool brass & piano(1088312) – Ponetto
Looks just like the real thing! Let’s handcraft some happy noodles.
Flatten a cotton ball made from yellow embroidery thread to form a lump of noodles.
Also, wrap another embroidery thread around chopsticks and soak it in water mixed with liquid starch.
Once it dries and you remove it, it will turn into curly noodles, so make some of those too.
Use a small paper cup as the container and attach a package label you designed with a design app.
Put in the noodles and a packet of toppings, then stick on the lid to finish! You might even be able to use it as a keychain if you add some parts.
Cute mysterious bottle

A mysterious bottle where two liquids won’t mix even when tilted.
It’s a fun idea that works great as interior decor or a small gift.
First, fill the bottle about halfway with baby oil.
Next, add colored water tinted with food coloring.
Put in glitter or holograms as you like, cap it, and decorate the bottle to make it cute—and you’re done! The method is very simple, so even younger elementary school children can enjoy making it.
Along with the craft, try summarizing both your own ideas and the correct explanation for why baby oil and water don’t mix.
Cute goldfish scooping

When you think of summer, you think of festivals—and goldfish scooping, right? Let’s make a cute, handmade goldfish scooping game and have some fun! Prepare a cardboard box as the base and cut several slits into the sides.
Thread a thick blue string across the slits to represent water and create an aquarium.
Next, cut a paper cup to make a ring from the rim.
Attach a popsicle stick as the handle, and glue tissue paper to the inside of the ring to complete the poi (scooper).
Finally, tie individually wrapped candies with rubber bands, add eyes to make goldfish, and you’re done.
Arrange the goldfish in the aquarium and try scooping them up with the poi!
Puru-Koro Soap
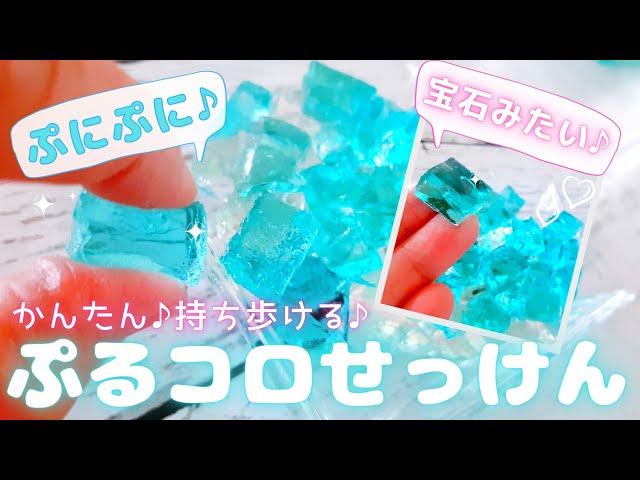
It’s like a jewel! Let me show you how to make cute, jiggly soap.
You’ll need liquid hand soap, gelatin, hot water, and food coloring.
Dissolve the gelatin in hot water, then mix in the liquid hand soap.
The trick is to stir slowly so it doesn’t foam.
Add food coloring, pour into a flat container, and chill in the refrigerator for 1–2 hours.
Then just cut it into your favorite shapes and you’re done! It looks adorable and might make handwashing more fun.
Just be careful to prevent small children from accidentally swallowing it.
Recommended for elementary school students! A collection of fun craft ideas to make for 6th graders (111–120)
Sparkling hourglass

Let’s make a cute, sparkly hourglass that doubles as interior decor.
Prepare two small bottles, glitter to use as sand, a clear plastic file sheet, and decorative parts.
Cut the clear file slightly larger than the bottle opening and make a hole in the center for the glitter to pass through.
Attach tape and half-cover the hole, then glue it to the bottle.
Add the glitter and glue on the other bottle.
Finish it off cutely with decorative parts.
After adding the glitter, be careful not to turn it over until the adhesive has dried.
lampshade

Here’s a lampshade idea that also works as room decor.
Brush glue mixed with water onto an inflated balloon, then stick on small torn pieces of washi paper.
For sturdiness, layer the washi several times until the balloon’s color isn’t very visible.
Be sure to leave an opening where the light will go.
Since washi is white, use tissue paper if you want to add color.
Once it’s completely dry, pop the balloon and remove it, then secure a wire along the inside edge of the opening for the light to finish it off.