Recommended for elementary students! A collection of fun craft ideas to make for 6th graders

Sixth graders grow rapidly and begin to develop their own opinions.
As they discover the joy of cooperating with friends, they also start to value their friendships even more.
Their interest in learning increases, making them eager to try many new things.
This is also a time when their creativity flourishes, so crafts are a great way to draw out those feelings.
Here, we’ve gathered unique projects that use a variety of materials and ideas.
We hope they’ll enjoy both the fun of making things and the fun of playing with friends using what they’ve made.
- Recommended for elementary schoolers! A fun collection of craft ideas for 5th graders
- [Indoor Activities] A Collection of Craft Ideas Recommended for Elementary School Students
- Recommended for Elementary Students! A Collection of Fun Craft Ideas for 4th Graders
- Recommended for elementary students! A collection of fun craft ideas for 3rd graders
- For 6th Graders: Unique and Fun Ideas for Independent Research Projects
- Recommended for elementary school kids! A collection of fun craft ideas for 2nd graders
- Recommended for elementary school students! A fun collection of craft ideas for first graders
- Recommended for 6th graders! A collection of easy self-study ideas you can enjoy while learning
- [For Elementary School Kids] Handmade Toy Craft Ideas
- [For Elementary School Students] A Fun Collection of Paper Clay Craft Ideas
- Simple but awesome! Craft ideas for upper-grade girls
- Play ideas kids can enjoy from 1st to 6th grade [indoors & outdoors]
- Crafts you can make with 100-yen shop items! A collection of fun project ideas that elementary school kids will love
Recommended for elementary school students! A collection of fun craft ideas to make for 6th graders (121–130)
Simple salt sand art
@watako.hoiku Also great for summer projects 🌻 | Salt Sand Art |Simple craftIndependent Researchtranslation
♬ เสียงต้นฉบับ – น้องมิแมวว♡ – ⋅˚₊‧ ୨ 𝒎𝒎𝒊𝒊 ୧ ‧₊˚ ⋅
This is about layering different colors of salt in a glass to create a picture-like, beautiful look.
Start by making colors that match what you want to create: mix paint into the salt to prepare it.
Once your colored salt is ready, simply layer it into the glass.
It’s best to pay attention to the boundaries between colors and avoid overmixing.
After filling the glass, press the layers to compact them—you can aim for more complex shapes this way.
Try various patterns to see what you can achieve.
paper cup hat
@lunimama_asobi Easy craft: paper cup hat! A super simple and super cute paper cup hat. Perfect for the coming season!HandmadeOrigami#origami#papercraft#easycraft#HandmadeToyswork
Fuzzy Navel – Conton Candy
If you’re looking for a craft idea that can double as a decoration, how about making a paper cup hat? Cut off the rim of a paper cup, then leave about one-third from the bottom intact and make many vertical slits starting from the rim side.
Spread the slit sections outward, then weave them by folding them up diagonally from the rim side to form the brim of the hat.
Decorate it with your favorite ribbon and you’re done.
The color and pattern of the paper cup will become the hat’s design as-is, so choosing the cups is part of the fun, too.
Homemade Pakkuncho
@chibi_miran How to Make a DIY “Pakkuncho” for First Graders ~Part 1~ The Drafting Edition Was Insanely Good lolGenius at crafts
♬ Jamboree Mickey! – Tokyo Disneyland
How about making your own version of your favorite snack package? First, buy the real product and carefully study its packaging.
Trace the shape onto construction paper or similar, and then recreate everything—the design and the text—just like the original.
After coloring it with pens or other materials, cut it out, assemble it, and you’re done.
It’s a task that requires patience, but the steps are very simple.
Find a package you love and give it a try!
Cute paper cup finger puppets
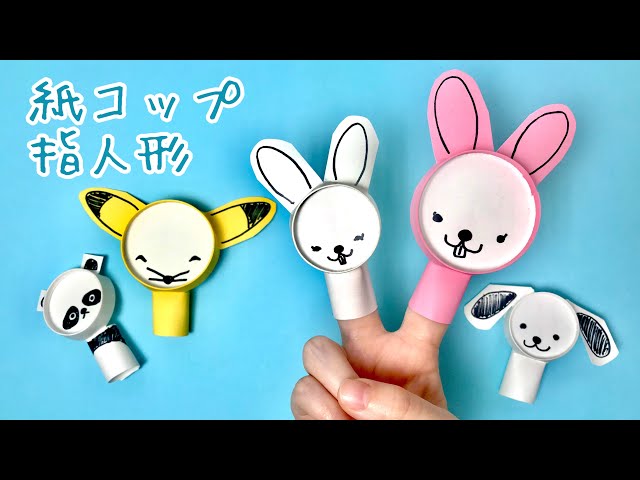
Here’s an idea for making finger puppets using paper cups.
The example shown here is a dog finger puppet, but with a little creativity you can make all kinds of animals.
Once you have a paper cup, cut four vertical slits along the side and remove the excess parts while shaping the dog’s ears and the rings that go around your fingers.
The bottom of the cup will be the face, so draw any expression you like with a pen.
Paper cups come in various colors, so using different colors might expand your range of expression.
Recommended for elementary school students! A collection of fun craft ideas to make for 6th graders (131–140)
Plastic bottle wind chime

Here’s an idea for an easy wind chime you can make with a plastic bottle.
Cut the bottle in half across the middle and make a hole in the center of the bottom piece.
Thread a string through the hole, attaching a strip of paper (tanzaku) and a bell to it.
Decorate the bottle, and you’re done.
Pens, nail polish, and decorative parts work well for embellishment.
To keep the string from slipping out, tie a short piece of a toothpick along the string as a stopper.
By taking advantage of the bottle’s translucence, you’ll get a cool, refreshing look.
If you’re looking for a summery craft idea, give this a try.
Cute glasses with moles

Let’s make cute glasses using pipe cleaners and straws.
First, think about the shape of the glasses you want to make—try sketching it out.
Round, square, star-shaped—anything you like is fine.
Once you’ve decided on the shape, form it with the pipe cleaners.
A single pipe cleaner isn’t very sturdy, so twist two together into one before shaping.
After the frame is done, thread straws onto the parts that go over your ears, and you’re finished.
If you use the accordion section of the straw over your ears, the glasses are less likely to slip off.
Paper cup Tyrannosaurus

This activity involves combining paper cups to create a three-dimensional, dynamic Tyrannosaurus.
The key is how you connect the cups: by trimming the edges and adding slits, you can set firm angles.
Build it by linking the cups from the head to the tail, then attach separately made legs and arms at the end to finish.
Try different variations, such as using cups of the same color for a cohesive look or mixing different colors for a colorful effect.