[For toddlers] Simple but amazing craft ideas — including toys they can play with


There are so many opportunities to do crafts at daycare and kindergarten, aren’t there?
Crafts help develop fine motor skills, nurture imagination and concentration, and offer plenty of great benefits for children’s development.
But are there teachers and parents out there thinking, “What should we make?” and running out of ideas?
In this article, we’ll introduce simple yet impressive craft ideas.
Many of them can be played with after making them, so the kids are sure to have a great time!
They’re all easy to make with materials that are simple to gather, so please use these as a reference.
- [Nursery/Kindergarten] Crafts you can play with after making them
- [Childcare] Recommended for 3-year-olds! Craft activity ideas
- Recommended for 5-year-olds! Simple DIY toy ideas
- Craft activity ideas for 4-year-olds
- [Childcare] Easy! Make a DIY target game. Playful craft and fun game
- Paper cup crafts that elementary school kids will love! A collection of fun project ideas
- For 2-year-olds! Fun craft activities and indoor play ideas
- [Today's Craft] Fun craft ideas recommended today that are useful for childcare!
- Simple yet amazing crafts: craft ideas that elementary school students will want to make
- Fun crafts using straws
- Craft ideas using plastic bottle caps [for boys]
- [Childcare] Simple DIY ideas you can use for pretend shops
- [Childcare] Recommended for toddlers! Toy ideas you can make and play with
[For toddlers] Simple but amazing craft ideas. Playable toys too (11–20)
Dinosaur Chomp-Chomp Puppet
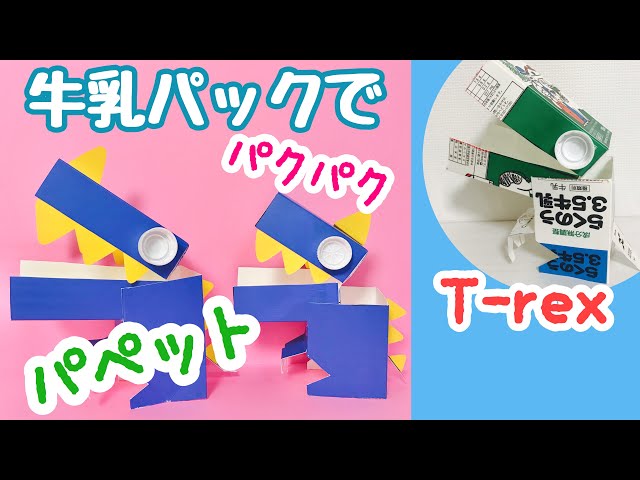
Dinosaurs that kids love turn into puppets! It’s a craft you can make with materials you have at home, and it’s fun to play with after making it.
Cut a milk carton in half, then make slits in one half to create the dinosaur’s arms and tail.
For the head, cut the other half that still has the bottom.
Attach the head and body with cellophane tape, glue on bottle-cap eyes, and it’s done! There are parts you should cut and parts you shouldn’t, so be careful not to mix them up.
As it gradually starts to look more like a dinosaur, your child will enjoy making it!
Clack-clack clappers

Naruko are traditional handheld clappers familiar from festivals like Yosakoi.
How about making your own naruko out of a milk carton and having fun playing with it? Even though it’s made of paper, it produces authentic clicking sounds! Cut the milk carton to create the clapper parts, and fold the cut pieces to make the handle.
Decorating the naruko with your favorite patterns will make it look festive.
By attaching plastic bottle caps, you can get that satisfying click-clack sound.
Kids love things that make noise, so please team up to make one and enjoy playing together!
Play with the wind! A colorful carousel

Let’s make a merry-go-round that you can spin and play with.
First, make a hole in the center of the base of one paper plate and the bottom of a paper cup.
Next, cut a 12 mm straw to 2 cm, then snip one end into fine fringes and flare them outward to make a stopper.
Thread the paper plate and the paper cup (with the bottom facing up) onto the uncut end of the straw, and tape the stopper part to the paper plate to secure it.
After attaching the 2 cm straw you just made as a stopper right above the paper cup, punch a hole in one end of an 8 mm straw.
Pass a short piece of 6 mm straw through that hole, place a paper plate shaped like an umbrella over it, and glue it in place.
Hang horse illustrations from the inside of the umbrella, insert the 8 mm straw into the 12 mm base straw, and it’s complete.
If preschoolers are making it, prepare the 8 mm straws with holes in advance.
handheld fan
@cuty_diyorigami Amazing! Transform from a paper cup into a fan in 10 seconds?!#craft#papercraft#diy#handmade#origami#easy#cute#foryouHandmadeCuteTranslationOrigamiInterestingTranslationHandmade giftchildrenLife with childrentoyUseful in everyday lifeRecommendation#IWantToBeOnTheRecommendationsIf you have any recommendations, let me know.
♬ Show – Ado
Introducing a handheld fan with rotating blades.
Prepare a paper cup, rubber bands, bamboo skewers, construction paper, a bottle cap, and a large bead.
Cut the paper cup with scissors to create the handle and the blade mount, forming the base.
Poke a hole in the center of the paper cup’s bottom to serve as the blade base.
Thread a single rubber band through the hole in the cup’s bottom, then pass it through a bead and a bottle cap lid, sandwiching the cup between the front and back.
Use two short bamboo skewers as the bases for the propellers: thread and secure each one through the rubber band on both the inside and outside of the cap.
Attach four pieces of construction paper cut into blade shapes around each skewer, centering them on the skewer.
It’s complete! When you spin the propeller on the back, the propeller on the front spins too, turning it into a handheld fan.
Merry-go-round! The horses that go round and round

Let’s make a toy where horses spin around like a merry-go-round.
For the base, use a paper bowl and a paper cup.
For the spinning mechanism, use a paper clip, a rubber band, a bead, a toothpick, and a wooden chopstick.
First, use an awl to make a hole in the center of the bottoms of both the paper bowl and the paper cup.
Straighten the paper clip, then bend one end into a hook shape.
Thread a bead onto a rubber band, hook one end of the rubber band onto the paper clip’s hook, and pass it through from the bottom of the paper cup.
On the other end of the rubber band, insert the wooden chopstick so it won’t slip out.
Next, pass the clip up through the bottom of the paper bowl, stack it with the paper cup, then remove the hook and insert a toothpick as a stopper.
Finally, attach paper with horse illustrations to both ends of the chopstick, and you’re done.
Pac-Man-style piggy bank

Let’s make a fun piggy bank that “chomps” your money! All you need are three things you likely have at home: a milk carton, a straw, and a bamboo skewer.
The steps are simple.
Use the bottom half of the milk carton to create the base container.
Attach a rotating “mouth” section to the base, using a bamboo skewer fixed in place with tape.
Add cute eyes if you like to give it some personality.
When you drop in a coin, its weight makes the opening flip around, so it looks like the bank is eating the money.
It’s a great way to recycle an empty carton, too.
[For Toddlers] Simple but Amazing Craft Ideas: Playable Toys Too (21–30)
Picture-matching puzzle

Picture-matching puzzles are popular as educational toys that let kids use their fingertips to play! If you want a simple DIY version, we recommend reusing milk cartons.
It’s fun to make with your child, and you can play with it right away.
Take apart a milk carton and cut it so you get three horizontal strips.
Decorate the grid by drawing pictures or adding stickers so the segments line up as 1:3, 2:2, and 3:1.
Assemble each of the three strips and connect them, and your easy puzzle is done! If you want to make it a bit more challenging, a six-sided changing picture puzzle using four milk cartons is also a great option.