[For Age 3] Let’s make it in April! A collection of craft ideas to feel spring events and nature


It’s April, and the children have moved up to the class for three-year-olds.
The preschool class brings a different kind of excitement than before.
At this age, they’re also getting used to handling scissors and glue during craft activities.
Here are some April craft ideas that three-year-olds can tackle with a sense of accomplishment.
There are plenty of familiar motifs for children, such as spring flowers and animals.
It’s also great to observe spring flowers and creatures outdoors alongside the craft activities.
Because the children’s creations are regarded as works, the term “seisaku” (制作) is used in the text to refer to them.
- For three-year-olds: A collection of craft ideas featuring spring events and creatures that you’ll want to make with your three-year-old
- [Origami] Simple Origami Ideas to Feel the Spring with 3-Year-Olds
- [Childcare] Let’s make things with various materials! A collection of recommended craft ideas for April
- [For 4-year-olds] A collection of April craft ideas that capture spring, such as Easter and cherry blossoms
- [Childcare] Recommended games to play in the warm month of April
- [4-year-olds] Craft ideas to enjoy with children in June
- [April] Cute spring-themed classroom wall decoration ideas for early childhood education
- [For 3-year-olds] Let’s make strawberries with origami! A collection of easy strawberry folding ideas
- [Childcare] Enjoy March! A collection of ideas for event-related activities and nature play
- [May] Have Fun with 3-Year-Olds! Craft Ideas Perfect for May
- [For 2-year-olds] Feel the warm spring! Fun April craft ideas collection
- [Childcare] Recommended crafts and activities for March, such as Hina Matsuri (Doll’s Festival) and cherry blossoms
- [Kindergarten (older class)] What kind of season is March? Let’s make events and natural objects with origami!
[Age 3] Make it in April! A collection of craft ideas that feel like spring events and nature (11–20)
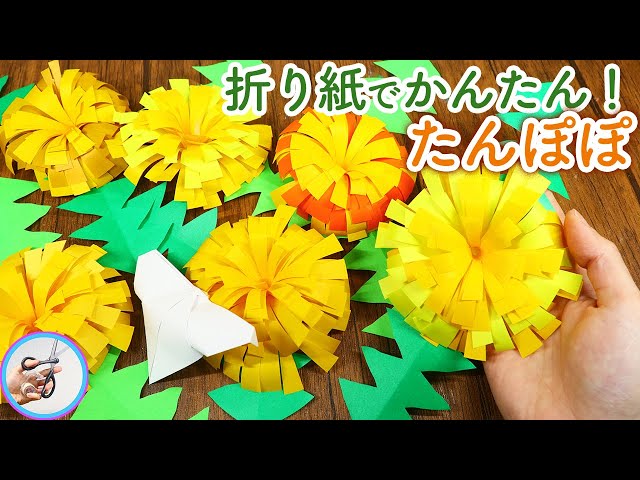
Giant dandelion made from construction paper

Let’s make a big, exciting dandelion using A4-size construction paper! Prepare three colors of paper for the petals, stem, and leaves.
First, fold the petal paper in half lengthwise.
Leaving about 2 cm at the top, make fine vertical cuts from the fold.
After cutting, roll it up tightly from one end and secure it, then gently spread open the cut fringes from the outside.
For the stem, roll the construction paper from a corner to form a rod.
For the leaves, cut them out from the paper with the characteristic jagged shape in mind.
Combine the three parts, and you’re done!
Two easy and cute spring wall decorations
Here are two quick and easy tulip crafts perfect for when you’re short on time.
The first is an origami tulip.
Start with the back side of the origami paper facing up, fold it into a triangle twice, then open it once.
Using the center line of the edge as an axis, fold up the left and right corners diagonally to suggest the shape of a tulip.
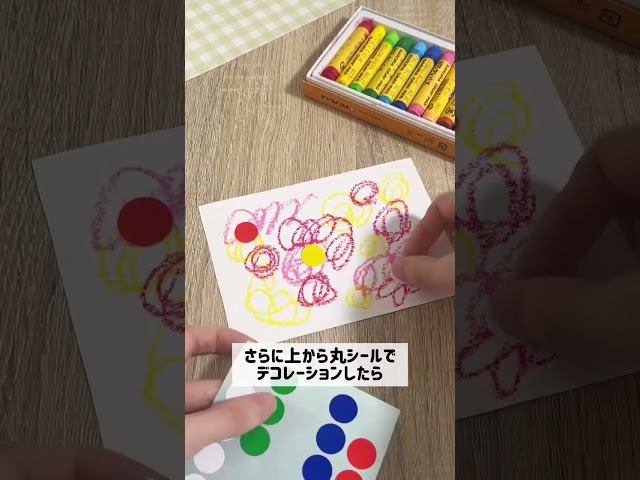
Glue it in place and you’re done! The second uses a sheet of drawing paper in a size that’s easy for kids to draw on.
Let them freely add color with crayons.
Then decorate with round stickers and the like, have an adult cut it into a tulip shape, and paste it onto a backing sheet.
Finally, draw the stem and leaves with crayons to finish.
It’s fun to play with all kinds of colors, so be sure to give it a try.
Perfect for spring! How to make fava beans

This is a cute broad bean craft.
Use glue to stick the prepared broad beans and parts onto construction paper.
When you’re done, use stickers and crayons to draw faces and add expressions.
It’s fun to make while thinking, “What kind of face should I do?” The steps are simple, so it’s an easy project for the beginning of a new school year or right after entering school.
If you stick them on construction paper, they make adorable pieces, and if you make a lot, they’re great as wall decorations.
Please use this as a reference and try your own variations!
If you make it larger, it can go on the wall too! Dandelion origami
Make it larger and you’ll have a showy dandelion that works as a wall decoration.
Cut origami paper to create petals and glue them in place while shaping them.
Increasing the number of petals adds more volume.
Draw patterns on a rectangular piece of origami paper, cut it out, and use it to represent grass.
By layering and connecting additional petals, you’ll achieve a three-dimensional finish.
Varying the colors and sizes will instantly brighten up a space—an idea enjoyable for both kids and adults.
It can also be used as a seasonal display.
Cherry blossom art made with paper clay and tissue paper
@levwell_hoikushi Age-based craft ideas posted daily. See more crafts from my profile! ▷ @levwell_hoikushi Press tissue paper into air-dry clay to create fluffy, gorgeous cherry blossoms. While feeling the softness of the clay, it’s fun to see the tissue gently expand with each press—so engaging that little hands won’t want to stop. This craft is perfect for 4-year-olds. Which other spring flowers could you make with this technique? Share your ideas in the comments! Craft goals: • Enjoy fingertip sensations by exploring the textures of clay and tissue paper • Build focus through repeated pressing motions • Become familiar with the feeling of spring through making cherry blossoms Materials (stores where purchased): • Construction paper (Daiso) • Air-dry clay (Daiso) • Pink tissue paper (Amazon) • Thin stick (like a chopstick) (Daiso) • Parts (tree trunk) How to make it Steps for the teacher: 1) Pre-cut the tissue paper into small pieces 2) Glue the tree trunk onto the base sheet 3) Knead the clay into a ball 4) Flatten the clay on the base sheet 5) Place tissue paper on top of the clay 6) Use the stick to press the tissue into the clay 7) Let dry to finish Target age: 4 years and up Difficulty: Medium Craft time (approx.): 10–15 minutes Age-based ideas updated regularly! Follow and check out other posts ▷ @levwell_hoikushi Nursery crafts Cherry blossom craft Spring craft For 4-year-olds March craft
♪ Original Song – Lebawell Nursery Teacher [Official] – Lebawell Nursery Teacher [Official]
Speaking of spring, it’s all about cherry blossoms! Let’s try making cherry blossoms using brightly colored pink tissue paper.
Be sure to cut the tissue paper into small pieces in advance.
Create a tree trunk from brown construction paper, place a ball of clay, and flatten it from above using a clear file.
After placing the tissue paper on the clay, use a thin stick like a chopstick to press the tissue paper into the clay.
By pressing in lots of tissue paper, you’ll create cherry blossoms in full bloom.
This craft lets you enjoy both the step of cutting construction paper with scissors and the tactile feel of the clay and tissue paper.
Butterfly decoupage with paint
@hoiku.labo Preschool craft to make in spring♪ Butterfly decoupage with paint 🦋ChildcareNursery teacher / Childcare workerKindergarten TeacherChildcare job openingsChildcare Column#NurseryTeacherThings#IWantToConnectWithChildcareWorkers#Nursery School Craft#DaycarePreparationNursery School PracticumChildcare studentAspiring childcare workerChildcare Job LabNursery teacher skillsJob change activities#JobChange#nursery_teacher_job_change
♪ Original song – Craft ideas for childcare ♪ Nursery Job Labo – Nursery Job Lab | Preschool teachers’ career changes and useful information
Here’s an idea for making cute butterflies using the decalcomania technique.
Decalcomania is a painting method where you fold a sheet with paint on it in half to transfer the paint.
Put several colors of paint on construction paper and fold it in half.
Cut it into a butterfly shape and open it up to reveal a lovely pattern.
Attach facial parts made from construction paper and pipe cleaners, and you’re done.
It’ll be exciting if you spark imagination and think about how the paints blend as you work! Let your child choose their favorite paint colors and proceed with the craft together.
[For 3-year-olds] Let’s make it in April! A collection of craft ideas (21–30) to feel spring events and nature
Stamp play is fun! Cute flowers
Here’s a craft idea that uses a stamp made from bubble wrap to depict cherry blossoms.
Lightly sketch the outline of a cherry blossom on pale pink construction paper, and have the children stamp inside the outline.
It’s fine if they go over the lines—unneeded parts will be cut off later! Encourage them to enjoy expressing themselves as they recall cherry blossoms.
The cutting step can be left to the children as good scissor practice.
If you display the cherry blossoms everyone made on the wall, it’ll feel like you can have a cherry-blossom viewing party right in the room!