[Childcare] Make it in April! Recommended easy origami folds


In April, when the new school year begins, children at daycare and kindergarten start life in a new environment, and some may feel nervous or even cry.
So this time, we’re sharing origami ideas perfect for April that will bring smiles to their faces.
There are plenty of motifs that capture the warmth of spring—flowers and insects, of course, as well as fruits and animals associated with Easter! Find something you’d love to make with the children and give it a try.
If you display their creations on the wall, you can enjoy spring indoors, too! Surrounded by a springtime atmosphere, we hope you can start a wonderful year with warm, cheerful feelings.
- [Childcare] Simple origami ideas for kids, perfect for spring
- [Origami] Easy spring-themed origami ideas to enjoy with 4-year-olds
- [For Age 3] Let’s make it in April! A collection of craft ideas to feel spring events and nature
- [For preschoolers] A collection of origami ideas to enjoy February, including Setsubun and Valentine’s Day
- Simple origami for kids: cute, playable origami ideas
- Recommended for preschoolers! A collection of origami ideas perfect for April
- Origami perfect for April! A collection of ideas recommended for preschoolers (around age 4–5)
- Origami ideas perfect for April that will captivate older kindergarteners!
- [For 4–5 year olds] A collection of recommended origami ideas for March—featuring seasonal events and natural motifs
- [April] Cute spring-themed classroom wall decoration ideas for early childhood education
- [Origami] Simple Origami Ideas to Feel the Spring with 3-Year-Olds
- [Origami] Simple Origami Folding Ideas to Savor Spring with 5-Year-Olds
- [Childcare] Let’s make things with various materials! A collection of recommended craft ideas for April
[Childcare] Let's make it in April! Recommended easy origami folding methods (21–30)
Easy! Recommended in spring: How to fold a horsetail (origami)NEW!

Let’s try making spring-like horsetail (tsukushi) with origami.
For this model, cut a 15 cm sheet of origami into thirds, so you can make three stems from one sheet! First, place the origami horizontally and fold it in half by bringing the left and right edges together.
Open it after creasing, then with the colored side facing up, fold the right edge to the crease.
Flip the paper over, fold the top and bottom edges inward, and make it into thirds.
Next, make a pleated fold (accordion fold) along the boundary where the color changes, and do the same pleated fold in the middle of the colored section.
Then fold the top and bottom edges of the colored section inward to make it narrower, and round the four corners of the white section by folding them in.
Draw patterns with a pen, and your tsukushi is complete!
A tulip you can stand up and display! A three-dimensional tulipNEW!

Here’s a cute tulip idea you can display on a tabletop rather than on a wall.
For the flower, fold a sheet of origami paper into a triangle twice, then squash the pocket into a square.
Fold the left and right corners inward to form the tulip shape.
Before spreading the flower open from the center, make a small cut at the bottom with scissors so you can insert the stem later.
The leaf and stem are made from a single sheet of origami paper.
First, fold it into a triangle once.
Open it after creasing, then fold the two left edges to the crease line twice, and the right edge once to the crease line.
This way, the stem will be on the left and the leaf on the right.
Finally, fold the stem and leaf together in half, and insert the stem into the flower to finish.
[Childcare] Let's make it in April! Recommended easy origami folds (31–40)
Easter Bunny
https://www.tiktok.com/@sachimama_asobi/video/7351882267540688144The rounded shape is so cute! Let me introduce an idea for making an Easter bunny out of origami.
What you need are origami paper, white round stickers, pens or colored pencils, and decorations like ribbons.
The adorable Easter bunny can be made with just one sheet of origami paper, which is great! The key points are the egg-like round body and the perky ears, so make sure to crease firmly as you fold.
Once it’s finished, stick on the little white round-sticker hands and draw the face!
Cubical Tulip Origami

A tulip that looks great from every angle—360 degrees! This cute idea features a potted design.
Fold the origami paper in half twice to make a square, open up the pocketed parts and squash them flat to form triangles on both sides.
Next, fold the two corners of each triangle up to meet the top corner, then flip layers so that the folded sections are on the inside and a flat face is showing.
On the flat face, fold the top edges on both sides toward the center line.
After folding both sides, tuck the right edge inside the folded left edge.
Then gently pull outward on the two triangular openings at the bottom of the paper and press with your fingers to flatten the base.
Finally, curl the four top corners outward to form the petals, and you’re done.
Make the stem, leaves, and pot as well to complete the piece.
If you make it larger, it can go on the wall too! Dandelion origami
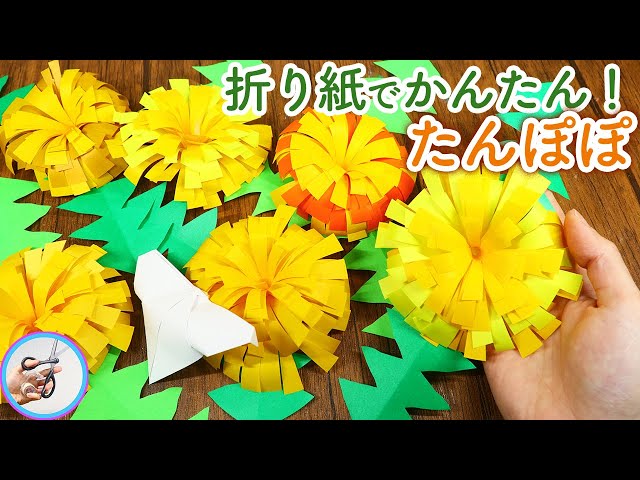
Make it larger and you’ll have a showy dandelion that works as a wall decoration.
Cut origami paper to create petals and glue them in place while shaping them.
Increasing the number of petals adds more volume.
Draw patterns on a rectangular piece of origami paper, cut it out, and use it to represent grass.
By layering and connecting additional petals, you’ll achieve a three-dimensional finish.
Varying the colors and sizes will instantly brighten up a space—an idea enjoyable for both kids and adults.
It can also be used as a seasonal display.
Japanese bush warbler

‘Hoo-hokekyo!’ You can almost hear the beautiful song of the Japanese bush warbler! Let me show you an idea for making a bush warbler out of origami.
All you need is origami paper, black round stickers, and a white pen.
The bird you’ll make with this idea has a round silhouette that captures the warbler’s charm—so cute! If you also make plum blossoms from origami or construction paper and display them together with your origami warbler, it creates a lovely, atmospheric scene.
Give it a try and have fun making it!
A simple dandelion flower

Here’s an easy dandelion idea that uses a basic folding method to create a flower shape and is simple to customize.
Fold the paper to align the top, bottom, left, and right edges to make creases, then align the opposite corners to add diagonal creases.
After cutting to the center, make pleat folds along the crease lines and align the inner corners to neaten the shape.
Slightly curl the petals for a softer look.
Glue two identical pieces face-to-face to complete the flower.
Connect a diamond-folded leaf and a made stem to create a cute dandelion.
Making them in different colors is recommended—it looks more festive when displayed together.