Spring wall decorations: A roundup of recommended motifs for nurseries and kindergartens


At daycare centers and kindergartens, you make fun wall displays every month, right?
Spring wall displays are full of cute motifs.
For teachers who are unsure which ones to use, here’s a roundup of wall display ideas perfect for spring, from March to May!
Cherry blossoms, colorful flowers, and adorable spring insects will brighten up the classroom.
If you make them together with the children, the fun doubles!
You can also combine several motifs to create original decorations.
Try expressing the excitement of spring on your walls!
Spring wall decorations: Recommended motifs for nurseries and kindergartens (1–10)
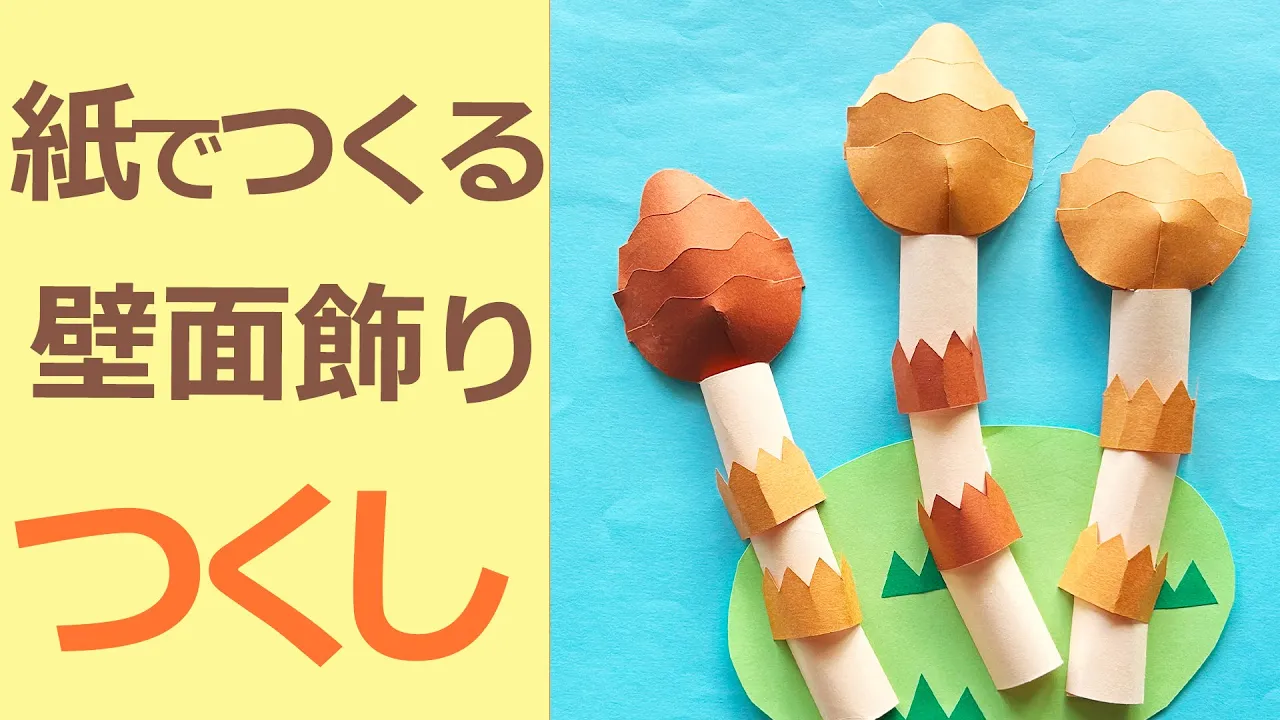
3D horsetail

Let me introduce a wall display featuring horsetails that appear from the soil in spring.
Place a horsetail template on construction paper and cut along it.
For the head of the horsetail, make slits with a craft knife and glue the pieces together with slight overlaps to create tiers—it might make it look more like a real horsetail.
It also helps to shape the paper so it has a rounded, three-dimensional look.
By making stems of different lengths and gluing long and short ones together, you’ll end up with horsetails of varying heights, which can give an even stronger sense of spring.
Once you’ve attached the horsetails to the ground you made, it’s complete!
A cute flower made from one sheet of tissue paper

Here’s how to make a cute flower using just one sheet of tissue paper.
First, fold the tissue paper into an accordion.
Then fold it in half.
After folding, round off the edges with scissors.
Staple the center, and gently open up the flower.
Once it’s opened, press down the center to finish.
You can make lots of flowers to decorate a wall, add leaves to make a bouquet, or cut the edges into points to turn it into a dandelion—there are many ways to arrange them, so give it a try!
Tissue-paper butterfly

Why not try making fluffy butterflies using soft tissue paper? If you use a template, you can easily make them in bulk.
Start by creating a butterfly template with dark-colored tissue paper.
Divide the tissue paper into six equal parts and cut out the template with scissors.
Once cut, stick it onto copier paper and make copies.
Stack several sheets of butterfly tissue paper on top of the copied paper, staple around the edges, and then cut them out along with the template.
After cutting, twist a chenille stem (pipe cleaner) around the center of the butterfly paper to finish.
Origami Bamboo Shoot

Bamboo shoots are a hallmark of spring.
Their taste and appearance are irresistible, aren’t they? Many people might even say they’re a favorite.
How about trying to fold bamboo shoots with origami? The steps are relatively simple and quick, so try making several.
They’re fun to stick on the wall, and it’s also enjoyable to fold a basket or bamboo with origami and paste them together as if placing the shoots inside.
Subtly decorating your space with seasonal accents lets you feel Japan’s four seasons even indoors—it’s delightful, isn’t it?
Dandelion wreath

Why not try making a dandelion wreath with origami? Dandelions are one of the flowers that symbolize spring, and some of you may have made crowns with real dandelions.
Here’s how to make it.
Cut yellow origami paper into thin strips and fold each strip in half; connect two strips together, then make small cuts along the looped edge.
After making the cuts, roll it up tightly—this will be the flower.
Create the fluff (seed head) the same way using tissue paper.
The wreath is made by assembling pieces crafted from green paper.
Attach the leaves, flowers, and fluff to the wreath, and it’s complete.
Weeping cherry blossom arch

Here is an arch of weeping cherry blossoms that you can make using only origami paper and bubble wrap (packing material).
Just set it up at your entrance or room doorway to create a gorgeous, festive look.
The main arch is made simply by rolling up the bubble wrap, but it also looks cute hanging directly from the top of an entrance or window.
First, make one cherry blossom to use as a template.
Once that’s done, connect sheets of origami with double-sided tape to create a continuous chain of blossoms.
After connecting them, place half of the template blossom on top and cut along it to finish.
Sakura Clockwork Wall

There are many types of wall decorations, but a trick wall where cherry blossoms bloom is quite rare, isn’t it? First, prepare a cherry tree with only the trunk and no flowers, and make slits where you want the flowers to appear.
For the flowers, mark circles on white construction paper and add small “horns” (tabs), then draw cherry blossoms inside the circles.
Cut a slit from the tip of each horn to the center, and insert only one side into the trunk.
If you take the protruding horn and twist it around, the flower will bloom.
It’s also fun to make them bloom one by one in time with the cherry blossom season.