

At daycare centers and kindergartens, you make fun wall displays every month, right?
Spring wall displays are full of cute motifs.
For teachers who are unsure which ones to use, here’s a roundup of wall display ideas perfect for spring, from March to May!
Cherry blossoms, colorful flowers, and adorable spring insects will brighten up the classroom.
If you make them together with the children, the fun doubles!
You can also combine several motifs to create original decorations.
Try expressing the excitement of spring on your walls!
- [April] Cute spring-themed classroom wall decoration ideas for early childhood education
- [Origami] Easy spring-themed origami ideas to enjoy with 4-year-olds
- [December Wall Displays] Cute Winter Craft Ideas You Can Use Beyond Christmas!
- Motifs for wall decorations that can be used year-round, recommended for nursery schools and kindergartens
- [Childcare] Cute to display! A collection of wall decoration ideas you’ll want to make in February
- [Childcare] Perfect for April: Wall decoration ideas to celebrate starting school and moving up a grade
- Wall decoration ideas recommended for sports day at nursery schools and kindergartens
- [Childcare] Wall decoration craft ideas featuring a cherry blossom motif
- Wall Decor: Celebrate April! A Special Feature on Cherry Blossom Wall Decoration Ideas
- [Childcare] Ideas for March wall decorations
- [Childcare] Decorate in April! A collection of recommended wall display ideas for Easter
- Perfect for spring crafts! A collection of recommended ceiling decoration ideas for childcare rooms
- Recommended for graduation ceremonies! A collection of handmade cherry blossom ideas to decorate your walls
Spring wall decorations: Recommended motifs for nurseries and kindergartens (1–10)
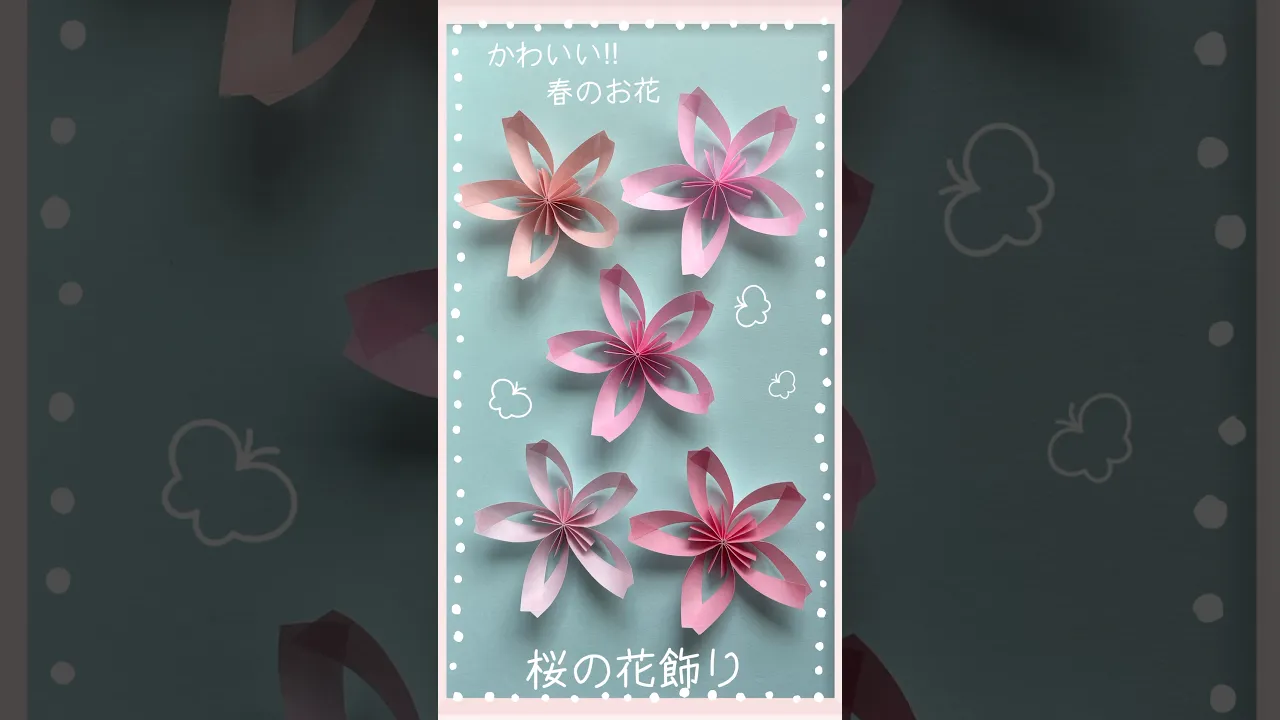
Cute cherry blossom origami on the wall as wellNEW!

Here’s an idea for making a cherry blossom by combining petal parts.
Use one strip of origami paper measuring 15 cm by 1 cm to make a single petal.
First, leaving 3 cm at each end, accordion-fold the paper at 1.5 cm intervals.
Once folded, glue both ends so that the mountain-folded sections face inward.
With one petal complete, make four more and attach them together to form a cherry blossom.
Use pink origami paper and place the colored side on the inside when making it.
Tear-and-enjoy! Butterfly decorations

Let’s try making a cute butterfly decoration.
First, cut paper into the shape of a butterfly and paste it onto a backing sheet.
Then tear pieces of paper and stick them onto the wings to decorate.
Finally, attach the parts for the butterfly’s body and face, and you’re done.
It sounds fun to imagine what kinds of paper to tear, and the very sensation of tearing will be interesting too.
Once finished, it can also be used as a wall decoration.
Your room will be filled with a springtime atmosphere.
3D horsetail

Let me introduce a wall display featuring horsetails that appear from the soil in spring.
Place a horsetail template on construction paper and cut along it.
For the head of the horsetail, make slits with a craft knife and glue the pieces together with slight overlaps to create tiers—it might make it look more like a real horsetail.
It also helps to shape the paper so it has a rounded, three-dimensional look.
By making stems of different lengths and gluing long and short ones together, you’ll end up with horsetails of varying heights, which can give an even stronger sense of spring.
Once you’ve attached the horsetails to the ground you made, it’s complete!
Fits perfectly on walls too! Cute bubbly strawberries

When you think of strawberries, you picture all those seeds on the surface! In this craft, we’ll use bubble wrap and paint to represent the strawberry’s seeds.
After cutting construction paper into a strawberry shape, layer on bubble wrap brushed with paint and stamp it.
Once the paint dries, finish by adding a calyx made from construction paper.
The classic combo is stamping white paint onto red construction paper, but stamping red paint onto pink paper is cute, too.
What color are strawberry seeds again? Chat about that while you make some delicious spring strawberries.
Two easy and cute spring wall decorations
Here are two quick and easy tulip crafts perfect for when you’re short on time.
The first is an origami tulip.
Start with the back side of the origami paper facing up, fold it into a triangle twice, then open it once.
Using the center line of the edge as an axis, fold up the left and right corners diagonally to suggest the shape of a tulip.
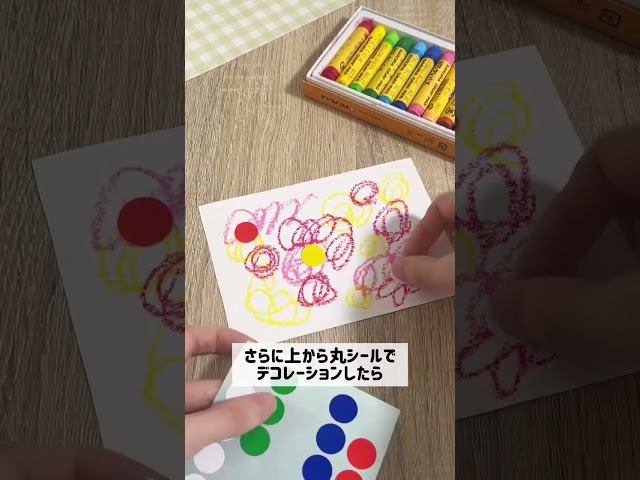
Glue it in place and you’re done! The second uses a sheet of drawing paper in a size that’s easy for kids to draw on.
Let them freely add color with crayons.
Then decorate with round stickers and the like, have an adult cut it into a tulip shape, and paste it onto a backing sheet.
Finally, draw the stem and leaves with crayons to finish.
It’s fun to play with all kinds of colors, so be sure to give it a try.
Weeping cherry blossom arch

Here is an arch of weeping cherry blossoms that you can make using only origami paper and bubble wrap (packing material).
Just set it up at your entrance or room doorway to create a gorgeous, festive look.
The main arch is made simply by rolling up the bubble wrap, but it also looks cute hanging directly from the top of an entrance or window.
First, make one cherry blossom to use as a template.
Once that’s done, connect sheets of origami with double-sided tape to create a continuous chain of blossoms.
After connecting them, place half of the template blossom on top and cut along it to finish.
Connect the loops to make a ring caterpillar

Here’s a craft idea for making a caterpillar using classic loop chains, often used as birthday decorations.
Cut construction paper into long strips, form a loop and glue it; then thread the next strip through that loop, form another loop, and glue it the same way.
Repeat to create the caterpillar’s body.
Draw a face on a circle cut from construction paper, and attach antennae made by wrapping pipe cleaners around a pom-pom.
Once you fix the face to the body with double-sided tape, it’s complete! If you connect a stick with a tied string, you might be able to take it for a little walk around the room.