![[Childcare] Ideas for March wall decorations](https://i.ytimg.com/vi_webp/jdJComkzUq8/maxresdefault.webp)
[Childcare] Ideas for March wall decorations


Here are some ideas for March wall decorations that are useful in childcare settings.
March is packed with end-of-year events—Hinamatsuri (Girls’ Day), farewell field trips, graduation, and preparations for moving up or starting school—so it’s easy to wonder what kind of wall displays to make and when to find the time.
The ideas introduced here focus on decorations that can be displayed as complete wall pieces or used as parts.
If you work on them little by little in your spare moments and put them up, your room will not only look more vibrant, but just seeing them will lift everyone’s spirits!
As the weather gradually warms, enjoy creating colorful wall displays to match the season.
[Childcare] March wall decoration ideas (1–10)
Connect the loops to make a ring caterpillar

Here’s a craft idea for making a caterpillar using classic loop chains, often used as birthday decorations.
Cut construction paper into long strips, form a loop and glue it; then thread the next strip through that loop, form another loop, and glue it the same way.
Repeat to create the caterpillar’s body.
Draw a face on a circle cut from construction paper, and attach antennae made by wrapping pipe cleaners around a pom-pom.
Once you fix the face to the body with double-sided tape, it’s complete! If you connect a stick with a tied string, you might be able to take it for a little walk around the room.
Three-dimensional dandelion made with Suzuran tape

Let’s make a three-dimensional dandelion using pom-poms, which are often used in school sports day dances.
By using yellow raffia tape, you can capture the dandelion’s distinctive petals.
Wrap yellow raffia tape around a small piece of cut cardboard; once it has enough volume, slide it off the cardboard and tie the center with another piece of yellow raffia tape.
Cut through the looped sections with scissors, then trim it into a rounder shape.
Glue this onto a backing sheet, and draw the stem and leaves underneath to finish! If the children are still practicing with scissors, an adult should handle the rounding and trimming steps.
Pop-up! Fluttering Tulip

This is a tulip craft with a charming, fluttering, raised look.
Fold the origami paper in half horizontally, then fold both sides toward the crease.
Fold back along the previous crease, and fold so the piece becomes one-third its size vertically.
Draw half of a tulip on it, cut along the line with scissors, and you’ll have six parts.
Glue each part together, attach them to a backing sheet, and adjust the shape to complete the flower.
Making a stem and leaves as you like will make it even nicer.
It’s a tulip craft that makes your heart flutter with the coming of warm spring—please give it a try.
Cute and easy! 4 butterfly picks
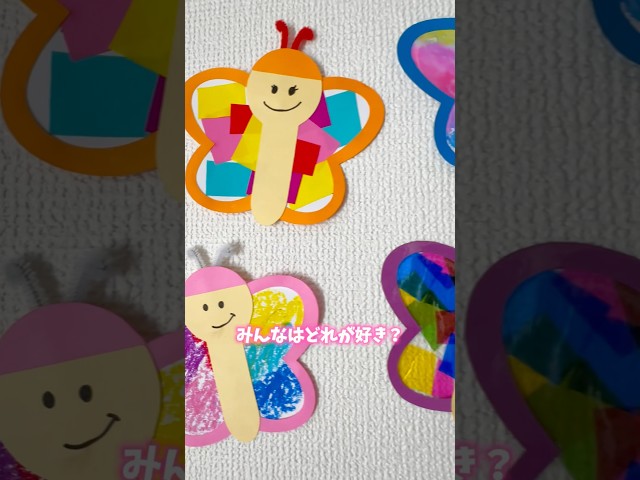
Here’s how to make butterflies in four different, fun ways.
The first is to draw swirling patterns with crayons on construction paper.
The second is torn-paper art: glue small pieces of origami paper onto construction paper.
The third is to color aluminum foil with color markers, spray it with water, and then transfer the color onto construction paper.
The last idea uses cooking parchment: attach pieces of colored cellophane to it.
Each method is lovely and results in a uniquely personal piece.
Finish by attaching pipe-cleaner antennae and gluing on the body with a drawn face.
Fluffy Balloon Sakura

March marks the end of the fiscal year and is also a month for celebrating new beginnings.
Here’s a perfect idea for March: hot-air-balloon cherry blossoms.
Prepare several strips of warm-colored construction paper cut lengthwise, then gently paste them on the wall in a rounded shape to form a balloon.
Scatter cherry blossoms and leaves in the gaps, add a basket and strings, and you’re done! If you place animals or people in the basket and decorate the area with children’s self-portraits or photos, you’ll have a wonderfully festive wall display.
Let’s celebrate new beginnings with a cute hot-air-balloon cherry blossom wall decoration!
Easy! Flapping Ladybug

When the weather gets warm, you feel like running around in meadows and flower fields, don’t you? It’s also the season when animals and insects become active.
Let’s try making a ladybug craft that’s perfect for March! Cut out three circles from red and beige construction paper.
Fold the two red circles in half and stick them onto the beige circle.
Attach them to a head made from black construction paper, draw patterns on the wings, and you’re done.
The fluttering wings are so cute—why not make a bunch and use them as wall decorations?
Candy fits inside too! Cute tulip origami

Let’s use two sheets of origami paper to make a tulip flower and leaves.
First, we’ll make the flower: fold the origami into a triangle.
Once folded, starting from the center of the base, fold the left and right corners upward at an angle to form the petals.
Turn the paper over, then fold the left, right, and bottom corners into triangles, and the flower is done! Next, for the leaf piece, also start by folding it into a triangle.
Fold the top corner down to meet the base.
Flip the paper top-to-bottom, then fold up each half of the base along the center line to create two leaves.
Turn the paper over, fold up the bottom corner, and it’s complete.
Combine the two parts to make a cute tulip.
You can place sweets inside from the top of the flower.