[Childcare] Ideas for March wall decorations


Here are some ideas for March wall decorations that are useful in childcare settings.
March is packed with end-of-year events—Hinamatsuri (Girls’ Day), farewell field trips, graduation, and preparations for moving up or starting school—so it’s easy to wonder what kind of wall displays to make and when to find the time.
The ideas introduced here focus on decorations that can be displayed as complete wall pieces or used as parts.
If you work on them little by little in your spare moments and put them up, your room will not only look more vibrant, but just seeing them will lift everyone’s spirits!
As the weather gradually warms, enjoy creating colorful wall displays to match the season.
- [Childcare] Recommended crafts and activities for March, such as Hina Matsuri (Doll’s Festival) and cherry blossoms
- Perfect for spring: Wall display ideas with a horsetail motif you’ll want to make in March!
- [Childcare] Perfect for spring! Dandelion wall decorations
- [April] Cute spring-themed classroom wall decoration ideas for early childhood education
- [Graduation Ceremony] Add Handmade Flair and Festivity! A Collection of Wall Decoration Ideas
- [Childcare] Ideas for March wall decorations
- [Childcare] Wall decoration craft ideas featuring a cherry blossom motif
- Perfect for spring crafts! A collection of recommended ceiling decoration ideas for childcare rooms
- [Childcare] Fun to Make! Recommended Craft Ideas for Spring
- Nursery/Childcare: Creative Ideas for Making Rape Blossoms (Nanohana) Crafts
- [Kindergarten (older class)] What kind of season is March? Let’s make events and natural objects with origami!
- [Graduation Ceremony Wall Decor] A collection of rainbow-themed ideas to send off the children
- [Childcare] Fun Craft Ideas for Hinamatsuri (Girls' Day)
[Childcare] Ideas for March Wall Decorations (21–30)
Perfect for walls! A butterfly craft that makes paint play fun
Cut an A4 sheet of drawing paper into the shape of a butterfly, then apply paint on just one side.
Once you’re ready, fold it in half and lift the wing—your design will have transferred beautifully to the other side! You can also enjoy the excitement of seeing what pattern appears the moment you open it.
After that, attach the wings to another A4 sheet for the background, and stick a photo of your child in the center.
You’ll have a one-of-a-kind, adorable butterfly! It will look very spring-like on a wall display and become a wonderful, memorable piece.
Easy tulips you can enjoy by sticking them on
@hoiku.labo For a March wall display: Just cut and paste! Easy tulips 🌷#Childcare CraftingNursery teacher / Childcare worker#Drawers of Childcare#NurseryTeacherInTraining#NurseryTeacherThingsWith childrenFelt#Wall CreationTulip
♪ Original Song – Craft Ideas for Childcare ♪ Hoiku Kyujin Labo – Hoiku Kyujin Labo | Nursery Teacher Job Changes and Helpful Information
Here’s a gentle and fun craft that lets you enjoy a springlike atmosphere.
Cut construction paper into the shape of a tulip to make a base.
Next, prepare felt in your favorite colors and cut it into circles, squares, or any sizes and shapes you like.
Once you’re ready, stick the felt pieces onto the tulip base to decorate.
If you start with the larger felt pieces, it’s easier to keep things balanced and to place them.
By decorating freely, you’ll create a colorful and cute tulip.
Finally, glue on a stem and leaves made from construction paper to finish.
Two easy and cute spring wall decorations
Here are two quick and easy tulip crafts perfect for when you’re short on time.
The first is an origami tulip.
Start with the back side of the origami paper facing up, fold it into a triangle twice, then open it once.
Using the center line of the edge as an axis, fold up the left and right corners diagonally to suggest the shape of a tulip.
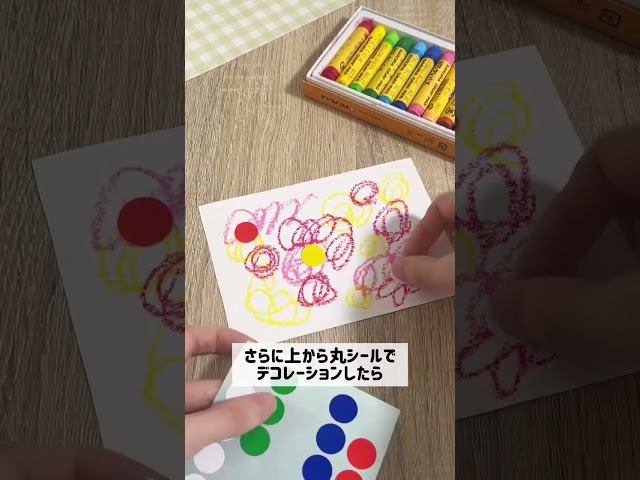
Glue it in place and you’re done! The second uses a sheet of drawing paper in a size that’s easy for kids to draw on.
Let them freely add color with crayons.
Then decorate with round stickers and the like, have an adult cut it into a tulip shape, and paste it onto a backing sheet.
Finally, draw the stem and leaves with crayons to finish.
It’s fun to play with all kinds of colors, so be sure to give it a try.
Let’s draw cherry blossoms using only a straw!

Make five evenly spaced cuts on one side of a straw, then spread that section out into a flower shape.
After that, just dip it in pink paint and stamp it to create a cherry blossom tree.
Beforehand, stick a trunk made from construction paper onto the backing sheet, and have the children stamp over it.
You can stamp to clearly show the flower shape, or layer the stamps to express a tree in full bloom.
After pressing the stamp onto the backing sheet, move the handle in a circular motion as it is.
That will create a clean flower shape!
Quick and easy with bubble wrap stamps! Cute beehive

This is a fun stamping activity to make a cute honeycomb using bubble wrap.
Roll the bubble wrap to create a stamp, dab it in paint, and pop-pop it onto construction paper to easily make a honeycomb-like pattern.
Using two colors of paint lets you enjoy the contrast and looks very pretty.
Once the pattern is done, make bees and other parts and glue them on.
Since it’s just stamping, even young children can enjoy it and get absorbed in the activity.
After you attach the parts at the end, your adorable honeycomb artwork is complete!
Let’s make and display it! The Very Hungry Caterpillar

How about making the famous Very Hungry Caterpillar? First, take five sheets of construction paper and cut them into oval shapes to form the caterpillar’s body.
Prepare the antenna pieces as well, then arrange the body segments and stick them onto the backing paper one by one.
After you’re done gluing, use round stickers to decorate freely.
Simply adding stickers in your favorite colors will give you a colorful, cute caterpillar.
Next, draw the face with crayons and add drawings to the background too.
Finally, write your name and you’re done.
Each child’s individuality will shine through in their one-of-a-kind caterpillar.
Perfect for spring! How to make fava beans

This is a cute broad bean craft.
Use glue to stick the prepared broad beans and parts onto construction paper.
When you’re done, use stickers and crayons to draw faces and add expressions.
It’s fun to make while thinking, “What kind of face should I do?” The steps are simple, so it’s an easy project for the beginning of a new school year or right after entering school.
If you stick them on construction paper, they make adorable pieces, and if you make a lot, they’re great as wall decorations.
Please use this as a reference and try your own variations!