[Childcare] For 5-year-olds! Autumn craft ideas

Autumn is full of fun events for children, like Halloween, sports days, and field trips.
In this article, we’ll introduce craft ideas that are perfect for the autumn season.
Since autumn is a comfortable time of year, there are also plenty of chances to go for walks and collect acorns and fallen leaves.
We’ve included ideas that use natural materials like these as well.
You’ll also find ideas for crafts and wall decorations that can be used for events, so be sure to try making a variety of them.
Because the children’s creations are regarded as works (artworks), we refer to them as “sei-saku” (制作) in the text.
- Craft Activity Ideas for 5-Year-Olds: November Edition
- [Childcare] Perfect for October! Autumn crafts to enjoy with 5-year-olds
- Preschool: Autumn-Themed Craft Ideas Recommended for November
- [Childcare] For 5-year-olds! Autumn craft ideas
- For 5-Year-Olds: Enjoy Autumn! Easy Origami Ideas
- Recommended for 5-year-olds’ September crafts! A collection of ideas to enjoy autumn
- September: Autumn crafts! Ideas you can use in childcare
- Irresistible for 5-year-olds! A collection of recommended craft ideas for Halloween
- [Childcare] Autumn craft ideas
- [October] Craft ideas for fall you can use in childcare
- [Childcare] Playful craft ideas to enjoy with 5-year-olds
- [For 4-Year-Olds] Recommended in November! Autumn-Themed Craft Activities
- Grape craft ideas to enjoy in childcare! Have fun making autumn fruits
[Childcare] For 5-year-olds! Autumn craft ideas (21–30)
Cute, freshly baked sweet potato

Let’s fold an autumn treat—sweet potatoes—using a single sheet of origami paper.
As you fold, be sure to make crisp creases.
By freely adjusting the angles, each person’s sweet potato will have its own unique shape, making it even more fun when you finish.
For the white areas, it’s recommended to add color using crayons or paint.
Fold in the corners to give your sweet potato a plump, rounded shape.
It could be fun to display them on an autumn-themed wall, or put them in a basket or bag and use them for pretend shopping play.
Cute little squirrel!

A squirrel you can make from a single sheet of origami—also great for November wall displays—is a perfect craft for preschoolers.
Fold the paper into a triangle, then fold up the left and right sides to form a cup shape.
After folding down the tip of the paper, create the squirrel’s belly.
For the tail, make horizontal snips into the flappy triangular part of the paper.
Be careful not to cut all the way through.
Draw the face to finish.
To give the tail a fluffy look, you might curl it with a ballpoint pen to add some movement.
Cute! Horsetail Origami

Let’s make a cute horsetail (tsukushi) using 15×7.5 cm origami paper.
First, place the white side of the paper facing up and fold it into a square by bringing the top and bottom edges together.
Open it once the crease is made, then fold the bottom edge up to meet the crease.
Rotate the paper 90 degrees to the right and turn it over, then fold the top and bottom edges inward to make it into thirds.
Create the hakama (pleated trousers) look by making two step folds (valley–mountain) on the white section, then fold the top and bottom inward toward the center.
At this point, it’s easier if you squash-fold the right corner into a triangle.
Finally, fold all four corners of the brown section inward, and you’re done.
Two ways to fold an acorn

Even when we say “acorns” as a catch-all, there are many kinds—apparently more than 20 species native to Japan alone.
In this idea, we introduce two styles: a long acorn and a round acorn.
That said, the folding method is the same for both.
With the colored side of the origami facing up, fold down the top edge.
This part becomes the acorn’s cap, so make this section narrower for a long acorn and wider for a round acorn.
After folding the cap, flip the paper over and fold the left and right edges toward the center line.
A key point here is to align only the brown section with the center line.
You want the white section to suggest the cap’s flare, so fold it while slightly opening it outward and flattening it.
After that, just fold the top and bottom corners inward to refine the shape.
Adding patterns to the cap makes it extra cute.
Ginkgo hanging ornament
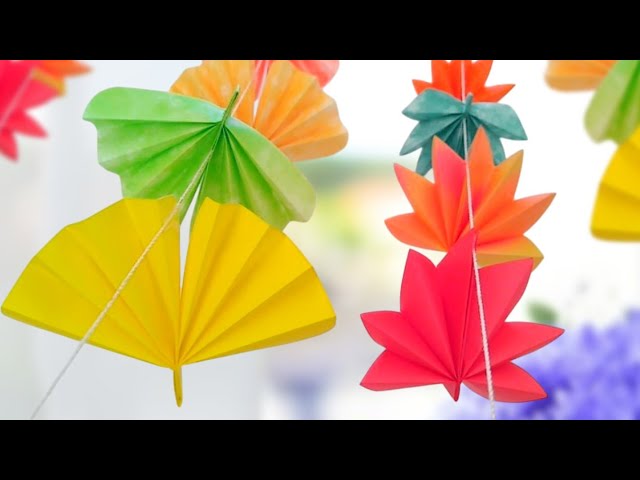
Ginkgo decorations, which are very popular as autumn ornaments, add a warm touch to any room.
Prepare origami paper, string, double-sided tape, and a stapler, then let’s get started.
Fold the origami paper in half horizontally three times, aligning with the center line, then unfold it completely.
Flip the paper front and back as you make an accordion fold.
Trim the corners to create a rounded shape, fold it in half toward the center, and staple the bottom.
Finally, stick the center together with double-sided tape to finish.
Attach them to a string to make hanging garlands, or decorate walls and other spaces—have fun creating!
Recommended for walls too! How to fold a ginkgo leaf

Around November, when autumn deepens, the autumn leaves are at their most beautiful.
It’s also a great time to enjoy the foliage with children by folding origami.
This ginkgo leaf can be made with just one sheet of origami paper.
First, fold the paper into a triangle twice to create crease lines.
Fold both sides toward the center line, then fold the bottom tip upward to form the ginkgo shape.
The key is to use your fingertips to make crisp, firm creases.
Using brightly colored paper like orange or yellow will let you create a lovely, large ginkgo tree.
A cute autumn tree made of origami

Let’s make a simple autumn tree using origami.
Prepare two sheets of origami paper and create separate parts for the leaves and the trunk.
For the leaves, fold into triangles and squares, pressing firmly with your fingers to set crisp creases.
Following the creases, fold everything inward as if tucking it inside.
If it’s difficult, have an adult help.
Once you shape the corners into leaf-like points, the leaf section is complete.
For the trunk, fold along the center line to create a three-dimensional shape.
Attach the leaves and trunk together to finish.
It’s also nice to use different paper colors for a more autumnal look.