Origami ideas boys will want to make!

We’ll introduce origami ideas and instructions that boys will love, including playable origami toys, favorite creatures, and items perfect for pretend play.
Many of these can be made with just one sheet of origami paper, so even young children can give them a try.
Once you master the folds, try making them in different colors and patterns, or draw eyes and designs with a pen to add your own originality.
If you draw a picture on construction paper and paste your origami on top, it will add a three-dimensional feel and make a wonderful piece of art.
If you’re a boy who wants to try origami, have fun and give it a go!
- Cool origami that boys will love and want to fold
- Simple origami that can be folded from a single sheet
- Kids will love it! Easy origami ideas—great as gifts too!
- Craft ideas using plastic bottle caps [for boys]
- Let's make it with origami! A collection of ways to fold “dinosaurs”
- Let's make it with origami! Ideas for simple 3D creations
- [Origami] Cool DIY Ideas for Paper Shuriken
- Made of paper! A fun collection of DIY toy ideas you can play with
- Popular characters that are easy to make with origami. A collection of creations you can enjoy with children.
- Easy to make! DIY ideas for Whack-a-Gator
- Kids’ Origami: Cute and Easy Ideas to Make for a Birthday
- Cute Origami Ideas for Girls
- [For Kids] Let's Fold! Today's Origami Idea Collection
Ideas for origami boys will want to make! (41–50)
Fold the whole body! How to fold AnpanmanNEW!

Here’s a helpful idea when you want to make not just the face but the body too! We’ll create it in separate parts: face, nose, torso, cape, arms and legs, plus the decorative belt and face emblem.
The steps for the face and torso are the same up to a point, so it’s a good idea to fold them in parallel.
For the nose, limbs, and decorations, use smaller 7.5 cm origami paper, so please prepare 15 cm sheets cut into quarters.
Once all the parts are done, combine them to finish.
There’s a section on the cape for attaching the head, so after gluing, you won’t have to worry about the head tipping backward from its weight!
A slightly more detailed way to fold cheeseNEW!
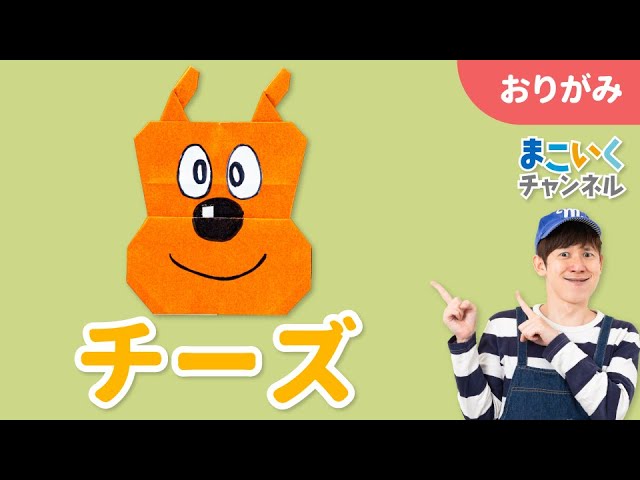
A dog named Meiken Cheese who lives in a bread factory.
You can make this origami idea with a single sheet, but since there’s one place where you need to make a cut, please prepare scissors.
First, fold the left and right edges of the origami to meet at the center to make a rectangle.
From there, create multiple horizontal crease lines and make two valley-mountain step folds to divide the paper into three sections: ears (top), the upper head, and the lower head.
The top section will be the ears, so make a cut at the center and split it into left and right.
While folding the left and right edges of the ears inward, squash the four lower corners into triangles.
Then, overlap the folded edges and tilt them diagonally to complete Meiken Cheese’s distinctive ears.
For the middle section, follow the same steps to form the outline, but fold the edges so they flare outward from the step line.
Finally, fold the lower left and right bottom corners of the bottom section into triangles, and you’re done!
How to fold a playable Anpanman spinning topNEW!

Let’s make a Beyblade you can easily battle with using origami! In this idea, you’ll use four sheets of origami paper to create the outer body, inner body, handle, and hand decorations, then combine them into a single Beyblade.
The inner body and handle are basically made with the zabuton fold.
The outer body follows the same steps as the trick boat up to a point.
After making two boats, squash both sides into squares, then transform them into diamond shapes.
Draw the Anpanman illustration on this part.
Finally, make four hand decorations using origami paper cut into quarters, insert them into the illustrated section, and you’re done! The folding steps themselves aren’t difficult, so it’s perfect for parent-child origami time.
Challenge from age 3! CurrypanmanNEW!

Let’s make Currypanman, who fights by blasting curry from his mouth, using a single sheet of brown origami.
Fold the paper in half to make a crease, then open it and fold the top edge down to meet the crease.
About 1 cm below the folded top edge, fold both left and right corners into triangles, then fold the bottom edge up to align with those points.
Next, fold the bottom corner into a triangle, fold the left and right edges inward, and then fold them back outward to create the curry-bun shape.
Finally, fold the top and bottom corners into small triangles to round them off, and you’re done!
shield

Didn’t you ever admire the hero’s shield when you were a kid? Let’s try making a cool shield like that with origami! You can make it with just one sheet, and the folding is relatively simple, so it’s great for little kids too.
There’s a handle on the back of the shield, so you can play with it after folding—that’s a nice bonus! Also, since the back side of the paper becomes part of the design, using double-sided origami paper is recommended.
You can freely customize it by changing the paper colors.
And if you make a sword to go with the shield, it’ll be perfect for pretend play.
Push Pop

A push pop toy where you press the little bulging bumps for fun.
Let’s make one out of origami so you can enjoy it anytime, anywhere! First, fold twice into a square, then twice into a triangle, and fold each of the four corners toward the center, opening them back up to create creases.
Next, fold once along the most recent creases, then fold once more and flip it over.
Again, fold all four corners toward the center, then fold the shape in half into a rectangle.
Finally, shape it into a 3D form so that the white side of the origami bulges outward, and you’re done! Make several of them—it’s also fun to have many to play with at once.
Cute and easy! Dog box

Here’s an origami idea for making a small dog-shaped box.
After folding the paper in half both ways into a square and a triangle to make creases, do a cushion fold (zabuton).
Using the creases, fold it into a square with the corners on the outside, then open the center of the square and squash it into a rectangle.
Repeat the same steps on the other side.
Turn and adjust the paper so the folded sections are on the inside, then fold the top corner of the new face down into a triangle.
Using the crease, tuck this section inward—this will be the dog’s ear.
Next, fold the left and right edges to meet the center line, and do the same on the back side, then fold the ears downward.
Open it out from the center and shape it, and your box is complete!
Cute star-shaped box

This is a star-shaped origami box that looks cute just as it is on display.
Because you fold it into a star shape, some steps may feel a bit complex.
But that makes the sense of accomplishment even greater when it’s finished.
It’s a piece I’d love origami enthusiasts to try.
As you keep folding and adjust the form, the star shape will come together.
Once it’s done, just imagining what to put inside can be exciting.
You could make several boxes to decorate your room, or fill them with sweets and give them as gifts.
That irresistibly puffy feel! A star-shaped box

Let’s try making an origami box with a fun shape: it has a small opening and a plump, rounded interior.
The puffy shape looks cute, and the overall star-like form makes it even more adorable.
After folding to a certain point, use scissors to cut about halfway.
When you unfold the cut piece, it becomes a pentagon.
Fold this pentagonal origami into the shape of a box.
Adjust the opening and the bottom, and you’ll have a plump, star-shaped box.
You can put in small items, of course, as well as little treats like candies or chocolates.
No scissors needed! How to fold MimikyuNEW!

Mimikyu is known for its distinctive look of wearing a tattered cloth like Pikachu.
Let’s fold it using slightly duller yellow origami than Pikachu! First, fold in half vertically and open to make a crease.
Fold both edges toward the crease, then fold in half from the opposite direction as well.
Using the new crease, fold one edge toward the center to create another crease.
Open it up along the creases to form a boat-like shape.
Fold one end upward and slightly lower the other end to create the ears.
On the side opposite the ears, fold upward to make a step in the center, then create a pinch between the face and the body, and spread the bottom out like the hem of a skirt.
Finally, draw Mimikyu’s face and you’re done! Since it can be made without scissors, it’s recommended even for small children.