Toys you can make from cardboard crafts! Authentic ideas you can build and play with


“It moves like the real thing!” “It’s just like an arcade!” Want to try making cardboard crafts that will amaze your family and friends?In fact, with a bit of ingenuity in assembling cardboard, you can create all kinds of fun projects like a claw machine, a basketball game, and even a cardboard car.Besides cardboard, most of the materials you’ll need are everyday items, along with a utility knife and glue.Why not take on the challenge of creating your own original project without fear of failure?In this article, we’ll share cardboard craft ideas that both kids and adults can enjoy!
- For summer vacation homework! Simple and amazing crafts for elementary school students that you’ll want to make after seeing them
- You can make them with cardboard! Cool katanas & swords
- Simple yet amazing crafts: craft ideas that elementary school students will want to make
- Let's make toys out of cardboard! Easy and fun handmade toys
- Adults will be hooked! A collection of craft ideas using toilet paper rolls
- DIY science projects that elementary school boys will love: ideas you can make with everyday materials
- [For Upper Elementary Students] Simple but Awesome! A Collection of Summer Vacation Craft Ideas
- [For Adults] Simple yet Impressive Crafts: A Stylish, Eye-Catching Collection
- Paper cup crafts that elementary school kids will love! A collection of fun project ideas
- Craft ideas using plastic bottle caps [for boys]
- [For Kids] Today’s Handmade Craft Ideas
- Crafts parents and kids can enjoy together. Recommended craft ideas to keep children entertained.
- Fun crafts using straws
Toys Made with Cardboard Crafts! Authentic Ideas You Can Make and Play With (21–30)
Monster Hunter bow
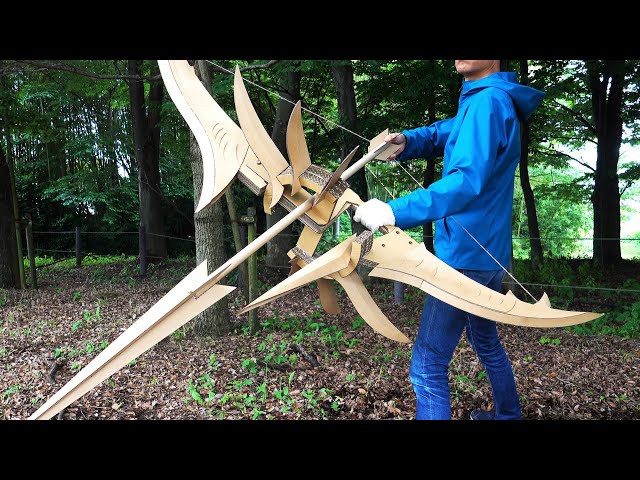
Wouldn’t you get super excited if you could make a bow from the popular game Monster Hunter? By watching this video, you can make one out of cardboard.
The works of cardboard artists who create all kinds of things from cardboard are amazing, and you might be able to get closer to being a cardboard artist yourself.
However, the difficulty level is relatively high, so we recommend making it with help from someone at home.
This is a challenging example, but cardboard crafting has limitless possibilities, so please start with something simple and give it a try.
omikuji (a Japanese fortune slip typically drawn at Shinto shrines or Buddhist temples)

It’s nice to make something simple, but you still want originality.
For kids like that, making omikuji (fortune slips) is perfect.
First, let’s make the container for the omikuji.
A regular box works, but if you create a cylindrical container that you can shake with a rattling sound, it really boosts the atmosphere.
Blueprints for making one are available on various websites, so take a look for reference.
The most important part is the contents of the omikuji.
You can include fortunes ranging from Great Curse to Great Blessing, but if you make the content unique, you’ll have a one-of-a-kind omikuji in the world.
For example, how about something themed around anime, or an animal fortune-telling style? Adding a fun penalty game as a result could be interesting, too!
Toys you can make with cardboard crafts! Authentic ideas you can build and play with (31–40)
conveyor belt sushi machine
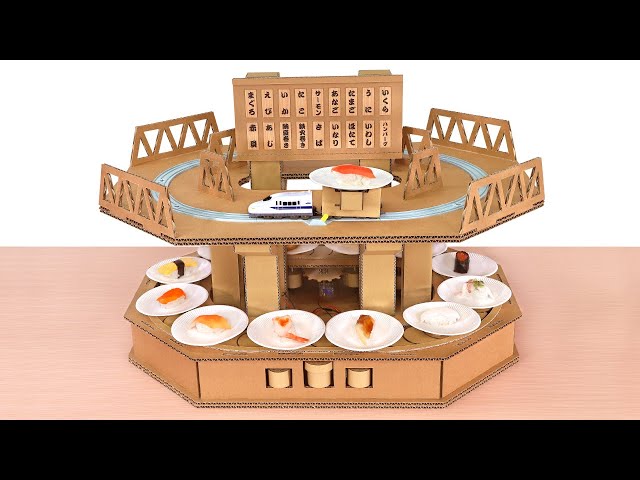
For children who enjoy playing make-believe, a great suggestion for a science project is building a conveyor-belt sushi setup.
Some people even make fully automatic rotating sushi lanes out of cardboard.
That’s not very realistic for most, though, so here’s a simpler method.
First, cut a piece of cardboard into a circle and insert a chopstick into the center.
Next, create a base so the chopstick can stand upright.
This lets the circular part spin around, creating the feel of a conveyor-belt sushi restaurant.
Finally, place toy sushi or sushi-shaped erasers on top, and it’s complete.
Even young children can make this.
Picture Book Post

A picture book that enhances children’s imagination—an essential item from early childhood, right? How about making a picture-book mailbox as a summer vacation craft? First, prepare a large cardboard box big enough to hold lots of mandarin oranges.
Cut and glue the cardboard to the size you need.
Here’s the key: attach the parts necessary for the mechanism.
Draw your favorite character and add color to make it extra cute.
The idea is that when you put a picture book into the mailbox, the character pops up.
Every time you insert a book, you’ll be so delighted you can’t help but smile.
Cardboard guitar

Guitars have a grown-up vibe, so I bet a lot of kids admire them.
For children who want to try playing the guitar, I recommend a cardboard guitar.
You can make your dream guitar out of cardboard, almost just like the real thing.
The materials are cardboard, tape, glue, toothpicks, rubber bands, and so on.
First, cut the cardboard into the shape of a guitar with a utility knife.
Be careful not to cut your hands when using the knife.
For the strings, you can make good use of the properties of the cardboard.
Give making a cool guitar a try!
cardboard pachinko

A “pachinko” game that even kids can play.
The materials are marbles, rubber bands, chopsticks, and cardboard.
First, make a box about 5 cm deep out of cardboard.
About half the size of a school desk works well.
If you want to make a huge one, you can change the size.
To add height, stack three pieces of cardboard and attach them to the bottom of the box.
Create the target sections where the marbles will land and fix them inside the box.
It’s a good idea to write the point values on them.
Make a launcher on the right side using rubber bands and chopsticks; if that’s too difficult, it’s fine to make a type where you roll the marble from the top instead.
You can get creative—for example, small targets can be worth high points!
Treasure chest with hidden storage

Here’s a slightly unusual “treasure chest.” Make this and it’s sure to draw attention! All you need is cardboard.
First, make the main body of the chest.
Just create a box with a lid that flips open—easy, right? Next, make the top lid.
To give it a treasure-chest feel, try shaping it with a bit of a curve.
Make a flip-open lid on the side opposite the curved portion.
Now attach this curved lid to the main body you just made, but be sure to glue them so that the main body’s lid and the curved lid open in opposite directions.
That way, when you open it from the front, you access the lower box, and when you open it from the back, you can hide things inside the upper lid.
It’s like a curious little trick—highly recommended!