[Day Service] Spring Take-Home Crafts: Ideas to Warmly Brighten Your Room


For crafts in day service programs, we recommend incorporating motifs that can only be enjoyed in that season.
Take-home projects using spring-specific motifs—such as cherry blossoms, tulips, carp streamers, and hina dolls—not only offer the fun of working with your hands, but also let people display the finished pieces at home to savor the season.
Even those who find it difficult to go out can feel the arrival of spring indoors.
We’ve included a wide range of items, from practical pieces like wall hangings, bouquets, and message stands to purely decorative creations.
Please make use of these ideas for spring-themed crafts.
- For Seniors: Come, Spring! Recommended March Craft Ideas for Daycare Services
- For Seniors: Simple and Lovely Crafts – A Collection of Take-Home Project Ideas for Day Service
- [For seniors] Enjoy spring: April craft ideas
- [For Seniors] Crafts to Make in March! Recommended Project Ideas
- Craft ideas with plum blossoms for seniors
- [For Seniors] Enjoy Cherry Blossoms Indoors: Wall Decoration Ideas
- [For Seniors] Have Fun Making Things Based on Today’s Mood! Today’s Recommended Craft
- [For Seniors] Making a March Calendar: Introducing Spring-Themed Motifs and Arrangements
- [For Seniors] Introducing Fun Crafts Made with Plastic Bottle Caps
- [For Seniors] Practical Crafts to Make in Day-Service Recreation: Idea Roundup
- Take-Home Craft Ideas for Winter: Perfect for Day Services for Seniors
- [For Senior Daycare Centers] Ideas for Summer Take-Home Crafts
- [For Seniors] Recommended for day-service centers. A collection of craft ideas for April
[Day Service] Spring Take-Home Crafts: Ideas to Warmly Brighten Your Room (131–140)
Hanging decorations for Children’s Day

This is a hanging decoration for Children’s Day made with items from a 100-yen shop.
We’ll make four kinds of ornaments, and I’ll explain them in order.
First is the carp streamer.
Cut a felt rectangle, snip the tail into a V shape, then attach felt scales and an eye—done.
Next is the kashiwa-mochi.
Just stick a white pom-pom and a leaf-shaped piece of felt together with double-sided tape.
For the iris flower, thread four small pom-poms onto a string and add another pom-pom in the center to finish.
For the May doll, thread two pom-poms and an origami samurai helmet onto a string, attach an origami armor piece, and add decorative stickers for the face to complete it.
The prep and steps are easy, and they look adorable, so they’re fun to make.
Wisteria swaying

How about a hanging wisteria decoration with a realistic, three-dimensional look? Prepare purple, light purple, and yellow-green origami paper, bamboo skewers, and string.
The flowers are made from quarter-size origami sheets, so please cut them in advance.
Fold the colored side in half, then fold in half two more times.
Draw petal shapes with a pencil and cut them out.
Use a bamboo skewer to curl the tips of the petals into a gentle curve.
Make a small stick-shaped piece and attach it to the petals to complete each flower.
Then, adhere the flowers onto a long, narrow strip of yellow-green origami to build up a three-dimensional floral cluster.
Attach a string and hang it by the window—watch it sway softly in the breeze.
Sakura hanging ornaments

We’d like to introduce a hanging cherry blossom decoration that will fill your room with the feeling of spring.
First, cut felt into a long, thin strip, make small slits, roll it up, and create the flower center (stamens).
Next, cut felt into a circle and make five evenly spaced cuts toward the center.
Round off the corners and trim the tips of the petals.
Add color with pastels or chalk, then glue the flower center to the middle.
While folding the petals, attach them around the center.
Your flower is complete.
Make six of these.
Cut another felt circle and glue the flowers you made along the circle.
It’s nice to place the best-shaped one in the center.
Sandwich the string and a flower between pieces of felt and glue them together to finish your hanging decoration.
The overall look can change dramatically depending on the flower colors and how you cut the petals, so have fun finding your own unique combination.
Give it a try!
Sakura haiku decoration

When you think of spring, cherry blossoms are surely one of the first things that come to mind.
Here’s a video that shows you how to make cherry blossoms easily.
It’s perfect for recreational activities at day-service centers and similar settings! Combining them with other flowers can create a more stylish atmosphere.
All you need are items like thick paper, craft bands, and colored paper.
Preparation is simple, so you can get started right away.
If everyone pitches in to make these cherry blossoms, you’ll be able to produce a lot in no time.
Give it a try!
Simple bookmark
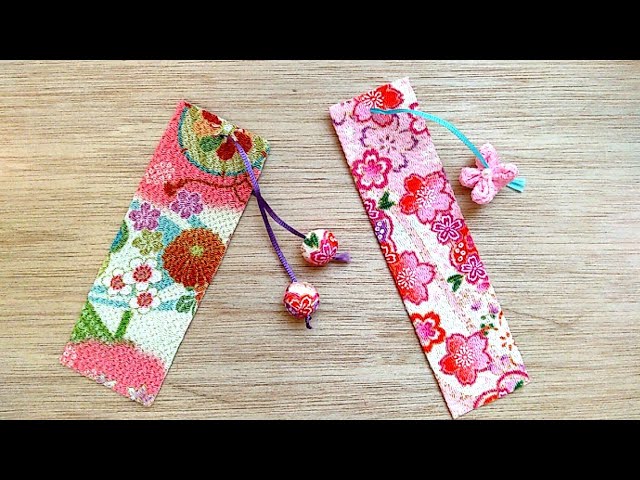
This is a bookmark craft we’d like older adults who enjoy reading to make.
Prepare chirimen fabric, apply double-sided tape to the back, and fold it in half.
Thread a string through with a needle.
It looks lovely to add decorations to the string, such as a small Styrofoam ball covered with chirimen, or other chirimen craft pieces.
Because this bookmark is easy to make, it should be approachable for older adults as well.
Having a handmade bookmark makes reading even more enjoyable.
Chirimen fabric is also available at 100-yen shops, so gathering materials is easy.
Wobbly paper-plate carp streamer

Would you like to make a gently swaying carp streamer using a paper plate? First, fold a paper plate in half.
Staple only one side; the stapled side will be the tail.
Trim the head end slightly.
Cut a colorful sheet of paper a little smaller than the body, and glue it onto the body.
Then cut another sheet slightly longer than the tail portion of the plate and glue it on, offsetting it.
Add an eye using an eye part or a round sticker, and it’s done.
When you display it, it will sway in the breeze and look very charming.
collage (paper collage; cut-and-paste picture)

This activity involves sticking small colored pieces of paper to create a picture with a sense of volume.
It really tests your ability to focus on detailed handwork, such as making tiny parts and carefully placing them while being mindful of shapes.
I recommend painting various colors onto white paper and then cutting it into small pieces—this lets you create color gradients even within the tiny parts.
After that, decide on the overall shape you want, and attach the pieces to match that shape until it’s complete.
As you work, pay attention to the overall color gradation and how layering can add depth and volume.