Take-Home Craft Ideas for Winter: Perfect for Day Services for Seniors


Many people enjoy doing crafts at nursing homes and day service centers, don’t they?
This time, we’re introducing craft ideas for seniors to make in winter that they can take home from day service!
We’ve gathered easy-to-prepare projects, including those that use recycled materials and supplies from 100-yen shops.
When it comes to crafts, aside from large decorations to hang on the wall, most items can be taken home.
More intricate projects that require fine motor skills may take several days to complete, but the sense of accomplishment and joy when they’re finished is exceptional.
Of course, there are also cute crafts that can be made in a single day, so please use these ideas as a reference for craft activities at nursing homes and day service centers.
- For Seniors: Auspicious Handmade Zodiac Ornament Craft Ideas
- [For Seniors] Perfect for winter events! Easy craft ideas
- For Seniors: Simple and Lovely Crafts – A Collection of Take-Home Project Ideas for Day Service
- [For Day Service Centers] February Craft Ideas: Decorations for Setsubun, Valentine’s Day, and the Feeling of Spring
- [For Seniors] Practical Crafts to Make in Day-Service Recreation: Idea Roundup
- [For Seniors] Enjoy the Cold Winter! Simple, Recommended Crafts
- [For Seniors] Fun Crafts Recommended for December
- [For Seniors] Recommended for day services! Simple and cute small craft ideas
- [For Seniors] Fun to Make, Soothing to Display! Snowman Craft Ideas
- [For Seniors] Small craft ideas: for yourself and as gifts!
- [For Seniors] Easy Origami Recommended for Winter
- [For Seniors] Introducing Fun Crafts Made with Plastic Bottle Caps
- [For Seniors] DIY Strap Craft Ideas. Great as Gifts, Too!
[For Seniors] Day Service Take-Home Craft Ideas to Make in Winter (71–80)
Christmas tree made with ribbons

This is a handmade tree idea that’s completed simply by sticking teardrop-shaped ribbon pieces onto a cone base made from thick paper.
To make the teardrop-shaped parts, cut ribbon to a suitable length and glue the two ends together.
When attaching the ribbon to the base, face the rounded end downward and stick them in a straight line.
If it’s hard to keep them straight, draw guide lines on the base beforehand to help with placement.
Once all the ribbons are attached, decorate the top with a star to finish! Adding small beads for extra sparkle would also look cute.
Just cut and paste. Shaka-shaka ornament.
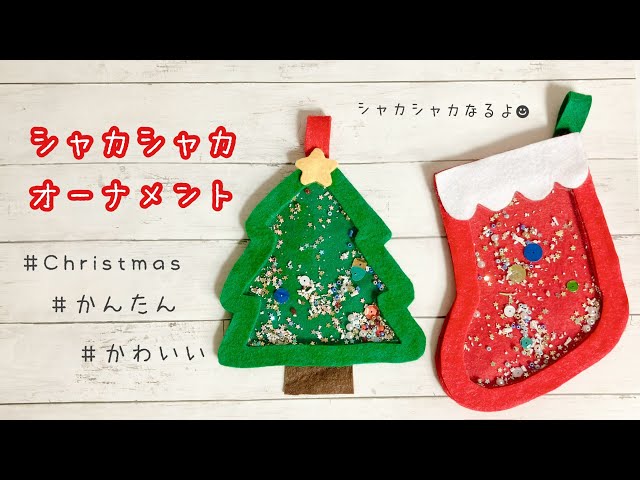
Let’s handcraft warm, felt Christmas ornaments.
First, create your favorite shapes—like a stocking or a tree—using thick paper.
Next, use this template to cut 0.3 mm plastic sheet and the felt that will serve as the ornament base.
Cut out the inside of the thick-paper template to make a frame-only template, then use that to cut three felt frames.
Glue two of the felt frames onto the felt base to add height, and place your favorite beads or sequins inside.
Glue the plastic sheet and the remaining felt piece on top, attach a hanging component, and you’re done!
A voluminous Christmas wreath made with origami

Origami that can be done while seated is an easy, accessible recreation.
Many older adults may be quite skilled at it.
A Christmas wreath made by combining flower-shaped origami pieces has a delicate feel.
Some seniors might feel inspired to say, “I want to try making that.” Because it’s made by assembling small parts from smaller origami paper, it involves a lot of fine hand movements.
It seems likely to stimulate the brain even more than regular origami crafts.
It’s also a lovely wreath project that can spark conversation as you chat with those around you while making it.
Santa stuck in a chimney

How about making a Santa Claus decoration trying to climb down a chimney to deliver presents? It’s a humorous piece that will surely make you chuckle and feel delighted every time you see it.
All you need are a toilet paper roll, colored construction paper, a pen, scissors, and glue.
First, draw a chimney pattern on brown construction paper with a white pen and paste it onto a slightly flattened toilet paper roll.
Next, use red, white, and black construction paper to create Santa’s lower half.
Once Santa is ready, glue him upside down on top of the chimney.
Finish by adding snow pieces and a white sack to the chimney.
Christmas boots made from paper cartons

Here’s an idea for Christmas boots that are perfect for decorations.
You’ll need two small paper cartons, red and white felt, any origami paper you like, and white cotton balls.
The base of the boot is made by combining the two paper cartons.
Use the first carton to form the vertical part of the boot and the second carton to form the rounded toe.
Before assembling, decorate the inside of the first carton with the origami paper.
Once you’ve combined the cartons into a boot shape, attach the red and white felt to the outside, then finish by decorating with the cotton balls.
A trivet woven from toilet paper rolls
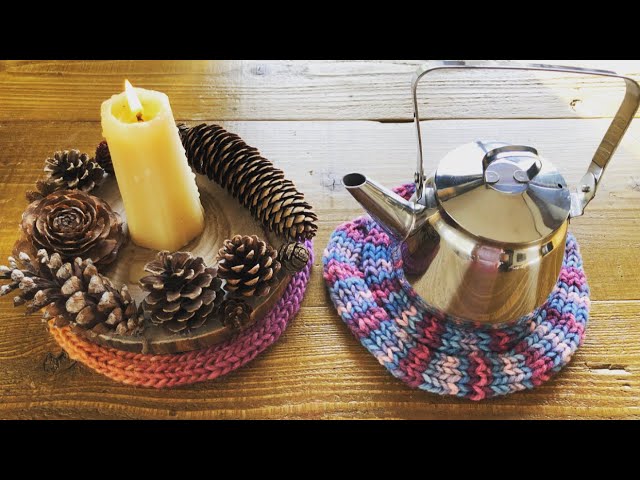
A simple-to-make trivet woven using toilet paper rolls has a warm, original feel.
Prepare the materials: disposable chopsticks, toilet paper rolls, cellophane tape, yarn, and a needle.
First, make the base for weaving the trivet using the toilet paper rolls.
Cut the chopsticks in half and tape them vertically around the toilet paper roll, spacing them evenly.
Once that’s ready, string the yarn in an alternating pattern to form the base.
Next, gently loop the yarn over the chopsticks so it sits on top; the key is to drape the yarn lightly and loosely.
Hook the yarn onto the needle and weave around in circles until it forms the shape of a trivet, and you’re done.
Using colorful yarn will give you a bright, cheerful trivet.
A fluffy, cozy pouch woven from cardboard

A fluffy, fuzzy pouch you can use for cosmetics or quick outings.
You’d never guess it was woven with cardboard.
Cut slits into both ends of a piece of cardboard and glue chopsticks to it.
Thread yarn through the slits and wrap it around the cardboard.
Using yarn attached to the chopsticks, weave over-under, over-under along the threaded yarn—similar to how you’d use a loom.
Once you’ve woven a sufficient length, cut it free from the cardboard.
Make two woven panels and tie the yarn at the ends to join them.
Turn it inside out, insert an inner pouch, add decorations, and you’re done.
Try making one with fluffy yarn!