Take-Home Craft Ideas for Winter: Perfect for Day Services for Seniors


Many people enjoy doing crafts at nursing homes and day service centers, don’t they?
This time, we’re introducing craft ideas for seniors to make in winter that they can take home from day service!
We’ve gathered easy-to-prepare projects, including those that use recycled materials and supplies from 100-yen shops.
When it comes to crafts, aside from large decorations to hang on the wall, most items can be taken home.
More intricate projects that require fine motor skills may take several days to complete, but the sense of accomplishment and joy when they’re finished is exceptional.
Of course, there are also cute crafts that can be made in a single day, so please use these ideas as a reference for craft activities at nursing homes and day service centers.
- For Seniors: Auspicious Handmade Zodiac Ornament Craft Ideas
- [For Seniors] Perfect for winter events! Easy craft ideas
- For Seniors: Simple and Lovely Crafts – A Collection of Take-Home Project Ideas for Day Service
- [For Day Service Centers] February Craft Ideas: Decorations for Setsubun, Valentine’s Day, and the Feeling of Spring
- [For Seniors] Practical Crafts to Make in Day-Service Recreation: Idea Roundup
- [For Seniors] Enjoy the Cold Winter! Simple, Recommended Crafts
- [For Seniors] Fun Crafts Recommended for December
- [For Seniors] Recommended for day services! Simple and cute small craft ideas
- [For Seniors] Fun to Make, Soothing to Display! Snowman Craft Ideas
- [For Seniors] Small craft ideas: for yourself and as gifts!
- [For Seniors] Easy Origami Recommended for Winter
- [For Seniors] Introducing Fun Crafts Made with Plastic Bottle Caps
- [For Seniors] DIY Strap Craft Ideas. Great as Gifts, Too!
[For Seniors] Take-Home Craft Ideas for Day Services to Make in Winter (51–60)
Easy, no sewing needed! Fukumamori

The “Fukumamori” charm, which can be made without needles or thread, is a project that seniors can work on with confidence.
Cut felt into a 4×12 cm piece, make slits about 8 mm from the top and bottom, then use double-sided tape to sandwich a pom-pom and a string inside.
Decorate by attaching fabric and buttons, and tie the string to complete the owl shape.
By choosing different eye buttons and color combinations, each piece gains a unique expression, resulting in a simple yet polished protective charm.
It’s an inviting and auspicious idea, perfect for displaying in an entryway or on a wall.
Making a Kadomatsu with everyday materials
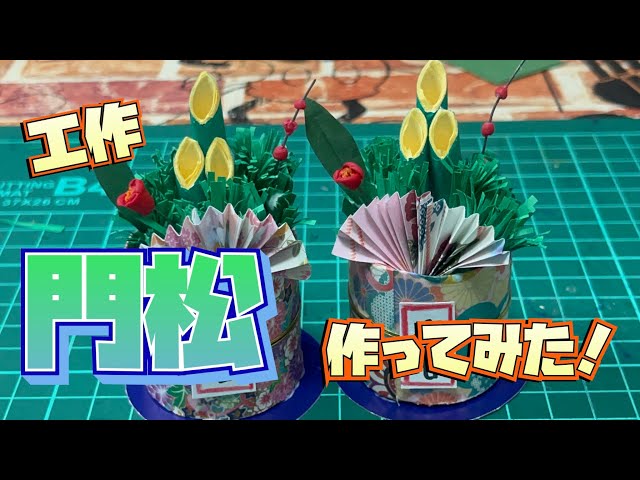
Let’s collect toilet paper rolls and transform them into a lovely kadomatsu decoration.
Although we usually throw away toilet paper cores, repurposing them turns waste into something eco-friendly.
Cut the toilet paper rolls and cover them with patterned origami paper to create the base of the kadomatsu.
Because the base circle is small, make the bamboo, pine needles, and fan decorations inside on a smaller scale.
This project should be quite enjoyable for people who are good with their hands or who love origami.
If crafting parts like the bamboo is difficult, ask someone nearby to help.
Seniors are likely to enjoy making these adorable, palm-sized kadomatsu too.
Snow Rabbit Kagami Mochi and Sanpō

Decorations of a snow rabbit kagamimochi and a sanpo tray that you can make with familiar materials and give a three-dimensional feel.
With its traditional Japanese atmosphere, this craft is recommended for seniors as interior decor or a hands-on activity.
Crumple tissue paper to form large and small mochi, and stack them in a balanced way.
Use a long No.
3 envelope as the base; placing the kagamimochi on top creates the look of a sanpo tray.
Make parts like the red berries of nandina and the rabbit’s ears from origami paper, and by getting creative with the expression, you can finish it as an adorable snow rabbit.
The soft texture of paper and cotton gives it a gentle impression, making it a friendly New Year’s decoration.
It’s an idea that conveys the warmth of something handmade.
Swaying Snowman Wreath

Let’s make a wreath you can enjoy displaying not only at Christmas but throughout the winter.
The main motif is a snowman, so the key is to keep the edges rounded and make everything as circular as possible! You’ll need a paper plate, colored construction paper, masking tape, jute twine, fishing line (monofilament), paints, oil-based colored pens, a snowflake-shaped craft punch, double-sided tape, a utility knife, and scissors.
Instead of finishing it in a single day, aim to complete it over two to three days—you’ll be able to take your time and focus on the details.
Give it a try!
[For Seniors] Winter Take-Home Craft Ideas for Day Service (61–70)
Snowman-shaped Christmas wreath

Stylish and beautiful! Let’s try making an authentic wreath that soothes you just by looking at it.
The key is using bases of different sizes so that, on closer look, they form the shape of a snowman.
It would be wonderful to finish your one-of-a-kind piece packed with details using dried flowers, all while having fun.
The appeal is that you can get everything you need even at a 100-yen shop.
The process of attaching the bases, dried flowers, ribbon, and felt motifs with glue or a glue gun is exciting.
Shaka-Shaka Snowman
@haruharo_made Christmas craft / Shaker snowman ornament with lace paper. The sequins inside shake and look adorable ♡ You can also color the lace paper and turn it into Santa, a reindeer, etc.—also cute ♡ Materials: • Construction paper • Lace paper doilies • Clear plastic bag • Sequins • Glue • Scissors • String • Clear tapeCrafts for 4-year-olds Crafts for 5-year-olds#3-year-old crafts#2-year-old's craftCrafts for 1-year-oldsCrafts for 0-year-oldsProduction#Nursery schoolWall decoration#StayHomeTime#AtHomePlayProduction ideas#Nursery School CraftWinter Craft#KindergartenKindergarten craftNursery teacher / Childcare workerKindergarten Teacherwall surface #ChristmasTreeProduction for children under age (infants and toddlers) #Snowman Making Snowman#Christmas Santa Lace paperOrnament Ornament making Made in December # January productionMade in February
♬ Do You Want to Build a Snowman? (Frozen) Music Box – Kyoto Music Box Ensemble
Let’s make a shaker snowman that you can use as an ornament for your tree.
For preparation, get two paper doilies and cut out the inside of one so it becomes just a frame.
Put sequins or any small parts you like into a clear bag, fold the corners, tape them down, and shape it into a circle.
Stack and glue them in this order: a full paper doily, the bag, and the doily frame.
Finish by adding a face, hat, scarf made from construction paper, and a string for hanging.
The paper doily part will be the snowman’s body.
Paper Plate Snow Globe
@hachimitu_835 The laminate film is the hand-applied laminate from Daiso.Nursery teacher / Childcare worker#Nursery schoolProductionTranslationsnow globe#Wall Creation
♬ Loose and cute “Turkish March”(102686) – KK
Let’s make a paper-plate snow globe that looks beautiful when hung on a window and lit from behind.
First, cut out the inner part of a paper plate and attach a circular piece of laminate film.
Next, from the back, cover the entire opening with tissue paper cut into a circle, and seal the adhesive edge with OPP tape.
Finally, stick a construction-paper snowman onto the front of the laminate film, and you’re done.
In this idea, colorful tissue paper is used for a vibrant finish, but I think it would also look lovely unified in blue tones to evoke snow.