

Many people enjoy doing crafts at nursing homes and day service centers, don’t they?
This time, we’re introducing craft ideas for seniors to make in winter that they can take home from day service!
We’ve gathered easy-to-prepare projects, including those that use recycled materials and supplies from 100-yen shops.
When it comes to crafts, aside from large decorations to hang on the wall, most items can be taken home.
More intricate projects that require fine motor skills may take several days to complete, but the sense of accomplishment and joy when they’re finished is exceptional.
Of course, there are also cute crafts that can be made in a single day, so please use these ideas as a reference for craft activities at nursing homes and day service centers.
- For Seniors: Auspicious Handmade Zodiac Ornament Craft Ideas
- [For Seniors] Perfect for winter events! Easy craft ideas
- For Seniors: Simple and Lovely Crafts – A Collection of Take-Home Project Ideas for Day Service
- [For Day Service Centers] February Craft Ideas: Decorations for Setsubun, Valentine’s Day, and the Feeling of Spring
- [For Seniors] Practical Crafts to Make in Day-Service Recreation: Idea Roundup
- [For Seniors] Enjoy the Cold Winter! Simple, Recommended Crafts
- [For Seniors] Fun Crafts Recommended for December
- [For Seniors] Recommended for day services! Simple and cute small craft ideas
- [For Seniors] Fun to Make, Soothing to Display! Snowman Craft Ideas
- [For Seniors] Small craft ideas: for yourself and as gifts!
- [For Seniors] Easy Origami Recommended for Winter
- [For Seniors] Introducing Fun Crafts Made with Plastic Bottle Caps
- [For Seniors] DIY Strap Craft Ideas. Great as Gifts, Too!
[For Seniors] Winter Take-Home Craft Ideas for Day Service (1–10)
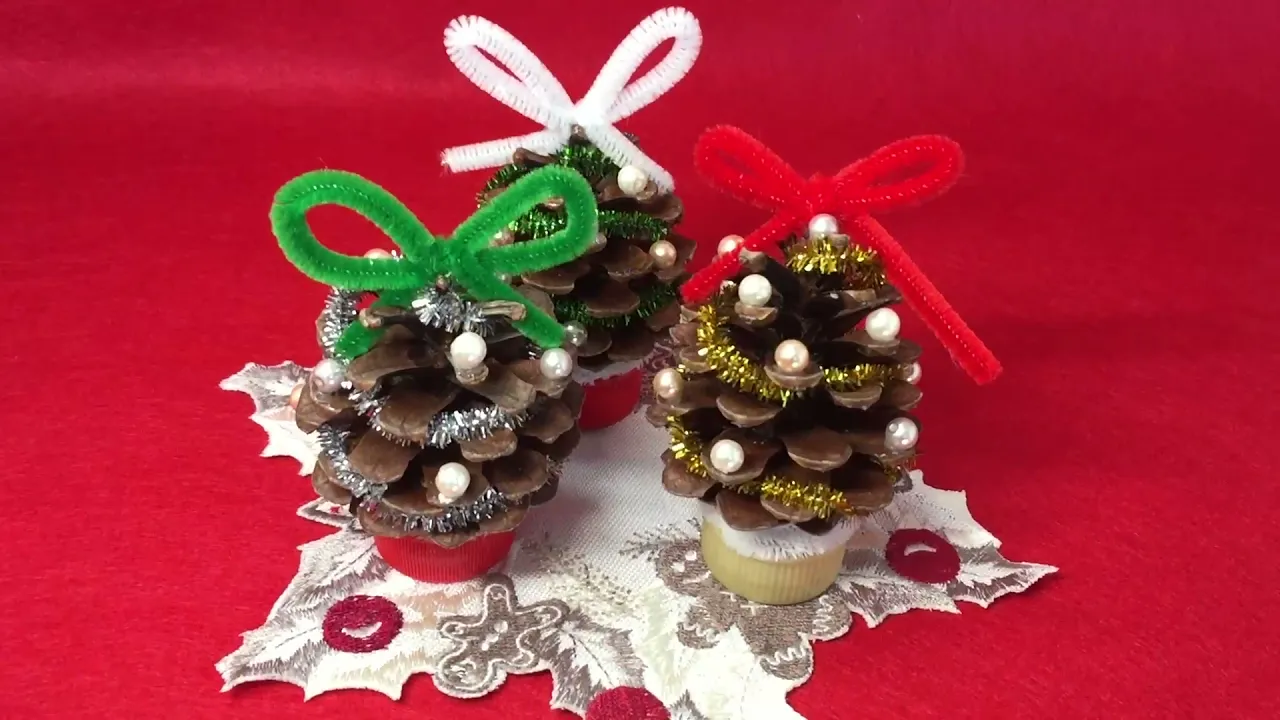
Simple and cute! Pinecone tree

This is a cute pinecone tree you can easily make with materials from a 100-yen shop—as long as you have a pinecone.
You can use a store-bought pinecone or one you picked up on a walk.
To make it, simply decorate the pinecone with beads and pipe cleaners however you like, then fix it to a base made from a plastic bottle cap.
Crafts that use the fingertips are very effective for seniors’ hand rehabilitation and dementia prevention.
If you’ve picked up the pinecone outdoors, be sure to sterilize it by boiling it beforehand so seniors can enjoy crafting safely and with peace of mind.
Ehomaki made by rolling paper

When the Setsubun season approaches, making an Ehomaki out of origami is a fun idea.
First, prepare yellow, green, pink, and red origami sheets cut to half-size, and crumple each into a ball.
Open them back up, lay them horizontally, and roll them up tightly.
They’ll look just like fillings such as tamagoyaki, cucumber, tuna, and crab.
Wrap them with two rolled sheets of kitchen paper and secure with clear tape, then wrap the outside with black cardboard and tape that as well, and you’re done.
You can also think up other fillings to try!
Glowing Snowman

How about making a fun Christmas-time snowman using just empty Yakult bottles, round stickers, and decoration lights from the 100-yen shop? Peel off the outer label from the empty Yakult bottle, then use round stickers to create the snowman’s features.
For the nose, cut a large round sticker into a triangle—it works great.
Put the decoration light inside, and you’re done.
Even if it’s not a snowman, you can add any pattern to the empty bottle and pop in a decoration light to use it as various kinds of ornaments.
Festive sea bream decoration
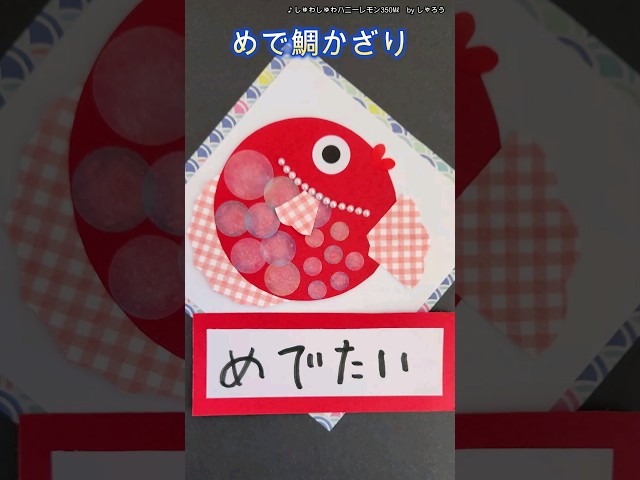
New Year’s, a winter event, conjures up images of displaying lucky charms, and sea bream (tai) is an indispensable motif for the holiday as a symbol of good fortune.
Let’s create a festive, celebratory decoration that incorporates a sea bream into the design.
Use a circle-cut piece of construction paper for the fish’s body, then attach fins, scales, and facial features to complete the look.
Next, mount it on a background that matches the sea bream’s colors, and add a message to finish the piece.
Keep the sense of auspiciousness in mind as you decide which decorations to include to make the overall design feel vibrant and festive.
Toilet-paper kadomatsu

Here’s a decorative kadomatsu you can make by reusing toilet paper rolls.
It’s perfect for a New Year’s craft activity, so consider trying it at a day service center or similar setting.
Cut the ends of toilet paper rolls diagonally and wrap them with green construction paper to represent bamboo.
Make three of these and glue them together.
Next, take a rectangular piece of construction paper, snip fine cuts along the top and bottom edges, and wrap it around the bamboo to finish.
For an even more festive look, wrap red construction paper or washi-patterned paper over it.
Christmas tree made with construction paper

Let’s make a cute, palm-sized Christmas tree using construction paper and a paper cup! Represent the fir tree’s fluffy needles with small, strip-shaped pieces of green and white construction paper.
To make it easier for older adults to participate, prepare the paper strips in advance and make other thoughtful adjustments.
You can enjoy decorating it with craft pom-poms and ribbons, which are available at 100-yen shops and similar stores.
Since you’ll use your fingertips a lot and plan the steps as you create, this activity can also help stimulate the brain.
Make the tree’s thick trunk with cardboard, though a toilet paper roll can be used as a substitute.
If you substitute it, be sure to check that it fits into the paper cup “flowerpot” that serves as the tree’s base.
bear
There are many kinds of dolls made with Yakult containers, but using them upside down might be unusual.
Here, let’s use an empty container upside down to make a bear.
First, stick double-sided tape all around the container, then wrap yarn around and around it.
The bottom of the container will be the head, so attach a circular piece of colored paper there and add the ears.
Draw the nose and mouth on a round sticker and stick it on, add the eyes, and you’re done.
They look very cute if you make lots of them in various colors.