For older kindergarteners: December crafts that 5-year-olds will love — ideas from flat to three-dimensional projects


How about enjoying some fun crafts with children during the winter season? This time, we’re sharing enjoyable craft ideas perfect for five-year-olds, such as Christmas stockings and snow globes made with roll sticky notes, as well as wreaths featuring Santa and reindeer.
These can be made with familiar materials like construction paper, origami paper, and paper cups, so preparation is easy.
Encourage each child to use their imagination and enjoy creating their own original pieces! If you use them to decorate walls and other areas, you can instantly create a festive atmosphere.
Because the children's creations are treated as works of art, we use the term “seisaku” (制作) to refer to them in the text.
- [For 5-year-olds] Recommended for Christmas! A collection of fun crafts to make
- Ideas for Winter-Themed Crafts and Bulletin Board Projects for 5-Year-Olds
- [For Toddlers] A Big Roundup of Craft Ideas to Enjoy at Christmas
- [Childcare] Perfect for December wall displays! A collection of Christmas tree ideas
- December origami! Simple ideas for Santas and wreaths that kids can enjoy in childcare
- [For Toddlers] A Big Collection of Craft Ideas to Enjoy at Christmas [Part 3]
- [December Wall Decorations] Christmas Trees and Wreaths! Ideas You Can Use in Childcare
- [Childcare] For 5-year-olds! Autumn craft ideas
- [For 3-year-olds] December Christmas Crafts! A Collection of Fun Handmade Ideas
- December craft ideas! A collection of childcare activities to enjoy with Christmas and winter themes
- [For 5-year-olds] Let’s Make It! A Collection of Recommended Craft Ideas for February
- [Age 3] Let’s Make It at Nursery or Kindergarten! A Collection of Christmas Craft Ideas
- [For 3-year-olds] Winter craft activities and bulletin board decoration ideas for use in childcare
[For older kindergarteners] December crafts that 5-year-olds will love! Ideas to enjoy from flat to three-dimensional (41–50)
Easy paper-plate Christmas tree

First, fold a paper plate and cut along the crease to divide it into four equal parts.
Tear green origami paper into small pieces, as you would for a collage, and paste them on to represent the leaves of a Christmas tree.
If you layer and attach the paper plate pieces with double-sided tape, you’ll create bumps and add a three-dimensional effect.
Stick on stickers in your favorite colors to light up the tree, then add a star ornament at the top.
Finally, make a trunk with orange origami paper and attach it, and your Christmas tree is complete.
It’s a Christmas craft that uses simple materials but can be made festive with a bit of creativity.
Cute Minnie Santa origami

Let’s make a Minnie Santa with origami! It’s cute to stick on the wall as is, and it would also look great combined with other Christmas-themed origami pieces to create a garland or hanging decoration.
First, use one sheet of origami paper to make the face, body, and hat.
Then use several other sheets to make the ears, bow, and scarf.
Since there are parts that require cutting, prepare scissors, a pen for drawing the face, and glue for assembly.
There aren’t any complicated steps, but because you’ll be putting several pieces together, fold each part carefully, one by one.
Poinsettia Christmas tree

Why not try making a tree together by dividing the process into different steps? The main tasks include crumpling tissue paper, cutting materials, folding and finishing them, and assembling the pieces.
Even a project that might seem time-consuming and difficult for one person can become a meaningful memory when everyone works together to create something.
Let’s make the most of each person’s strengths and complete a dazzling tree that you’ll want to look at forever.
It will surely be a Christmas that stays in your heart.
[Origami] Snowman
![[Origami] Snowman](https://i.ytimg.com/vi/WD6wH5QnP64/sddefault.jpg)
This origami snowman is perfect for December, when it’s also the season of snow.
A snowman is made by placing one snowball on top of another, right? With a clever folding method, you can express the two stacked snowballs using just a single sheet of origami paper.
You can also make a scarf around the snowman’s neck.
If you use polka-dot or patterned paper, the pattern becomes the scarf, making it extra cute.
You can draw the eyes and mouth yourself, so each snowman has its own personality.
You can stick them on a wreath or a calendar, so try arranging them in different ways to expand the range of your creations.
Santa and Reindeer Wreath
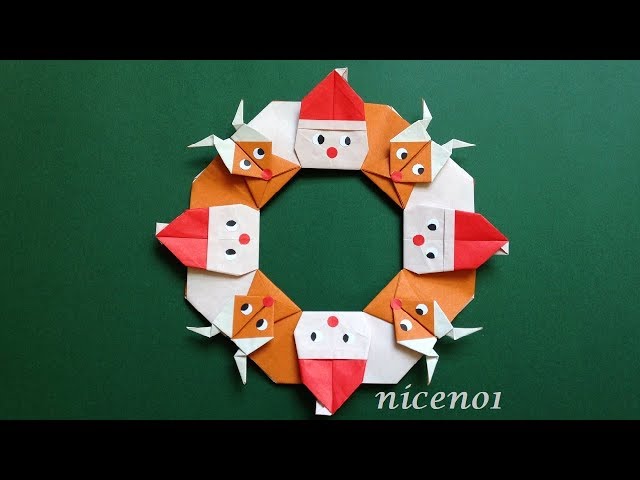
We’ll show you how to make a wreath featuring classic Christmas characters: Santa Claus and reindeer.
The method is very simple—just fold Santa and reindeer out of origami and connect them in a circle to complete the wreath.
By drawing faces on the finished origami or adding eyes and noses, you can make your piece even more unique.
It’s a cute craft that will brighten up Christmas and build kids’ excitement for the holiday—give it a try!
Gloves made with origami

Gloves that ward off the cold are essential in winter and make perfect decorative motifs, don’t you think? How about using origami to create cozy-looking gloves? Since you use origami paper cut in half, one sheet lets you make both the left and right gloves—that’s a key point.
This project offers lots of ways to enjoy arranging it, such as using them as decorative ornaments, or making large-paper gloves with a design where a character peeks out from inside.
Stained-glass-style Christmas tree

Making real stained glass by hand can be challenging, but a stained-glass-style Christmas tree using familiar materials might be something you can enjoy with children.
It’s perfect for Christmas decorations and crafts, so give it a try! First, cut black construction paper into star, circle, and Christmas tree shapes to create the stained-glass frames.
Place these pieces between laminating sheets and laminate them.
Since the machine gets very hot during lamination, please have a teacher or guardian handle this step.
After that, color with permanent markers and stick crumpled aluminum foil on the back—and you’re done! The coloring process with various hues will help nurture children’s imagination.