![[For 5-year-olds] Recommended for Christmas! A collection of fun crafts to make](https://i.ytimg.com/vi/MFdnzSYrVMI/sddefault.jpg)
[For 5-year-olds] Recommended for Christmas! A collection of fun crafts to make

Five-year-olds who have already experienced Christmas are likely to feel a strong sense of excitement and anticipation for the holiday.
Here are some fun, hands-on craft ideas perfect for children who are eagerly awaiting Christmas.
You’ll find a great collection of ideas that five-year-olds will be excited to make—items you can use as wall decorations, ornaments to hang on the tree, and projects that incorporate natural winter materials.
Be sure to enjoy the festive spirit as you create together with the children.
Since the children’s creations are treated as artworks, we refer to them as “seisaku” (creations) in the text.
[For 5-Year-Olds] Recommended for Christmas! A Collection of Fun Craft Ideas to Make (1–10)
Stained-glass-style Christmas tree
This is a stained-glass-style Christmas tree that’s perfect for wall decorations.
It’s arranged to make it easy to create stained glass together with children.
Because it uses familiar materials and is simple to make, why not give it a try? First, cut black construction paper into star, circle, and Christmas tree shapes to make the stained glass frames.
Place these pieces between laminating sheets and run them through the laminator, then color them with permanent markers.
Finally, attach crinkled aluminum foil to the back, and you’re done! When laminating, the machine gets very hot, so an adult should handle this step.
Have fun working on it while using your imagination to think, “What colors should I use?”
Santa and Reindeer Wreath
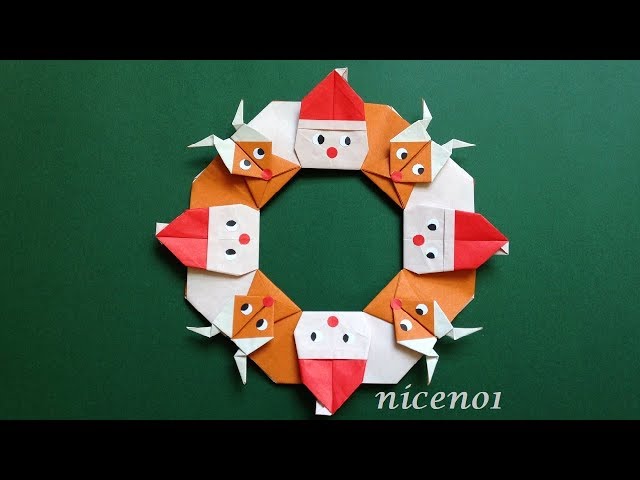
Let’s make a “Santa and Reindeer Wreath” together with 5-year-olds who are excited for Christmas! This wreath is easy to make—just create the Santa and reindeer parts and connect them into a circle.
You won’t need scissors or glue, so you can enjoy it together safely! You can also add a personal touch by drawing the eyes and noses of Santa and the reindeer, or keep it simple by using round stickers.
It’s a great way to capture children’s anticipation for Christmas and will surely become a fun craft that brightens up the winter season!
Christmas paper cutout
https://www.tiktok.com/@ren.mama_tae/video/7300211085926223105You can make it by folding and cutting origami three times! Here’s a cute snowman paper-cut craft.
With the colored side facing down, fold the paper into a triangle three times.
With the open side at the top, use coins of different sizes as templates; using the bottom corner as the axis, draw the outline of a snowman on the left and right.
Cut along the lines with scissors, then unfold to finish! Use colored pens to draw the face as you like.
It’s also cute to draw lines to suggest a hat or ears on the snowman’s head—highly recommended.
Christmas sweater
https://www.instagram.com/p/CW8Bk34pUhj/Why not make Christmas sweaters that spark kids’ creativity? Prepare sweater-shaped cutouts from construction paper, and let the children glue on Christmas motifs or paint sweater patterns with paint! Recommended colors are the classic Christmas palette of red, green, and white.
For the motifs, you can either provide pre-made templates or have the kids cut them out of construction paper themselves.
You can also add materials like felt pom-poms and sequins to make the pieces even more lively.
Paku-Paku Santa & Reindeer

Are you looking for something fun to make for Christmas? If so, here’s a suggestion: a “Chompy Santa & Reindeer” craft.
It’s a puppet made by joining two halves of a paper cup, and you can move the mouth like a puppet to play with it.
Put on a little puppet show with it and it’s sure to be a hit! Of course, it also makes a striking decoration, so it’s a great option if you’re looking for something cute to display.
There are many steps that involve using scissors, so please proceed with supervision.
A Christmas tree made from tree branches

Let’s try making a Christmas tree using branches the children picked up in the playground or at the park.
The finished tree will have a warm, cozy feel—something that’s sure to make you smile when you display it.
Tie the branches together with string to create the base of the tree.
Then wrap yarn around and around it; you can use any colors you like! Mixing different colors looks great, too.
The kids will likely enjoy the process of making it as well.
Adding a star on top or decorating with beads and other ornaments will make it even cuter.
Christmas wreath made of clay
https://www.tiktok.com/@haruharo_made/video/7435119385049566471Make it with paper plates and air-dry clay! Here’s how to craft a cute Christmas wreath.
You’ll need air-dry clay, a paper plate, tissue paper, decorations, glue, and a plastic desk mat.
First, roll out two long ropes of clay.
Place them on a paper plate with the center cut out, then flatten them using the desk mat or something similar.
Finally, glue on small pieces of tissue paper, and decorate with ribbons or drawings to finish.
Using your favorite stickers also looks adorable—get creative!