For older kindergarteners: December crafts that 5-year-olds will love — ideas from flat to three-dimensional projects


How about enjoying some fun crafts with children during the winter season? This time, we’re sharing enjoyable craft ideas perfect for five-year-olds, such as Christmas stockings and snow globes made with roll sticky notes, as well as wreaths featuring Santa and reindeer.
These can be made with familiar materials like construction paper, origami paper, and paper cups, so preparation is easy.
Encourage each child to use their imagination and enjoy creating their own original pieces! If you use them to decorate walls and other areas, you can instantly create a festive atmosphere.
Because the children's creations are treated as works of art, we use the term “seisaku” (制作) to refer to them in the text.
For Older Preschoolers: December Crafts for 5-Year-Olds! Ideas to Enjoy from 2D to 3D (1–10)
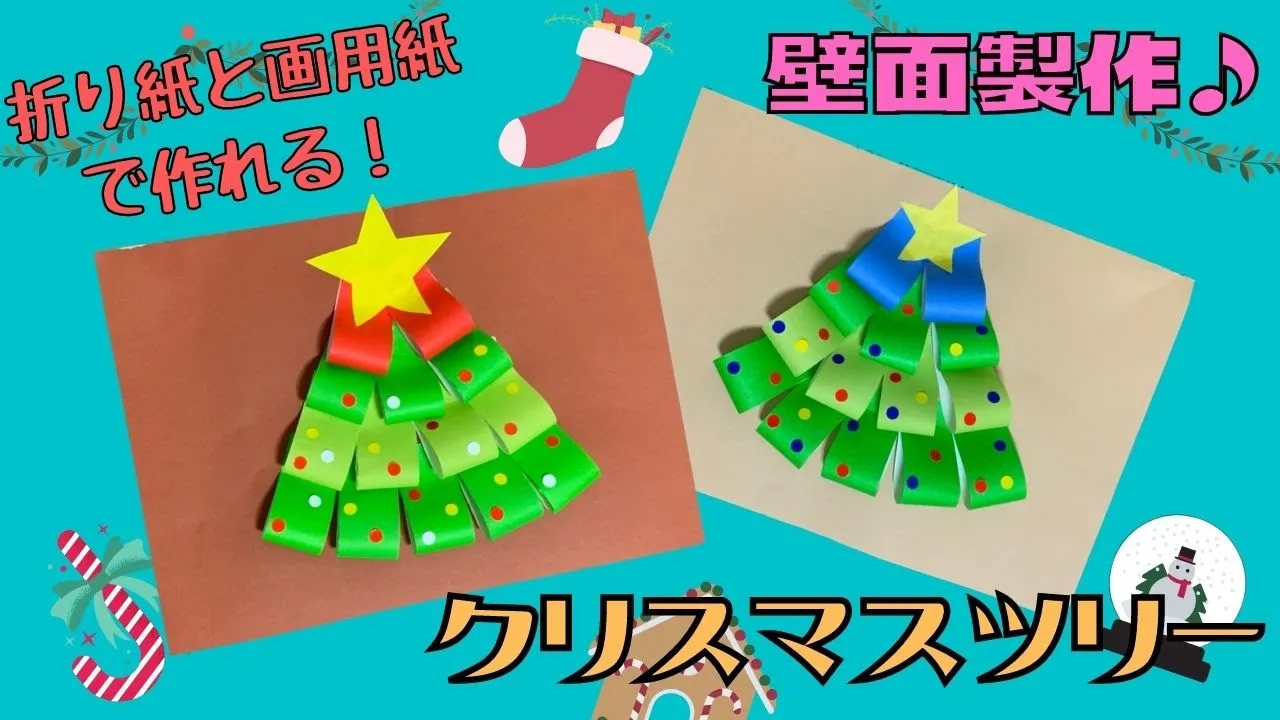
Christmas tree with origami!

We’ll make a Christmas tree by sticking strip-shaped origami onto a backing sheet.
First, prepare the origami and cut it into strips.
Overlap the two ends of each strip to form a loop, then start gluing the loops onto the backing sheet.
Arrange them in the shape of a tree: five loops in the bottom row, four in the row above, and so on.
Use red origami for the top row, and add a star at the top.
Decorate the tree with round stickers, and it’s done! You can also use wide paper tape instead of origami paper.
Perfect as a decoration! The Chimney House

Here’s a cute way to fold a little house that also works as an ornament.
First, place the origami paper colored side up and fold it in half into a square twice to make crease lines.
Fold both top corners toward the center to make creases.
After folding the corners, fold the edges to the crease lines twice.
Fold up the bottom edge just a little.
Next, turn it over and fold the left and right sides to the center.
Fold the right corner up to the top crease.
Fold the left edge inward along the crease.
Finally, fold the bottom section up to meet the center crease.
Glue it in place, and you’re done!
Cute and easy Santa boots
https://www.tiktok.com/@hoiku.labo/video/7310107669031931138Fold the origami in half by bringing the top and bottom edges together to make a crease.
Open it up, place the colored side facing up, and fold the right edge inward by about 1 cm.
Flip the paper over again, then fold the top and bottom edges to meet the center crease.
Place it with the white side facing up, and fold the bottom edge up to align with the lower line of the white area.
Fold the paper in half by bringing the left and right edges together, then pinch the inside section and pull it outward 90 degrees.
Fold the pulled-out section upward on the front and the back to form a boot shape.
Finally, fold the tip of the boot to round it off, and you’re done!
Let’s make a snowman with a single sheet of origami!

Many kids want to make snowmen in winter, don’t they? Here’s an idea for an origami snowman.
First, fold the top corner of the origami paper into a small triangle and fold it down about 1 cm.
This will be the pom-pom on top of the hat.
Next, tightly roll-fold the right corner twice to create the hat’s white brim.
Fold the paper in half by matching the left and right edges, then fold the brim section back outward to match the width of the rolled folds.
Align the top and bottom to make the paper a square, then lift the top-left corner (two layers) and fold it to the opposite corner.
With the pom-pom at the top, turn the paper over, and fold the lower left and right edges toward the center line.
Open the pocket on the right side and squash-fold it, shaping it into a snowman.
Snow Fairy! How to Fold a Long-tailed Tit (Shima-enaga)

Let’s make a long-tailed tit using a single sheet of origami paper.
Fold the paper into a triangle, then fold both corners up to meet the top corner.
Fold the left and right corners inward to form a triangle, then rotate the paper to swap top and bottom.
Align with the top corners of the left and right triangles, and fold the two bottom corners outward to open them—these will be the wings.
Turn the paper over, squash-fold the triangular wings into squares, then fold the bottom corner up to meet the top corner and change the wings to black.
Tuck in the left and right corners of the black section to refine the shape, and flip the paper over.
Round out the remaining white area in the center, and you’re done.
Draw the face to finish it cutely.
How to fold a cute Tomte

Also popular as Christmas decorations! The Nordic gnome “Tomte.” Let’s make the hat with 15 cm origami paper, and the face and body with 7.5 cm origami paper.
First, fold the hat paper into a triangle to make a crease.
Next, fold the bottom corner up so it aligns slightly below the crease.
Fold it up again along the center crease to form a triangle, then turn it over and fold the left and right corners up to meet the top corner.
Fold the lower left and right edges inward so they meet at the center, and the hat is done.
Next, fold the face paper into a triangle to make a crease, then fold the two top edges down to meet the crease.
Open up the overlapped center and squash it to form the nose.
Fold the tip of the nose slightly to round it, then turn the paper over and fold the corner above the nose slightly inward to make a crease.
Insert the part under the hat, aligning the crease with the bottom edge of the hat, and fold both sides of the face to match the sides of the hat.
The white part left showing is the beard.
Fold the left, right, and bottom corners of the body paper inward, then attach it to the face to finish.
Cute mittens origami

Here’s an idea for making mitten gloves out of origami.
First, fold the paper in half twice to create a square and make crease lines.
Place the paper with the colored side up, then fold the bottom edge up to align with the central crease.
Fold the left corner of the folded-up section downward to form a triangle, then unfold the bottom edge once and make a roll fold along the crease.
Turn the paper over, and fold the left and right edges diagonally so they align just outside the center line.
Next, fold the top left and right corners toward the center line.
Finally, fold down the top corner to finish.
When making the second mitten, reverse which corner you fold into a triangle so you get the opposite hand.